Difference between revisions of "Vibration Sensor"
From Microduino Wiki
(Created page with "{| style="width: 800px;" |- | ==Purpose== This tutorial will show you how to use Microduino mCookie vibration sensor. ==Equipment== *'''Microduino-CoreUSB''' *'''Micr...") |
|||
| (2 intermediate revisions by 2 users not shown) | |||
| Line 1: | Line 1: | ||
| + | |||
{| style="width: 800px;" | {| style="width: 800px;" | ||
|- | |- | ||
| | | | ||
| − | == | + | ==Outline== |
| − | + | Vibration sensor---whose internal structure is like a metal ball that is fixed in a special spring as pole, around it is the other pole. When the vibration gets to an extent, the two poles are connected so as to judge the shock occurs. Vibration sensor outputs digital signal. | |
| − | + | <br /> | |
| − | |||
| − | |||
| − | |||
| − | |||
| − | |||
| − | |||
| − | |||
| − | |||
| − | |||
| − | |||
| − | |||
| − | |||
| − | |||
| − | |||
| − | |||
| − | |||
| − | |||
| − | |||
| − | |||
| − | |||
| − | |||
| − | |||
| − | |||
| − | |||
| − | |||
| + | ==Specification== | ||
| + | *Electrical specification | ||
| + | *Operation voltage: 5V | ||
| + | **Input device | ||
| + | *Tech parameters | ||
| + | **Wide vibration detection range | ||
| + | **Without direction limitation | ||
| + | **60,000,000 times of vibration insurance. (Special gold plating on the surface of the connection foot) | ||
| + | *Size | ||
| + | **Sensor size: 9.0mm*9.15mm | ||
| + | **Board size: 20mm*20mm | ||
| + | **1.27mm-pitch 4PIN interface can be connected with the sensorhub. | ||
| + | *Connection method | ||
| + | **Pin description: GND, VCC, signal input and NC(empty). | ||
| + | **Digital input | ||
| − | + | ==Development== | |
| − | + | ===Equipment=== | |
| − | [[ | + | *'''[[mCookie-CoreUSB]]''' |
| + | *'''[[mCookie-Hub]]''' | ||
| + | *'''[[Microduino-Shake]]''' | ||
| + | *Other hardware equipment | ||
| + | **A USB cable | ||
| + | [[File:shock-module.jpg|center|600px]] | ||
| + | ===Preparation=== | ||
| + | *Setup 1: Connect the Shake sensor's interface with the Hub's digital D6 port. | ||
| + | [[file:mCookie-shock-sensor.JPG|600px|center]] | ||
| + | *Setup 2: Stack the CoreUSB, Hub and Shake sensor together and then connect them to the computer with a USB cable. | ||
| + | [[file:mCookie-shock-pc.JPG|600px|center]] | ||
| − | + | ===Debugging=== | |
| − | + | * Open Arduino IDE and copy the following code into IDE. | |
| − | + | <source lang="cpp"> | |
| + | #define pushButton 6 | ||
| + | int buttonState; | ||
| − | + | // the setup routine runs once when you press reset: | |
| + | void setup() { | ||
| + | // initialize serial communication at 9600 bits per second: | ||
| + | Serial.begin(9600); | ||
| + | // make the pushbutton's pin an input: | ||
| + | pinMode(pushButton, INPUT); | ||
| + | } | ||
| − | + | // the loop routine runs over and over again forever: | |
| + | void loop() { | ||
| + | // read the input pin: | ||
| + | buttonState = digitalRead(pushButton);//Read the input value of the Shake sensor. | ||
| + | // print out the state of the button: | ||
| + | Serial.print("buttonState:"); | ||
| + | Serial.println(buttonState); //Print the sensor value in the serial port. | ||
| + | delay(100); //100ms delay | ||
| + | } | ||
| + | </source> | ||
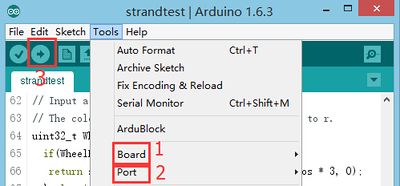
| + | *Select the right board and COM port, compile and download. | ||
| + | [[file:upload.JPG|400px|center]] | ||
| + | *Open the serial monitor. | ||
| + | [[file:comxx.JPG|400px|center]] | ||
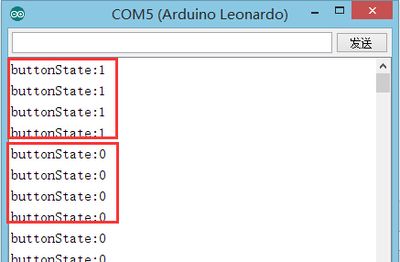
| + | *The value of " buttonState " is 0 when there is no vibration or it is 1 when there exists vibration. | ||
| + | [[file:Crash-one-res.JPG|400px|center]] | ||
| + | '''*Adopt "digitalRead(XX)" function to read vibration digital signal with two status of "0" and "1". | ||
| + | ==Application== | ||
| + | *Burglar arm | ||
==Video== | ==Video== | ||
|} | |} | ||
Latest revision as of 08:03, 4 August 2017
ContentsOutlineVibration sensor---whose internal structure is like a metal ball that is fixed in a special spring as pole, around it is the other pole. When the vibration gets to an extent, the two poles are connected so as to judge the shock occurs. Vibration sensor outputs digital signal.
Specification
DevelopmentEquipment
Preparation
Debugging
#define pushButton  6

int buttonState;

// the setup routine runs once when you press reset:
void setup() {
  // initialize serial communication at 9600 bits per second:
  Serial.begin(9600);
  // make the pushbutton's pin an input:
  pinMode(pushButton, INPUT);
}

// the loop routine runs over and over again forever:
void loop() {
  // read the input pin:
  buttonState = digitalRead(pushButton);//Read the input value of the Shake sensor.
  // print out the state of the button:
  Serial.print("buttonState:");
  Serial.println(buttonState);  //Print the sensor value in the serial port.
  delay(100);     //100ms delay
}
*Adopt "digitalRead(XX)" function to read vibration digital signal with two status of "0" and "1". Application
Video |


