Difference between revisions of "Sensor-Buzzer"
From Microduino Wiki
| Line 3: | Line 3: | ||
|- | |- | ||
| | | | ||
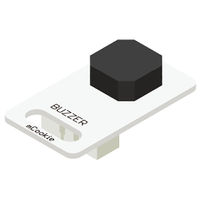
| − | [[File: Microduino-BUZZER.jpg|400px|thumb|right| | + | [[File: Microduino-BUZZER-v1.jpg|400px|thumb|right| Sensor-Buzzer]] |
| − | |||
| + | The product number of Sensor-Buzzer is: '''MSDO11''' | ||
| + | Sensor-Buzzer is a passive buzzer. Like a magnetic speaker, it needs voltage with different frequency so that it can make sound accordingly. The pitch becomes louder when the frequency gets higher. | ||
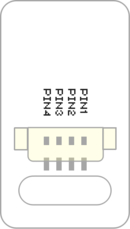
| + | ==Introduction of Pins== | ||
| + | {{Sensor_explain | ||
| + | |nameA=[[Sensor-Buzzer]] | ||
| + | |modeA=Output pin | ||
| + | |modeB=NC | ||
| + | }} | ||
| − | == | + | |
| + | ==Features== | ||
*Controllable sound frequency (eg: You can achieve the effect of piano spectrum with it. ) | *Controllable sound frequency (eg: You can achieve the effect of piano spectrum with it. ) | ||
| − | *Small size | + | *Small size which is easy to install. |
==Specification== | ==Specification== | ||
| − | * | + | *Voltage |
| − | *1.27mm | + | **3.3V~5V working voltage |
| + | |||
| + | *Size | ||
| + | **Size of the board: 23.5mm*13mm | ||
| + | **1.27mm-spacing 4Pin interface connected with sensorhub. | ||
| + | **The CAD drawing of the sensor: '''[[File:Sensor_CAD.zip]]''' | ||
| + | |||
| + | *Technical parameters | ||
| + | **Drive with 2K~5K square wave | ||
| + | **The sound frequency is controllable. | ||
| + | *Connection | ||
| + | **This sensor can be connected to the following interfaces of core: '''A0~A7''','''D2~D13''' | ||
| − | |||
==Document== | ==Document== | ||
| − | * | + | *Schematic diagram: '''[[File: Sensor-Buzzer.Zip]]''' |
==Development== | ==Development== | ||
| − | + | ===Program Download=== | |
| + | *Download and unzip the program '''[[File:Sensor-Buzzer_Test.zip]]''' | ||
| + | |||
| + | ===Programming=== | ||
| + | {{Upload | ||
| + | |nameA=[[Microduino-Core]], [[Microduino-USBTTL]] | ||
| + | |nameB=[[Microduino-USBTTL]] | ||
| + | |boardName=Microduino/mCookie-Core(328p), Atmega328P@16M,5V | ||
| + | |fileName=Sensor-Buzzer Test.ino | ||
| + | }} | ||
| + | |||
| + | ===Hardware Setup=== | ||
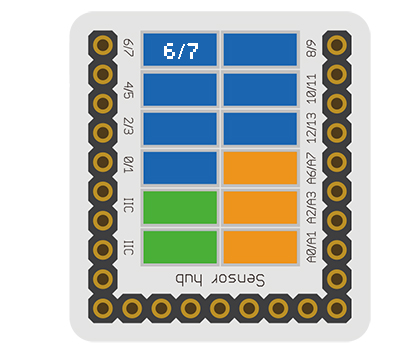
| + | *Referring to the following diagram, connect the Sensor-Buzzer to digital pin D6 of '''[[Microduino-Sensorhub]]'''. | ||
| + | <br> | ||
| + | [[file:Microduino-sensorhub_Shake.JPG|thumb|400px|left]] | ||
| + | <br style="clear: left"/> | ||
| + | |||
| + | ===Result=== | ||
| + | *After download, you can hear the alarming sound. | ||
| + | |||
==Application== | ==Application== | ||
*Hardware Needed: [[Microduino-Core]], [[Microduino-USBTTL]], [[Microduino-Sensorhub]], several dupont lines and USB cable; | *Hardware Needed: [[Microduino-Core]], [[Microduino-USBTTL]], [[Microduino-Sensorhub]], several dupont lines and USB cable; | ||
Revision as of 09:27, 10 November 2016
| Language: | English • 中文 |
|---|
|
The product number of Sensor-Buzzer is: MSDO11 Sensor-Buzzer is a passive buzzer. Like a magnetic speaker, it needs voltage with different frequency so that it can make sound accordingly. The pitch becomes louder when the frequency gets higher. ContentsIntroduction of Pins
Features
Specification
Document
DevelopmentProgram Download
Programming
Hardware Setup
Result
Application
#define buzzer_pin 6
void setup()
{
  pinMode(buzzer_pin,OUTPUT);
}

void loop()
{
  for(int i=200;i<=800;i++)  //Increase the frequency from 200HZ to 800HZ circularly.
  {
    tone(buzzer_pin,i);    //Output frequency in the port.

    delay(5);      //The frequency lasts for 5ms.
  }
  delay(1000);     //The highest frequency lasts for 1s.
  for(int i=800;i>=200;i--)
  {
    tone(buzzer_pin,i);
    delay(10); //The frequency lasts 10ms.
  }
}
PurchaseHistoryImage
|


