Difference between revisions of "Open Source Web Camera System"
| (6 intermediate revisions by 2 users not shown) | |||
| Line 3: | Line 3: | ||
| | | | ||
==Outline== | ==Outline== | ||
| − | * | + | *Project: MicroWrt Open Source Web Camera System |
| − | * | + | *Objective: Using MicroWrt to achieve the function of wireless video capture. |
| − | * | + | *Difficulty: Medium |
| − | *Time- | + | *Time-consuming: 2 hours |
| − | * | + | *Maker: Jason Sheng |
*Introduction: | *Introduction: | ||
| − | Wireless video capture is widely used in the real life, such as remote video surveillance, Terminal distance video surveillance. The current UAV system can also be equipped with a camera, and send the shooting image real-time to the control terminal. The common WIFI vehicles on the market are equipped with wireless video transmission in general. This project will use iSight | + | Wireless video capture is widely used in the real life, such as remote video surveillance, Terminal distance video surveillance. The current UAV system can also be equipped with a camera, and send the shooting image real-time to the control terminal. The common WIFI vehicles on the market are equipped with wireless video transmission in general. This project will use iSight Apple's camera in microWRT to complete the video acquisition. The user can connect PC or mobile phone client to MicroWrt to real-time view the video. Players can also use other UVC drive camera according to their needs. The specific camera model you can browse the openwrt official website to get detailed information. After the completion of the project, players can use the system in their other projects to achieve video capture. |
==Bill of Material== | ==Bill of Material== | ||
*MicroWrt Equipment | *MicroWrt Equipment | ||
| Line 16: | Line 16: | ||
|Module||Number||Function | |Module||Number||Function | ||
|- | |- | ||
| − | |[[MicroWRT | + | |[[MicroWRT Core]]||1||Core board |
|- | |- | ||
| − | |[[MicroWRT HUB | + | |[[MicroWRT HUB ]] ||1|| USB extension |
|} | |} | ||
| Line 38: | Line 38: | ||
==Installation and Debugging== | ==Installation and Debugging== | ||
| − | Our MicroWrt factory firmware has already the USB camera. Of course players can program through openwrt, and then write onto MicroWrt, and specific programming and writing process please refer to other wiki progress. It is important to note that if you want to write his firmware which has been compiled, | + | Our MicroWrt factory firmware has already the USB camera. Of course players can program through openwrt, and then write onto MicroWrt, and specific programming and writing process please refer to other wiki progress. It is important to note that if you want to write his firmware which has been compiled, you'd better write through uboot not programmer. Because the firmware which you compile by yourself hasn't uboot. If you use programmer to write directly, the MicroWrt will change into brick. The isight camera is used in this project. What is special of this camera is that it needs a special driver. It's fortunate that openwrt already contains the driver, and we also configured it into the factory firmware. So the player can use directly. If you want to compile by yourself, you can do the following configuration: |
Device DRivers ---> | Device DRivers ---> | ||
| Line 47: | Line 47: | ||
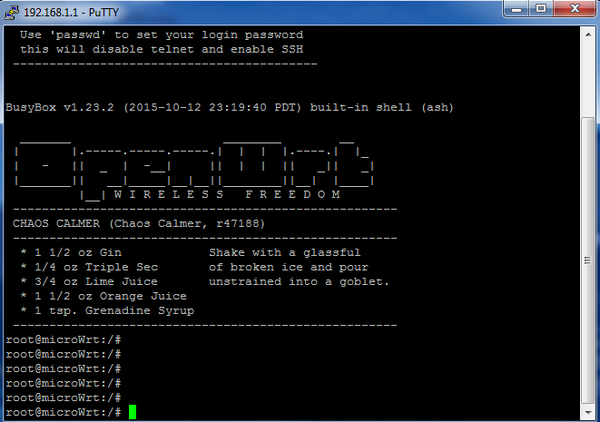
Open the terminal software putty (or other Windows terminal software). The default factory IP of MicroWrt is 192.168.1.1, and use telnet to visit MicroWrt. | Open the terminal software putty (or other Windows terminal software). The default factory IP of MicroWrt is 192.168.1.1, and use telnet to visit MicroWrt. | ||
| − | After landing the system interface is as | + | After landing the system interface is as follows: |
[[File:putty.png||600px|center]] | [[File:putty.png||600px|center]] | ||
| Line 79: | Line 79: | ||
o: commands..........: enabled | o: commands..........: enabled | ||
| − | After finished mjpeg-streamer execution successfully, you can use the browser (the best is firefox or chrome) to access the 8080 port of the router, to view the picture in the camera. The command | + | After finished mjpeg-streamer execution successfully, you can use the browser (the best is firefox or chrome) to access the 8080 port of the router, to view the picture in the camera. The command is: |
192.168.1.1:8080/?action=stream | 192.168.1.1:8080/?action=stream | ||
Latest revision as of 07:44, 13 September 2016
Contents[hide]Outline
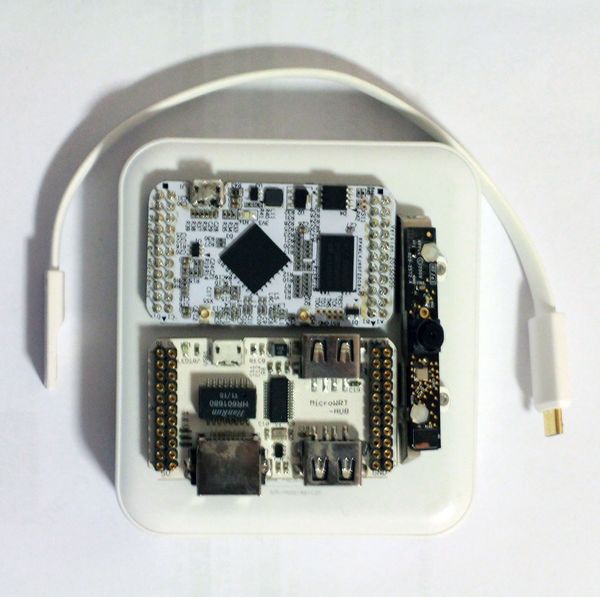
Wireless video capture is widely used in the real life, such as remote video surveillance, Terminal distance video surveillance. The current UAV system can also be equipped with a camera, and send the shooting image real-time to the control terminal. The common WIFI vehicles on the market are equipped with wireless video transmission in general. This project will use iSight Apple's camera in microWRT to complete the video acquisition. The user can connect PC or mobile phone client to MicroWrt to real-time view the video. Players can also use other UVC drive camera according to their needs. The specific camera model you can browse the openwrt official website to get detailed information. After the completion of the project, players can use the system in their other projects to achieve video capture. Bill of Material
Principle of the ExperimentOpenwrt software comes with the support of USB, Video, by adding these modules, USB camera can be correctly detected and identified. In order to start the USB camera, you also need to install another software mjpeg-streamer, which can access the camera through the file or the HTTP. It only requires very little CPU and memory resources to work, and most of the coding work is done by the camera. So it is very practical to the router whose content and performance are very limited. When the user connect to the MicroWrt through the wireless, you can view the real-time video through the browser. Installation and DebuggingOur MicroWrt factory firmware has already the USB camera. Of course players can program through openwrt, and then write onto MicroWrt, and specific programming and writing process please refer to other wiki progress. It is important to note that if you want to write his firmware which has been compiled, you'd better write through uboot not programmer. Because the firmware which you compile by yourself hasn't uboot. If you use programmer to write directly, the MicroWrt will change into brick. The isight camera is used in this project. What is special of this camera is that it needs a special driver. It's fortunate that openwrt already contains the driver, and we also configured it into the factory firmware. So the player can use directly. If you want to compile by yourself, you can do the following configuration: Device DRivers --->
USB Support --->
<*> iSight firmware loading support
After the firmware problem is solved, overlay MicroWrt core board and HUBboard together. Pay attention to the arrow on the board when adding, then use charger baby or PC to supply power to MicroWrt through MicroUSB. After the system has normally booted, you will find new MicroWrt hotspot in the wireless connection of the PC. Build connection between PC and MicroWrt. Open the terminal software putty (or other Windows terminal software). The default factory IP of MicroWrt is 192.168.1.1, and use telnet to visit MicroWrt. After landing the system interface is as follows: Insert the camera into the USB port of MicroWrt, at the same time, the following information will be printed out from the puttyterminal. root@microWrt:/# root@microWrt:/# [ 392.310000] usb 1-1.2: new high-speed USB device number 3 using ehci-platform [ 392.460000] usb 1-1.2: New USB device found, idVendor=05ac, idProduct=8502 [ 392.460000] usb 1-1.2: New USB device strings: Mfr=1, Product=2, SerialNumber=3 [ 392.470000] usb 1-1.2: Product: Built-in iSight [ 392.470000] usb 1-1.2: Manufacturer: Apple Inc. [ 392.550000] uvcvideo: Found UVC 1.00 device Built-in iSight (05ac:8502) [ 392.570000] input: Built-in iSight as /devices/101c0000.ehci/usb1/1-1/1-1.2/1-1.2:1.0/input/input0 Then check if there is device video0 under the /dev catalog. If there is, it says that the camera has been successfully loaded. mjpg_streamer -i "input_uvc.so -d /dev/video0 -r 640x480 -f 20" -o "output_http.so -p 8080 -w /www/webcam" There will be the following output: root@microWrt:/etc/init.d# mjpg_streamer -i "input_uvc.so -d /dev/video0 -r 640x 480 -f 20" -o "output_http.so -p 8080 -w /www/webcam" MJPG Streamer Version: svn rev: Unversioned directory i: Using V4L2 device.: /dev/video0 i: Desired Resolution: 640 x 480 i: Frames Per Second.: 20 i: Format............: JPEG i: TV-Norm...........: DEFAULT o: www-folder-path...: /www/webcam/ o: HTTP TCP port.....: 8080 o: username:password.: disabled o: commands..........: enabled After finished mjpeg-streamer execution successfully, you can use the browser (the best is firefox or chrome) to access the 8080 port of the router, to view the picture in the camera. The command is: 192.168.1.1:8080/?action=stream If you want to realize remote monitoring, you can configure dynamic DNS such as Peanut-Hull in the router, then you can access to router in the outside net through domain name. video |

