Difference between revisions of "MCookie 302 Expert Kit Tutorials"
From Microduino Wiki
(→Step 3: Configuring and Testing the Software) |
|||
| (4 intermediate revisions by the same user not shown) | |||
| Line 1: | Line 1: | ||
| − | |||
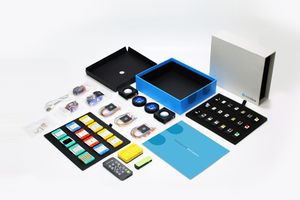
[[File:302 Expert Kit.jpg|right|thumb|link=mCookie Expert Kit|<center>[[mCookie Expert Kit]]</center>]] | [[File:302 Expert Kit.jpg|right|thumb|link=mCookie Expert Kit|<center>[[mCookie Expert Kit]]</center>]] | ||
=Getting Started= | =Getting Started= | ||
| − | == | + | {{Clickable_headed_image_table_box|header=Windows|link=Getting_Started_with_302_Expert_Kit_(Windows)|image=File:MicroduinoGettingStart-ForWindows.jpg|image_size=300px|table_height=|table_width=|optional_text=<center>[[Getting_Started_with_302_Expert_Kit_(Windows)|Getting Started with 302 Expert Kit for <br>'''Windows''']]</center>}} |
| − | + | {{Clickable_headed_image_table_box|header=Mac|link=Getting_Started_with_302_Expert_Kit_(Mac)|image=File:MicroduinoGettingStart-ForMAC.jpg|image_size=300px|table_height=|table_width=|optional_text=<center>[[Getting_Started_with_302_Expert_Kit_(Mac)|Getting Started with 302 Expert Kit for <br>'''Mac''']]</center>}} | |
| − | + | <br clear=all> | |
| − | + | =Printed Manual= | |
| − | + | Download the digital version of the printed manual:<br> | |
| − | + | [[File:302_Printed_Manual.png|x150px|link=http://microduinoinc.com/downloads/manuals/302_Expert_Kit_EnglishManual.zip]] | |
| − | |||
| − | |||
| − | |||
| − | |||
| − | |||
| − | |||
| − | |||
| − | |||
| − | |||
| − | |||
| − | |||
| − | |||
| − | |||
| − | |||
| − | |||
| − | |||
| − | |||
| − | |||
| − | |||
| − | |||
| − | |||
| − | |||
| − | |||
| − | |||
| − | |||
| − | |||
| − | |||
| − | |||
| − | |||
| − | |||
| − | |||
| − | |||
| − | |||
| − | |||
| − | |||
=Projects= | =Projects= | ||
<div style="width:80%; float:left"> | <div style="width:80%; float:left"> | ||
| Line 356: | Line 320: | ||
=Additional Projects= | =Additional Projects= | ||
| + | |||
| + | =Troubleshooting= | ||
| + | <b>IMPORTANT</b>: Before attempting these troubleshooting steps, follow the <b>[[#Getting Started|Getting Started]]</b> section first. | ||
| + | |||
| + | ==I can't select my port!== | ||
| + | # <b>Drivers for mBattery (yellow battery) not installed</b><br>The drivers to use mBattery may not have been installed. <br><br><b>Solution</b>: Please carefully follow the <b>[[Software_Setup:_Arduino|Software Installation Guide for your OS]]</b>.<br><br> | ||
| + | # <b>Defective mBattery (yellow battery)</b> <br> If the above solutions do not resolve the issue, ([https://microduinoinc.com/contact/ Contact Us]) for a replacement part. Please indicate the prior troubleshooting steps you have performed and the results for a quicker response time. | ||
| + | |||
| + | =="stk500_recv(): programmer is not responding" error== | ||
| + | If you are able to select the port successfully and receive this error when attempting to upload, then the error may be related to: | ||
| + | # <b>mBattery (yellow battery) is not supplying power to the modules.</b> <br>Blinking blue LEDs indicates CHARGING ONLY. <br><span style="color:red">A red LED on indicates that the battery is ON and SUPPLYING power to the modules. This is required for uploading/programming and using your projects.</span> <br><br><b>Solution</b>: Press and hold the button for a few seconds on mBattery (yellow battery) until a red LED comes on.<br><br> | ||
| + | # <b>Incorrect port selection or software configuration</b><br>This error can occur when the software is not properly configured.<br><br><b>Solution</b>: <br>Confirm "Tools > Boards > Microduino/mCookie-device" is selected. <br>Confirm "Tools > Processor > Microduino/mCookie-Core (328@16M,5V)" is selected. <br> Select a different port under "Tools > Port". Then attempt to upload again. If you have multiple ports, try different ones and attempt to upload each time.<br><br> | ||
| + | # <b>Bad connection between the Core module and mBattery (yellow battery)</b><br>The gold pins between the Core module and mBattery may be bad, which results in being unable to program.<br><br><b>Solution</b>: Carefully clean the contacts (gold pins & gold pads) on both the Core module and mBattery with rubbing alcohol. Also check for defective pins or pads on both modules.<br><br> | ||
| + | # <b>Defective mBattery (yellow battery) or Core module</b> <br> If the above solutions do not resolve the issue, ([https://microduinoinc.com/contact/ Contact Us]) for a replacement part. Please indicate the prior troubleshooting steps you have performed and the results for a quicker response time. | ||
| + | =Projects= | ||
Latest revision as of 18:59, 18 April 2018
Contents
Getting Started
Printed Manual
Download the digital version of the printed manual:

Projects
Basic Tutorials
Basic Module Tutorials
| Core | Communication |
|---|---|
| Function | Extension |
|
|
Basic Component Tutorials
Additional Projects
Troubleshooting
IMPORTANT: Before attempting these troubleshooting steps, follow the Getting Started section first.
I can't select my port!
- Drivers for mBattery (yellow battery) not installed
The drivers to use mBattery may not have been installed.
Solution: Please carefully follow the Software Installation Guide for your OS. - Defective mBattery (yellow battery)
If the above solutions do not resolve the issue, (Contact Us) for a replacement part. Please indicate the prior troubleshooting steps you have performed and the results for a quicker response time.
"stk500_recv(): programmer is not responding" error
If you are able to select the port successfully and receive this error when attempting to upload, then the error may be related to:
- mBattery (yellow battery) is not supplying power to the modules.
Blinking blue LEDs indicates CHARGING ONLY.
A red LED on indicates that the battery is ON and SUPPLYING power to the modules. This is required for uploading/programming and using your projects.
Solution: Press and hold the button for a few seconds on mBattery (yellow battery) until a red LED comes on. - Incorrect port selection or software configuration
This error can occur when the software is not properly configured.
Solution:
Confirm "Tools > Boards > Microduino/mCookie-device" is selected.
Confirm "Tools > Processor > Microduino/mCookie-Core (328@16M,5V)" is selected.
Select a different port under "Tools > Port". Then attempt to upload again. If you have multiple ports, try different ones and attempt to upload each time. - Bad connection between the Core module and mBattery (yellow battery)
The gold pins between the Core module and mBattery may be bad, which results in being unable to program.
Solution: Carefully clean the contacts (gold pins & gold pads) on both the Core module and mBattery with rubbing alcohol. Also check for defective pins or pads on both modules. - Defective mBattery (yellow battery) or Core module
If the above solutions do not resolve the issue, (Contact Us) for a replacement part. Please indicate the prior troubleshooting steps you have performed and the results for a quicker response time.
