Difference between revisions of "Motor+ (use with mDesigner)"
(→Motor+ Brake) |
|||
| (10 intermediate revisions by the same user not shown) | |||
| Line 2: | Line 2: | ||
{| class="wikitable" style="background-color:#FEF9E7;" | {| class="wikitable" style="background-color:#FEF9E7;" | ||
| − | |'''Note:''' This module looks very similar to the '''mCookie Motor | + | |'''Note:''' This module looks very similar to the '''mCookie Motor''' module. This page is for the '''mCookie Plus Motor''' module! |
|} | |} | ||
| − | =Pins | + | =Compatible Pins= |
| − | + | This module uses I2C communication. This module is designed to stack upon the other mCookie modules. It does not require an additional wire to a Hub. <br>It does not conflict with any of digital or analog pins. | |
| − | |||
| − | |||
| − | |||
| − | |||
| − | |||
| − | |||
| − | < | ||
| − | |||
| − | |||
| − | |||
| − | |||
| − | |||
| − | |||
| − | |||
| − | |||
| − | |||
| − | |||
| − | |||
| − | |||
| − | |||
| − | |||
| − | |||
| − | |||
| − | |||
| − | |||
| − | |||
| − | |||
| − | |||
| − | |||
| − | |||
| − | |||
| − | |||
| − | |||
| − | |||
| − | |||
| − | |||
| − | |||
| − | |||
| − | |||
| − | |||
| − | |||
| − | |||
| − | |||
| − | |||
| − | |||
| − | |||
| − | |||
| − | |||
| − | |||
| − | |||
| − | |||
| − | |||
| − | |||
| − | |||
| − | |||
| − | |||
| − | |||
| − | |||
| − | |||
| − | |||
| − | |||
| − | |||
| − | |||
| − | |||
| − | |||
| − | |||
| − | |||
| − | |||
| − | |||
| − | |||
| − | |||
| − | |||
| − | |||
| − | |||
| − | |||
| − | |||
| − | |||
| − | |||
| − | |||
| − | |||
=Blocks= | =Blocks= | ||
| − | ==Motor | + | ==Motor+ Set Speed== |
{| class="wikitable" style="background-color:#FEF9E7;" | {| class="wikitable" style="background-color:#FEF9E7;" | ||
| − | |'''Note:''' This block looks very similar to the '''Motor | + | |'''Note:''' This block looks very similar to the '''Motor Set Speed''' block. Ensure, you are using the correct block! |
|} | |} | ||
This block sets the speed for the selected motor. | This block sets the speed for the selected motor. | ||
| − | ::[[File: | + | ::[[File:MDesigner_Motor_Plus_Set_Speed.png]] |
:*'''Motor Number''' - the motor number to set the speed for. The motor number is labeled on the Motor module. | :*'''Motor Number''' - the motor number to set the speed for. The motor number is labeled on the Motor module. | ||
| + | :**'''Left:''' The motor connected to the '''1A1B''' connector on Motor+ module. | ||
| + | :**'''Right:''' The motor connected to the '''2A2B''' connector on Motor+ module. | ||
:*'''Speed''' - the speed to set the target motor to. Accepted values are between -255 and 255. | :*'''Speed''' - the speed to set the target motor to. Accepted values are between -255 and 255. | ||
:**'''-255:''' full speed backwards. | :**'''-255:''' full speed backwards. | ||
| Line 104: | Line 26: | ||
:**... and the values inbetween. | :**... and the values inbetween. | ||
| − | ==Motor | + | ==Motor+ Brake== |
{| class="wikitable" style="background-color:#FEF9E7;" | {| class="wikitable" style="background-color:#FEF9E7;" | ||
| − | |'''Note:''' This block looks very similar to the '''Motor | + | |'''Note:''' This block looks very similar to the '''Motor Brake Control''' block. Ensure, you are using the correct block! |
|} | |} | ||
| − | This block sets the configured motor to start braking. This is a coasting stop -- no acceleration stop, not a hard stop. | + | This block sets the configured motor to start braking. This is a coasting stop -- a no acceleration stop, not a hard stop. |
| − | ::[[File: | + | ::[[File:MDesigner_Motor_Plus_Brake.png]] |
:*'''Motor Number''' - the motor number to brake. | :*'''Motor Number''' - the motor number to brake. | ||
| + | :**'''Left:''' The motor connected to the '''1A1B''' connector on Motor+ module. | ||
| + | :**'''Right:''' The motor connected to the '''2A2B''' connector on Motor+ module. | ||
| − | ==Motor | + | ==Motor+ Car Control== |
{| class="wikitable" style="background-color:#FEF9E7;" | {| class="wikitable" style="background-color:#FEF9E7;" | ||
| − | |'''Note:''' This block looks very similar to the '''Motor | + | |'''Note:''' This block looks very similar to the '''Motor Car Control''' block. Ensure, you are using the correct block! |
|} | |} | ||
This block is used to control both motors at the same. Usually used when a project is a car or vehicle. | This block is used to control both motors at the same. Usually used when a project is a car or vehicle. | ||
| Line 124: | Line 48: | ||
Since, the motors will be mounted opposing each other. The direction is automatically corrected in this block. | Since, the motors will be mounted opposing each other. The direction is automatically corrected in this block. | ||
| − | ::[[File:MDesigner Motor Car Control.png]] | + | ::[[File:MDesigner Motor Plus Car Control.png]] |
:*'''Left Motor Speed''' - sets the speed of the left motor. This block is automatically direction corrected. | :*'''Left Motor Speed''' - sets the speed of the left motor. This block is automatically direction corrected. | ||
:*'''Right Motor Speed''' - sets the speed of the right motor. | :*'''Right Motor Speed''' - sets the speed of the right motor. | ||
Latest revision as of 16:49, 13 June 2018
The Motor+ module is a stack-able module which allows the control of up to two DC motors. Each motor can be individually controlled for direction and speed. This module utilizes IIC communication. While the original "Motor module" utilizes pins 5~8. Support for this module is found in mDesigner.
| Note: This module looks very similar to the mCookie Motor module. This page is for the mCookie Plus Motor module! |
Compatible Pins
This module uses I2C communication. This module is designed to stack upon the other mCookie modules. It does not require an additional wire to a Hub.
It does not conflict with any of digital or analog pins.
Blocks
Motor+ Set Speed
| Note: This block looks very similar to the Motor Set Speed block. Ensure, you are using the correct block! |
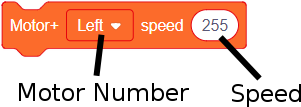
This block sets the speed for the selected motor.
-
- Motor Number - the motor number to set the speed for. The motor number is labeled on the Motor module.
- Left: The motor connected to the 1A1B connector on Motor+ module.
- Right: The motor connected to the 2A2B connector on Motor+ module.
- Speed - the speed to set the target motor to. Accepted values are between -255 and 255.
- -255: full speed backwards.
- -127: half speed backwards.
- 0: stop motor.
- 127: half speed forwards.
- 255: full speed forwards.
- ... and the values inbetween.
- Motor Number - the motor number to set the speed for. The motor number is labeled on the Motor module.
Motor+ Brake
| Note: This block looks very similar to the Motor Brake Control block. Ensure, you are using the correct block! |
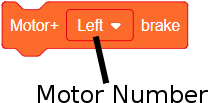
This block sets the configured motor to start braking. This is a coasting stop -- a no acceleration stop, not a hard stop.
-
- Motor Number - the motor number to brake.
- Left: The motor connected to the 1A1B connector on Motor+ module.
- Right: The motor connected to the 2A2B connector on Motor+ module.
- Motor Number - the motor number to brake.
Motor+ Car Control
| Note: This block looks very similar to the Motor Car Control block. Ensure, you are using the correct block! |
This block is used to control both motors at the same. Usually used when a project is a car or vehicle.
The "Left" motor would be the motor that is mounted on the left hand side when the front of the vehicle is pointing up. This motor should be connected to the 1A1B motor connector.
The "Right" motor would be the motor that is mounted on the right hand side when the front of the vehicle is pointing up. This motor should be connected to the 2A2B motor connector.
Since, the motors will be mounted opposing each other. The direction is automatically corrected in this block.
- Left Motor Speed - sets the speed of the left motor. This block is automatically direction corrected.
- Right Motor Speed - sets the speed of the right motor.


