Difference between revisions of "Itty Bitty Buggy: Online vs Offline Mode (mDesigner)"
(→Programming Overview (Offline Mode)) |
(→Uploading the program in Offline Mode) |
||
| (13 intermediate revisions by the same user not shown) | |||
| Line 45: | Line 45: | ||
=Communication Overview (Online Mode)= | =Communication Overview (Online Mode)= | ||
| + | {| class="wikitable" | ||
| + | | | ||
The communication between mDesigner running on a computer and the project (hardware) is outlined below. | The communication between mDesigner running on a computer and the project (hardware) is outlined below. | ||
| + | |} | ||
| + | |||
{| style="width: 1000px; text-align:left" | {| style="width: 1000px; text-align:left" | ||
|- | |- | ||
| Line 59: | Line 63: | ||
==Connected to Computer Requirement== | ==Connected to Computer Requirement== | ||
| + | {| class="wikitable" | ||
| + | | | ||
In this mode, to control the modules, the user will need to have their project (hardware) connected to the computer sending commands in real time. | In this mode, to control the modules, the user will need to have their project (hardware) connected to the computer sending commands in real time. | ||
| + | |} | ||
| + | |||
{| class="wikitable" style="background-color:#FEF9E7;" | {| class="wikitable" style="background-color:#FEF9E7;" | ||
|'''Note:''' If the project (hardware) is disconnected from the computer running mDesigner, then the project (hardware) will stop receiving commands and thus does nothing. | |'''Note:''' If the project (hardware) is disconnected from the computer running mDesigner, then the project (hardware) will stop receiving commands and thus does nothing. | ||
| Line 75: | Line 83: | ||
=Programming Overview (Offline Mode)= | =Programming Overview (Offline Mode)= | ||
| + | {| class="wikitable" | ||
| + | | | ||
The programming of a script (program) is outlined below. | The programming of a script (program) is outlined below. | ||
| + | |} | ||
| + | |||
{| style="width: 1000px; text-align:left" | {| style="width: 1000px; text-align:left" | ||
|- | |- | ||
| Line 98: | Line 110: | ||
|} | |} | ||
| − | =Switching to Offline Mode== | + | ==Switching to Offline Mode== |
| + | {| class="wikitable" | ||
| + | | | ||
Switching to '''offline''' mode is done simply buy clicking on the mode slider on the top right of mDesigner. | Switching to '''offline''' mode is done simply buy clicking on the mode slider on the top right of mDesigner. | ||
| − | [[File:]] | + | |} |
| − | ==Uploading the program in | + | [[File:IBB_mDesigner_Configuration_Online_Mode_Offline.png|800px]] |
| − | + | ||
| − | [[File:]] | + | ==Uploading the program in Offline Mode== |
| + | {| class="wikitable" | ||
| + | | | ||
| + | Select the COM port. | ||
| + | |} | ||
| + | {| class="wikitable" | ||
| + | !Windows | ||
| + | !Mac OS | ||
| + | |- | ||
| + | |Port will be listed as '''COM__''' (w/ a number). | ||
| + | |Port will be listed as '''/dev/tty.SLAB_USBtoUART''' | ||
| + | |} | ||
| + | [[File:mDesigner_v1.6_Offline_Mode_Select_COM_Port.png|800px]]<br> | ||
| + | |||
| + | {| class="wikitable" | ||
| + | | | ||
| + | To upload a program in '''offline''' mode. Click on the '''Flash firmware''' button as shown on the arrow. | ||
| + | |} | ||
| + | {| class="wikitable" style="background-color:#FEF9E7;" | ||
| + | | | ||
| + | '''Note:''' Do not use the '''Flash firmware''' under COM port selection! | ||
| + | |} | ||
| + | [[File:MDesigner_v1.6_Offline_Mode_Flash_Firmware.png|800px]]<br> | ||
| + | {| class="wikitable" | ||
| + | | | ||
| + | The program will begin to compile. Then upload. | ||
| + | |} | ||
| + | [[File:MDesigner_v1.6_Offline_Mode_Compiling.png|800px]]<br> | ||
| + | {| class="wikitable" | ||
| + | | | ||
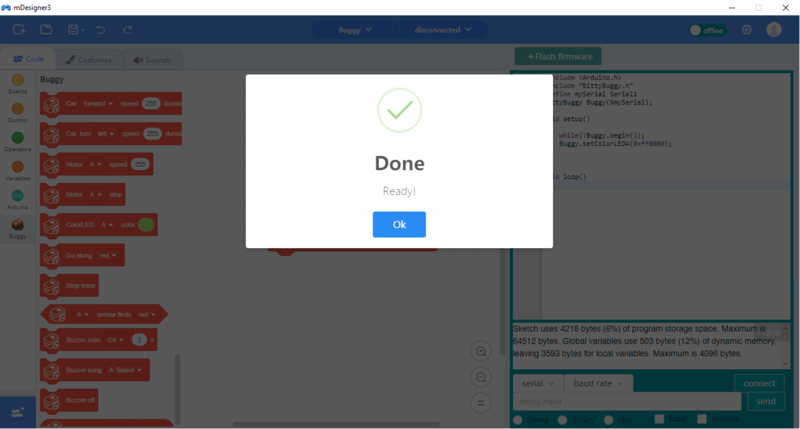
| + | When complete there will be a "Done" message. | ||
| + | |} | ||
| + | [[File:MDesigner_v1.6_Offline_Mode_Done.png|800px]] | ||
Latest revision as of 01:01, 3 November 2018
Contents
"Online" vs. "Offline" modes
|
mDesigner can operate in two different modes: "Online" and "Offline" modes. In the Getting Started guide. Here you will learn about "Offline" mode and its importance. |
mDesigner can interact with Itty Bitty Buggy in two different modes. Each mode has its own pros and cons. It is recommended to use Online mode initially before exploring Offline mode.
Online mode is Scratch, but with added blocks which are designed to interact with Itty Bitty Buggy and Microduino modules. This means the user has access to the stage and actor blocks. Projects (hardware, such as Itty Bitty Buggy) need to be connected to the computer running mDesigner. mDesigner communicates with the project (hardware), namely the Core+ module (embedded inside mCenter+), in "real time" over the USB connection by sending commands for the Core+ module to perform. This means that "Online" mode requires a constant connection with the computer running mDesigner.
Offline mode acts as a "visual" drag and drop coding editor. The script (code) is converted to "Arduino" (text code) code and then compile and uploaded to the attached the Core+ module (embedded inside mCenter+). This means that code can run even when detached from the computer. The stage and actor are disabled in this mode since the code runs independent of mDesigner.
| Capability | Online Mode | Offline Mode |
|---|---|---|
| Drag & Drop programming | Yes | Yes |
| Supports Microduino modules | Yes | Yes |
| Stage and actor enabled | Yes | No |
| Real time code testing | Yes | No |
| Code compiled and uploaded | No | Yes |
| Can run WITHOUT being connect to computer | No | Yes |
Communication Overview (Online Mode)
|
The communication between mDesigner running on a computer and the project (hardware) is outlined below. |

| ||
| Computer: Computer running mDesigner sends commands or receives data with mCenter+ over USB. |
mCenter+: mCenter+ acts as a communication bridge with the Computer (running mDesigner) and the Core+ module. |
Core+:
|
Connected to Computer Requirement
|
In this mode, to control the modules, the user will need to have their project (hardware) connected to the computer sending commands in real time. |
| Note: If the project (hardware) is disconnected from the computer running mDesigner, then the project (hardware) will stop receiving commands and thus does nothing. |

| ||
| Computer: Computer running mDesigner cannot send commands or receive data with mCenter+ over USB since it is disconnected. |
Core+: The Core+ module is no longer receiving commands and does nothing. | |
Programming Overview (Offline Mode)
|
The programming of a script (program) is outlined below. |
| Note: After uploading the compiled code onto the Core+ the project can be disconnected and can run independent of the computer and mDesigner. |

| ||
| Core/Core+: Compiled script (program) is programmed directly onto the Core+ module and can run independently of a computer and mDesigner. | ||
Switching to Offline Mode
|
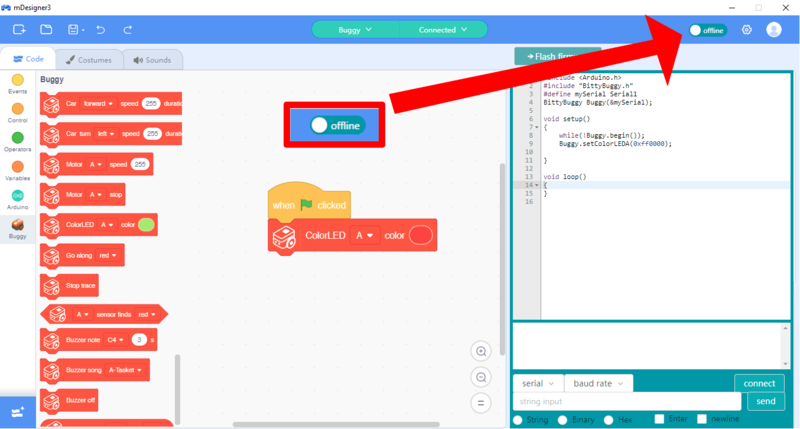
Switching to offline mode is done simply buy clicking on the mode slider on the top right of mDesigner. |
Uploading the program in Offline Mode
|
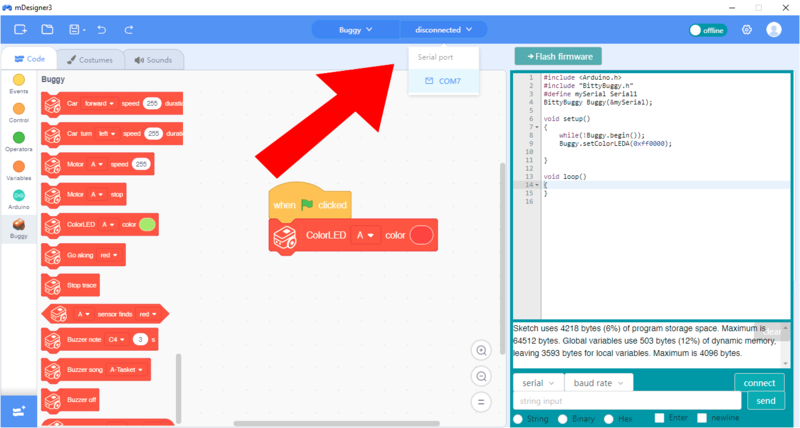
Select the COM port. |
| Windows | Mac OS |
|---|---|
| Port will be listed as COM__ (w/ a number). | Port will be listed as /dev/tty.SLAB_USBtoUART |
|
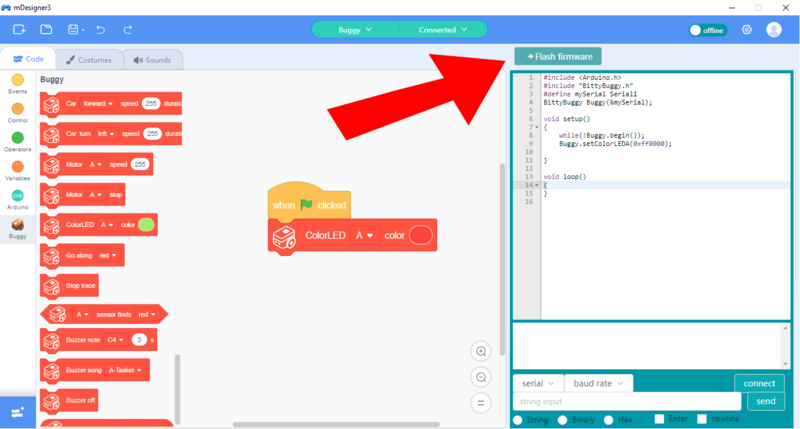
To upload a program in offline mode. Click on the Flash firmware button as shown on the arrow. |
|
Note: Do not use the Flash firmware under COM port selection! |
|
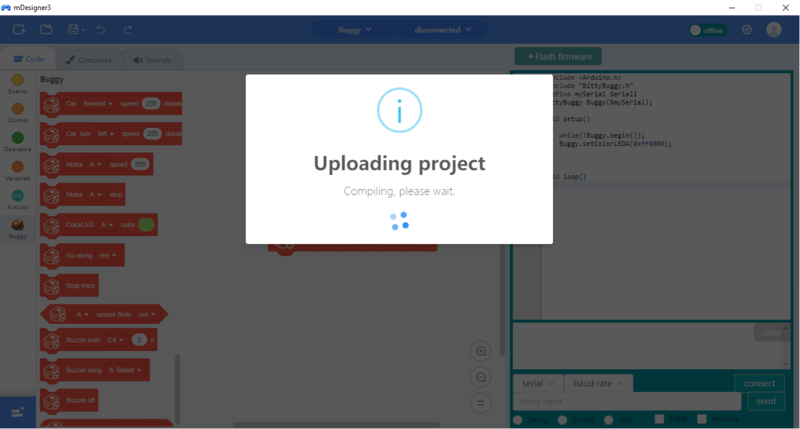
The program will begin to compile. Then upload. |
|
When complete there will be a "Done" message. |
