Difference between revisions of "Microduino-Joypad Getting started"
From Microduino Wiki
(Created page with "{| style="width: 800px;" |- | First, you need to quick started Microduino ,Reference:Microduino_Getting_started,If you finished it, Go ahead. *Microduino modules nee...") |
|||
| Line 1: | Line 1: | ||
| + | {{Language|Microduino-Joypad Getting start}} | ||
{| style="width: 800px;" | {| style="width: 800px;" | ||
|- | |- | ||
| | | | ||
| + | == Overview == | ||
| + | *Person in charge: PKJ | ||
| + | ===Project Background=== | ||
| + | *Joypad may be born to be the controller of the aircrafts. | ||
| + | *It can remotely control the Cube Robot, Self-balance Robtor and the Quadcopter. | ||
| + | *By stacking different Microduino modules, you can achieve multiple ways of communication. | ||
| + | *You can also set the functions through TFT colored screen. | ||
| + | *Get your Joypad started and play your Robot car and the Quadcopter. | ||
| − | + | ===Bill of Material=== | |
| − | |||
{|class="wikitable" | {|class="wikitable" | ||
|- | |- | ||
| − | | | + | |Components||Number||Function |
|- | |- | ||
| − | | | + | |Joypad mainboard||1||Motherboard |
|- | |- | ||
| − | | | + | |Core module||1||Core |
|- | |- | ||
| − | |[[Microduino- | + | |Communication module||1||Communication |
| + | |- | ||
| + | |TFT Screen||1||Display | ||
| + | |} | ||
| + | |||
| + | *Joypad offers several modules for option. | ||
| + | *So, you can refer to the following function/compatibility list to choose the right core module, communication module and the function module. | ||
| + | **Joypad is compatible with any one of Microduino core modules except for [[Microduino-CoreUSB]]. | ||
| + | {|class="wikitable" | ||
| + | | align="center" style="background:#f0f0f0;"|'''【Function】Module/【Function】Core''' | ||
| + | | align="center" style="background:#f0f0f0;"|'''【Not support communication】 Core''' | ||
| + | | align="center" style="background:#f0f0f0;"|'''【Not support communication】 Core+''' | ||
| + | | align="center" style="background:#f0f0f0;"|'''【Communication/Quadrotor】 CoreRF''' | ||
| + | |- | ||
| + | | '''【Communication /Robot】''' nRF||YES||YES||YES | ||
| + | |- | ||
| + | | '''【Communication /Quadrotor】''' BLE||YES||YES||NO | ||
| + | |- | ||
| + | | '''【Somatosensory】''' Motion||NO||YES||YES | ||
|} | |} | ||
| − | * | + | |
| + | ===Module Selection === | ||
| + | *Applied in: '''Remote control of the Robot''' | ||
| + | **Adopt Microduino-Core as the core module | ||
| + | **Adopt nRF24 as the communication module. | ||
| + | |||
| + | |||
| + | *Applied in: '''Remote control of the Quadrotor ''' | ||
| + | **Adopt Microduino-CoreRF as the core module. | ||
| + | **The CoreRF comes with 2.4G communication function and need no other core to work with. | ||
| + | |||
| + | |||
| + | * Applied in : '''Motion control of the Quadrotor ''' | ||
| + | **Adopt CoreRF as the core module. | ||
| + | ** The CoreRF comes with 2.4G communication function and need no other core to work with. | ||
| + | **Adopt the Motion as the somatosensory module. | ||
| + | |||
| + | |||
| + | * Applied in :'''Motion control of the Robot ''' | ||
| + | **Adopt Microduino-Core+ as the core module. | ||
| + | **nRF24 as the communication module. | ||
| + | **Motion as the somatosensory module. | ||
| + | |||
| + | |||
| + | ===Bill of Material === | ||
{|class="wikitable" | {|class="wikitable" | ||
|- | |- | ||
| − | | | + | |Component||Number||Function |
|- | |- | ||
| − | | | + | |Joypad mainboard||1||Mainboard |
|- | |- | ||
| − | | | + | |Nylon screw ||8||Fixation |
|- | |- | ||
| − | | | + | |Nylon nut ||8|| Fixation |
| + | |- | ||
| + | |Nylon column||8|| Fixation | ||
| + | |- | ||
| + | |White key cover ||4||Key | ||
| + | |- | ||
| + | |Joystick||2||Rocker | ||
| + | |- | ||
| + | |1.27mm 8P cable||1||Connect TFT screen | ||
| + | |- | ||
| + | |10440 3.7V Li-ion battery(for option) ||1||Power supply | ||
| + | |- | ||
| + | |Micro-USB cable(for option)||1||Program download | ||
|} | |} | ||
| − | [[ | + | ==Step-1:Programming== |
| + | ===Source Code Download=== | ||
| + | Download the program from the address below: | ||
| + | '''[[https://github.com/wasdpkj/Joypad_RC/ Joypad_RC]]''' | ||
| + | ===Stacking Modules=== | ||
| + | *Connect [[Microduino-USBTTL]] with a USB cable, stack it with your core module for program uploading. | ||
| + | **Note: Please upload programs before stacking all modules. | ||
| + | ===Configuring the Environment=== | ||
| + | *Open Arduino IDE for Microduino environment. (For buildup reference: '''[[AVR Core:Getting started]]''') | ||
| + | *Make sure choose the right "Board" and "Processor", select the corresponding port number (COMX). | ||
| + | |||
| + | ===Program Download=== | ||
| + | *Open " Joypad_RC.ino " in the programs you've downloaded. | ||
| + | *Click"→" and download programs to the development board. | ||
| + | |||
| + | |||
| + | ==Step-2: Reference Voltage== | ||
| + | *For matching input devices with any voltage on the Core and the Joypad: The reference voltage of the Joystick and switch is adjustable. | ||
| + | **If you choose CoreRF or other core modules in 3.3V like Core, Core+. | ||
| + | **Then you'll need to re-set the reference voltage of the Joypad's mainboard via the jumper wires. | ||
| − | |||
| − | |||
| − | |||
| − | + | ==Step-3:Power-on via battery== | |
| − | + | ===Battery Specification Supportable=== | |
| + | *As follows: | ||
| + | {|class="wikitable" | ||
| + | | align="center" style="background:#f0f0f0;"|'''Function/battery type ''' | ||
| + | | align="center" style="background:#f0f0f0;"|'''10440 Li-ion battery(3.7V)''' | ||
| + | | align="center" style="background:#f0f0f0;"|'''AAA battery(1.5V)''' | ||
| + | |- | ||
| + | | If it supports one battery ||YES||NO | ||
| + | |- | ||
| + | | If it supports two batteries ||YES||YES | ||
| + | |- | ||
| + | | If it is rechargeable ||YES||NO | ||
| + | |} | ||
| − | |||
| − | |||
| − | * | + | *'''Here we suggest using 10440 Li-ion battery (3.7V) ''' |
| − | |||
| − | + | ===Activate the Power Management Circuit === | |
| − | |||
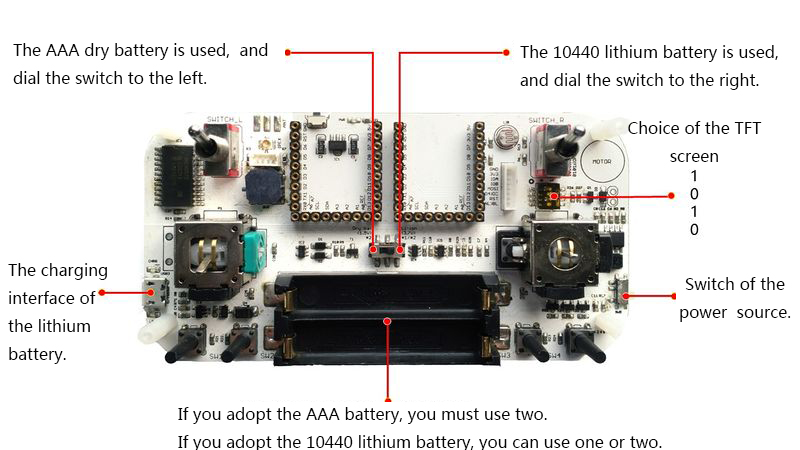
| − | * | + | *'''For the battery usage, please refer to the picture below, toggle the switch (in the battery mode) to the right position and then connect into battery. ''' |
| − | [[File: | + | [[File:Joypadstep1_1.jpg|center|800px]] |
| − | * | + | *After the connection, please make sure you plugged in the USB cable to "activate" the power management circuit of the Joypad. |
| − | |||
| + | *Then, you can control the power switch of the Joypad normally. | ||
| − | * | + | ===Power Quantity Reminder and Charging(only for 10440 Li-ion battery) === |
| − | + | *'''When you are using two AAA batteries, please don't adopt USB cable for power supply or it'll cause battery burning. | |
| + | *When the "LOW" indicator near the USB cable goes on, it means the battery power is insufficient. | ||
| + | **'''When using the AAA batteries, the indicator will be always on due to low voltage. | ||
| + | *Plug in the USB cable and you can start charging. | ||
| + | *The charging indicator will go on, and then will turn weak or go out when finishing charging. | ||
| − | * | + | ==Step-4: Buildup== |
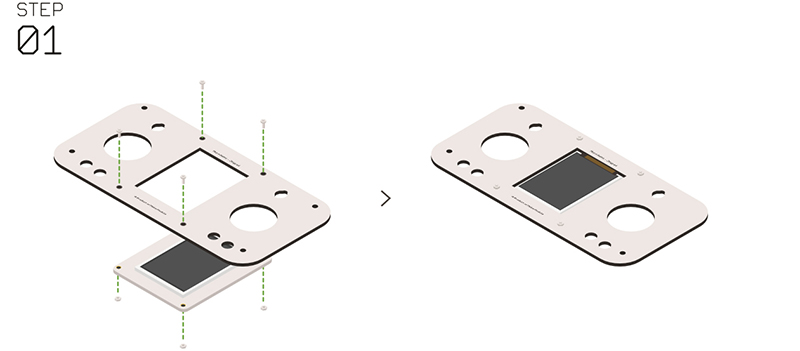
| + | *'''Step 1''': | ||
| + | *Insert the Microduino-TFT into the panel of the Microduino-Joypad. | ||
| + | *Fixate them with'''nylon screws ''' and '''nylon nuts ''', make sure the Microduino-TFT installation is right. | ||
| + | [[File:Joypadstep1.jpg|center|800px]] | ||
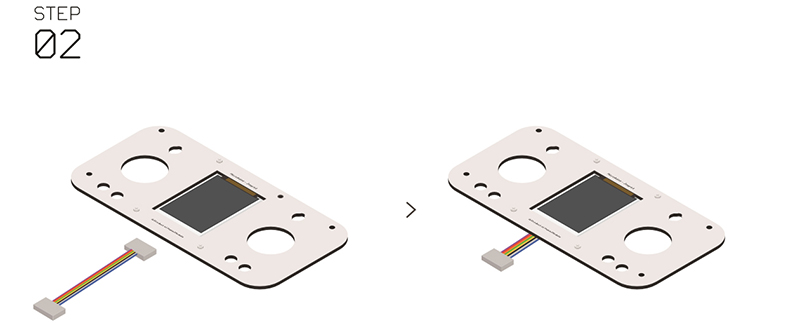
| + | *'''Step 2''': | ||
| + | *Insert the cable in the Microduino-TFT. | ||
| + | [[File:Joypadstep2.jpg|center|800px]] | ||
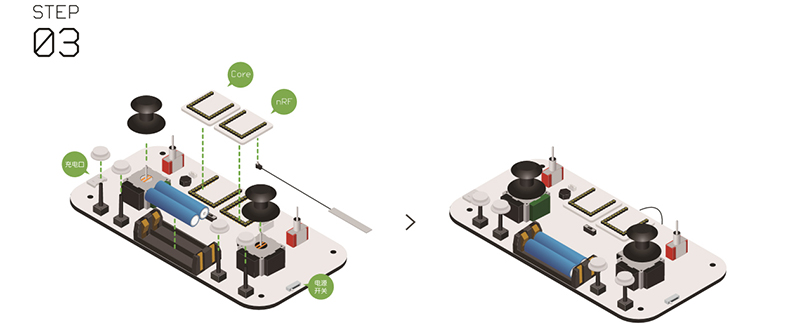
| + | *'''Step 3''': | ||
| + | *Install the communication module and the core module into the UPIN27 interface of the Joypad's baseboard. | ||
| + | *Make sure the "battery", "two rocker covers " and "four white keys " installed correct. | ||
| + | [[File:Joypadstep3.jpg|center|800px]] | ||
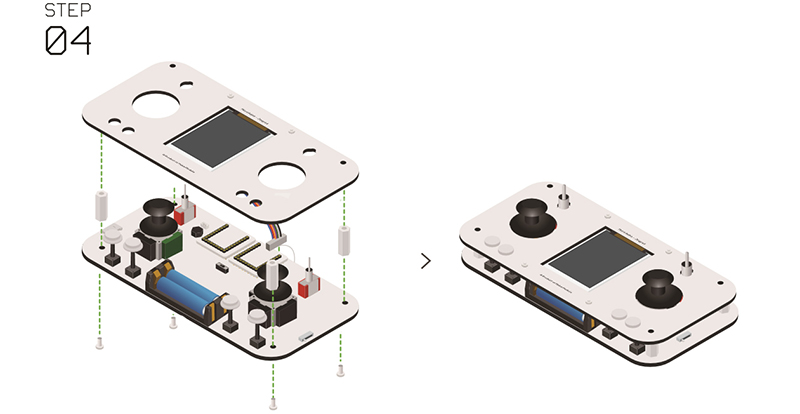
| + | *'''Step 4''': | ||
| + | *Connect the other side of the Microduino-TFT cable to the corresponding interface the baseboard. | ||
| + | *Install the nylon columns. | ||
| + | *Fixate the columns with nylon screws. | ||
| + | [[File:Joypadstep4.jpg|center|800px]] | ||
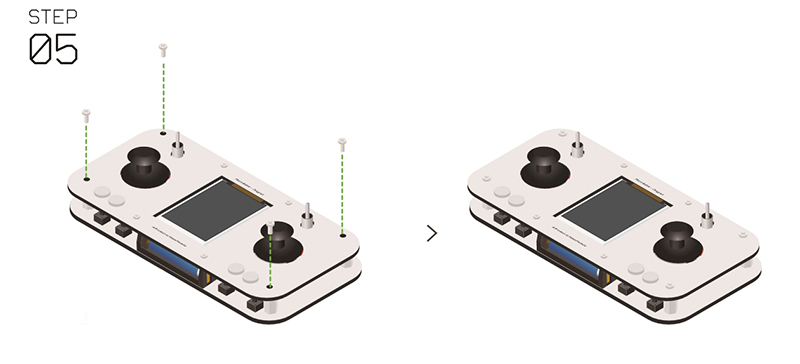
| + | *'''Step 5''': | ||
| + | *Fixate the four corners of the panel. | ||
| + | [[File:Joypadstep5.jpg|center|800px]] | ||
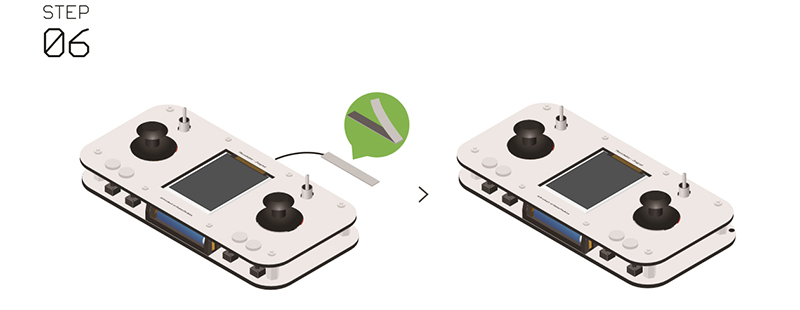
| + | *'''Step 6''': | ||
| + | *After the installation of the antenna, congratulations! you just completed the hardware buildup of the Joypad. | ||
| + | [[File:Joypadstep6.jpg|center|800px]] | ||
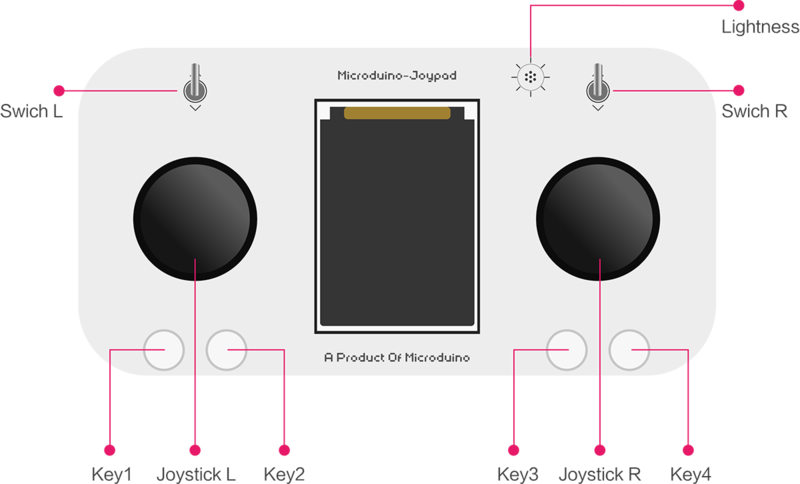
| − | [[File: | + | ==Step-5: Key Description== |
| + | [[File:Joypadbuttomreadme.png|center|800px]] | ||
| − | |||
| − | |||
| − | |||
| − | |||
| − | + | *Two rockers: Joystick L、Joystick R | |
| − | *Two | + | *Two switches: Switch L、Switch R |
| − | *Two switches | + | *Four keys: Key1、Key2、Key3、Key4 |
| − | *Four | + | *One Light sensor: |
| − | |||
| − | |||
| − | |||
| − | |||
| − | |||
| − | * | ||
| − | [[ | + | ==Step-6: Channel/Operation Description== |
| + | *Joystick L controls YAW[3-channel] and THROT[channe-4l]; Joystick R controls ROLL[channel-1] and PITCH[channel-2]. | ||
| + | *Key1, Key2, Key3 and Key4 respectively correspond to AUX1[channel-5], AUX2[channel-6], AUX3[channel-7] and AUX4[channel-8]. | ||
| + | *"Switch L" targets at locking the throttle. | ||
| + | *"Switch R" starts small rudder mode and under this mode, the quantity of the rudder is becoming smaller. | ||
| − | + | ==Step-7: Menu Configuration Instructions == | |
| − | **Please make sure | + | ===Enter Configuration Mode === |
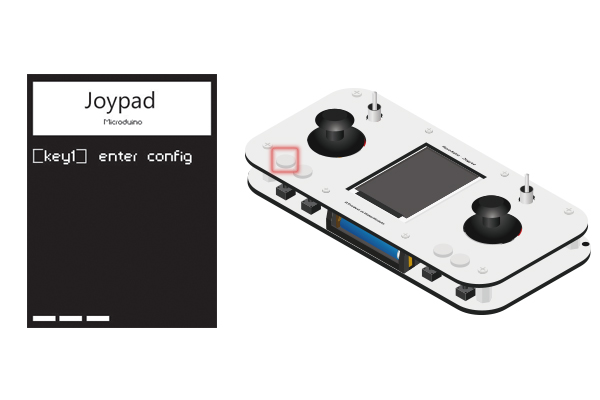
| − | * | + | *After opening the Joypad for around 4s, please press down the Key1 and enter the configuration mode. |
| + | **Note: Please make sure entering the configuration mode 2s ahead of entering the operation interface. If not, please try to enter again. | ||
| + | [[File:Step1进入设置.jpg|600px|center|]] | ||
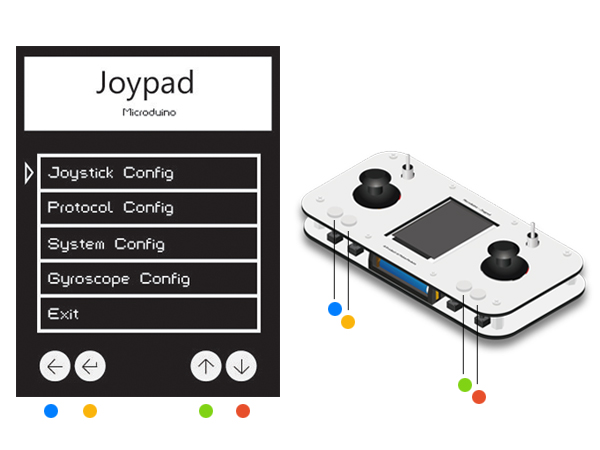
| + | *Find Key1-Key4 from left to right by checking the colors in the picture below. | ||
| + | [[File:Step1按键对应.jpg|600px|center|]] | ||
| + | *Press Key3 and Key4 to move the icon. Key1 means "Return" and Key2 refers to "Confirm". | ||
| + | ===Joystick Configuration=== | ||
| + | ====Calibration of the Joystick ==== | ||
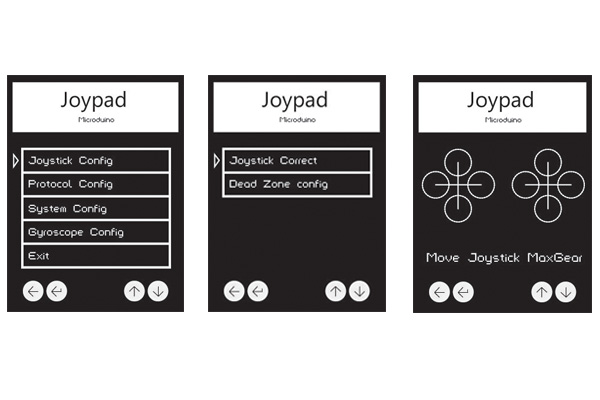
| + | *Select "Joystick Config-Joystick Correct" and enter the calibration mode of the Joystick. | ||
| + | **After that, you'll see two crosses at the beginning. | ||
| + | **Move the left and the right rockers around to the upmost. | ||
| + | **And you'll see cycles around the crosses. When the cycle gets to its largest, it indicates the rocker has been turned to the upmost. | ||
| + | [[File:Step2摇杆校准.jpg|600px|center|]] | ||
| + | ===="Dead zone" setting for the Joystick ==== | ||
| + | *Choose " Joystick Config-Dead Zone config " and you can set the "dead zone". | ||
| + | **The bigger of the value you set, the more insensitive the Joystick gets. | ||
| + | ===Communication Protocol Configuration === | ||
| + | ====Communication Mode ==== | ||
| + | *Select " Protocol Config-mode " and enter the setting. | ||
| − | * | + | **"Quadro" indicates Quadrobot mode and "nRF24" incates nRF mode. |
| − | * | ||
| − | |||
| − | |||
| − | |||
| − | |||
| − | |||
| − | |||
| − | + | ====Channel Configuration of the Quadro Mode ==== | |
| − | + | *Select " Protocol Config-Quadrotor Channel " and enter the setting. | |
| − | + | ====Channel Configuration of nRF Mode==== | |
| − | + | *Select " Protocol Config-nRF24 Channel " and enter the setting. | |
| − | |||
| − | |||
| − | |||
| − | |||
| − | |||
| − | |||
| − | + | ===System Configuration=== | |
| − | + | ====Them Configuration of the Display Screen==== | |
| + | * Select " System Config-TFT Theme " and enter the setting. | ||
| + | ====Display Screen Spinning Configuration==== | ||
| + | * Select " System Config-TFT Rotation " and enter the setting. | ||
| − | + | ====MCU Reference Voltage Configuration==== | |
| − | + | * Select " System Config-MCU Voltag " and enter the setting. | |
| − | |||
| − | + | ===Motion Configuration === | |
| − | + | * Select " Cyroscope Config " and enter the setting. | |
| − | |||
| − | |||
| − | * | + | ===Exit Configuration Mode === |
| + | * Select " Exit " and enter the setting. | ||
| − | + | == FAQ== | |
| + | *Q:'''Does Joypad support AAA batteries? ''' | ||
| + | **A:Yes, it'll need two. But we don't recommend that. | ||
| − | + | *Q:'''Why don't you recommend AAA batteries? ''' | |
| − | + | **A:The battery protection and low power indicator of the Joypad are designed for the 3.7V Li-ion battery. Two cells of AAA batteries may trigger circuit protection and cause the illusion of no electricity, | |
| − | |||
| − | |||
| − | |||
| − | |||
| − | |||
| − | |||
| − | |||
| − | |||
| − | |||
| − | |||
| − | |||
| − | |||
| − | |||
| − | |||
| − | |||
| − | |||
| − | |||
| − | |||
| − | |||
| − | |||
| − | |||
| − | |||
| − | |||
| − | |||
| − | |||
| − | |||
| − | |||
| − | * | + | *Q:'''Waht battery does Joypad recommend? ''' |
| − | ** | + | **A:Single or two cells of 10440 3.7V Li-ion batteries. |
| − | |||
| − | |||
| − | |||
| − | |||
| − | |||
| − | |||
| − | + | *Q:'''What core module does we need to control the Quadrobot? ''' | |
| − | + | **A:CoreRF, which comes with communication function and therefore, it needs no other communication modules. | |
| − | |||
| − | |||
| − | |||
| − | |||
|} | |} | ||
Revision as of 14:02, 6 March 2016
| Language: | English • 中文 |
|---|
Contents
Overview
Project Background
Bill of Material
Module Selection
Bill of Material
Step-1:ProgrammingSource Code DownloadDownload the program from the address below: [Joypad_RC] Stacking Modules
Configuring the Environment
Program Download
Step-2: Reference Voltage
Step-3:Power-on via batteryBattery Specification Supportable
Activate the Power Management Circuit
Power Quantity Reminder and Charging(only for 10440 Li-ion battery)
Step-4: Buildup
Step-5: Key Description
Step-6: Channel/Operation Description
Step-7: Menu Configuration InstructionsEnter Configuration Mode
Joystick ConfigurationCalibration of the Joystick
"Dead zone" setting for the Joystick
Communication Protocol ConfigurationCommunication Mode
Channel Configuration of the Quadro Mode
Channel Configuration of nRF Mode
System ConfigurationThem Configuration of the Display Screen
Display Screen Spinning Configuration
MCU Reference Voltage Configuration
Motion Configuration
Exit Configuration Mode
FAQ
|
