Difference between revisions of "Microduino-Shield Solo"
From Microduino Wiki
(→Feature) |
|||
| (4 intermediate revisions by 2 users not shown) | |||
| Line 1: | Line 1: | ||
| + | {{Language|Microduino-Solo}} | ||
{| style="width: 800px;" | {| style="width: 800px;" | ||
|- | |- | ||
| Line 9: | Line 10: | ||
==Feature== | ==Feature== | ||
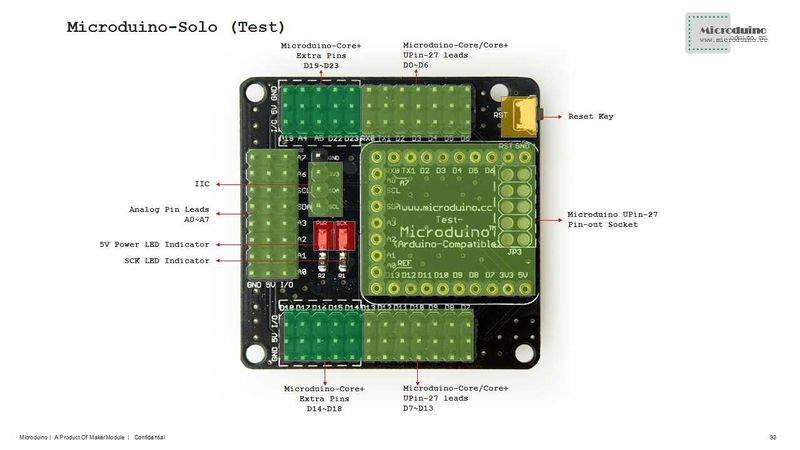
*Pin compatible with Arduino uno; | *Pin compatible with Arduino uno; | ||
| − | *2.54 pitch Female | + | *2.54 pitch Female Header is Microduino module based, the same name of the pins are connected to each other in the board, each pin is installed with the power and ground to facilitate debugging; |
*Define unified interface Microduino specification and contain rich peripheral modules. Set up the quick connection with other Microduino modules and sensors easily and flexibly. | *Define unified interface Microduino specification and contain rich peripheral modules. Set up the quick connection with other Microduino modules and sensors easily and flexibly. | ||
|- | |- | ||
| | | | ||
| + | |||
==Specifications== | ==Specifications== | ||
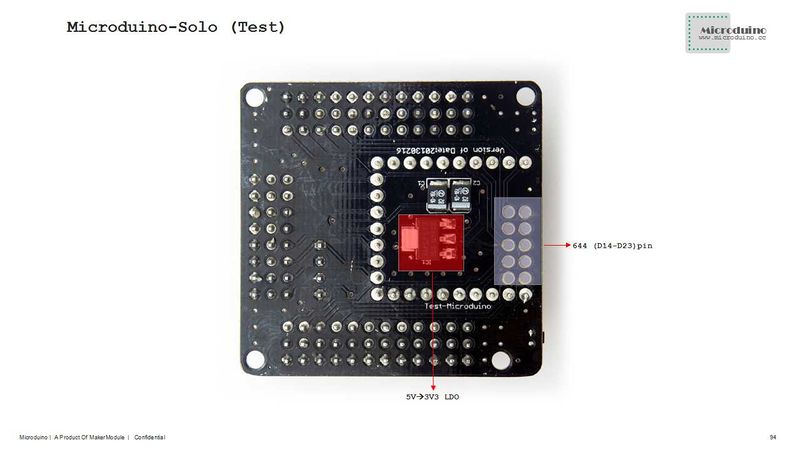
*3.3V regulator; | *3.3V regulator; | ||
*Digital port D13 (SCK) connected LED lights, high lights; | *Digital port D13 (SCK) connected LED lights, high lights; | ||
*Reset button on board; | *Reset button on board; | ||
| − | *Add I2C | + | *Add I2C interface(SCL,SDA); |
| − | *Each I / O port is installed next to the 5V supply and | + | *Each I / O port is installed next to the 5V supply and ground; |
*A Microduino UPIN27 seat locates in the board. | *A Microduino UPIN27 seat locates in the board. | ||
[[File:Solo-Pinout-1.jpg|800px|thumb|center|Microduino-Solo-Pinout]] | [[File:Solo-Pinout-1.jpg|800px|thumb|center|Microduino-Solo-Pinout]] | ||
| Line 31: | Line 33: | ||
==Application== | ==Application== | ||
*You can download Microduino provides testing program, D13 digital port connects the LED: | *You can download Microduino provides testing program, D13 digital port connects the LED: | ||
| − | *Prepared | + | *Prepared hardware: Microduino FT232R, Microduino Core, Microduino UNO; |
| − | *Prepared | + | *Prepared software: Microduino provides testing program(Arduino part), Arduino IDE(1.0 release upper); |
*Open the testing program using IDE firstly, then card type choose "Microduino Core (Atmega328P@16M,5V)", download directly, then the LED flashes every second once after download is completed. | *Open the testing program using IDE firstly, then card type choose "Microduino Core (Atmega328P@16M,5V)", download directly, then the LED flashes every second once after download is completed. | ||
Latest revision as of 23:32, 1 August 2017
| Language: | English • 中文 |
|---|
|
Microduino-Solo is sensor module expansion board based on Microduino core module. |
Feature
|
Specifications
DocumentDevelopmentSet up the quick connection with other Microduino modules and sensors easily and flexibly. Application
Pictures |


