Difference between revisions of "Microduino Enc Wired network experiment -302KIT"
(→Outline) |
|||
| (5 intermediate revisions by 2 users not shown) | |||
| Line 22: | Line 22: | ||
|Module||Number||Function | |Module||Number||Function | ||
|- | |- | ||
| − | |Microduino-Core(Microduino Core+)||1|| | + | |Microduino-Core(Microduino Core+)||1||Served as the slave machine,receiving and controlling signal |
|- | |- | ||
| − | |Microduino FT232R ||1|| | + | |Microduino-USBTTL(FT232R) ||1||For program download |
|- | |- | ||
| − | |Microduino Enc(Microduino Rj45)||2|| | + | |Microduino Enc(Microduino Rj45)||2||For wireless communication |
|} | |} | ||
*Other equipment: | *Other equipment: | ||
| Line 35: | Line 35: | ||
|Network cable||one | |Network cable||one | ||
|- | |- | ||
| − | |micro | + | |micro USB cable||one |
|- | |- | ||
|LED||Four | |LED||Four | ||
| Line 46: | Line 46: | ||
|- | |- | ||
| | | | ||
| + | |||
==Document== | ==Document== | ||
| Line 53: | Line 54: | ||
Step 1:Set up router network | Step 1:Set up router network | ||
| − | Power | + | Power the router and connect the PC to network. |
| − | Step | + | Step 2: Build the hardware |
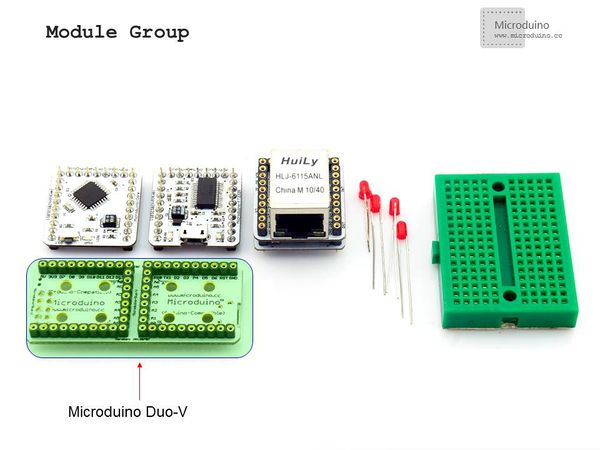
| − | Install all Microduino | + | Install all Microduino modules needed and adopt the extension board Microduino Duo-V for easy debugging. |
|- | |- | ||
| | | | ||
| Line 64: | Line 65: | ||
|- | |- | ||
| | | | ||
| − | Step | + | Step 3: Download program |
| − | Start Arduino IED, open the Microduino example program | + | Start Arduino IED, open the Microduino example program and choose the board "Microduino Core (Atmega328P@16M,5V)", then download directly. |
| − | Step 4:Connect the network | + | Step 4:Connect the network |
| − | Connect | + | Connect Microduino-RJ45 to the LAN port of router. |
| − | Step | + | Step 5:Wired control of the LED lights inside the LAN |
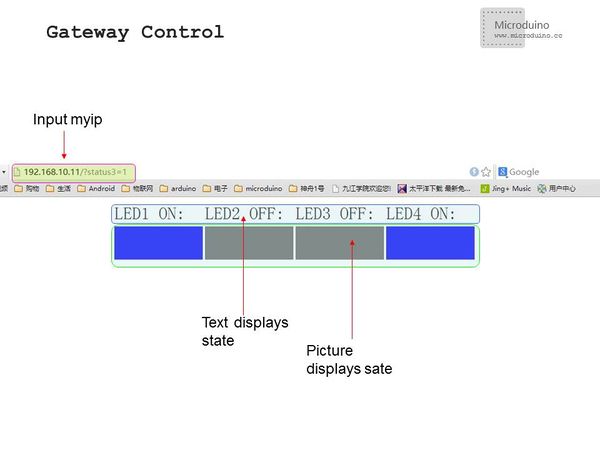
| − | Open a new | + | Open a new page and enter the "myip" address in the program.You can only enter the control interface when Microduino connects the internet successfully. Otherwise, it can not be opened. |
|- | |- | ||
| | | | ||
| Line 80: | Line 81: | ||
|- | |- | ||
| | | | ||
| + | |||
==Result== | ==Result== | ||
| − | + | After connecting the Microduino core to the internet, you can control the switch of the LED through the graphical button on the Gateway Control Interface, achieving the network control via the button. | |
|- | |- | ||
| | | | ||
| + | |||
==Note== | ==Note== | ||
| − | *Microduino Enc must be | + | *Microduino-Enc must be stacked with Microduino-RJ45 for use, forming networked devices; |
| − | * | + | *Device network connection needs to configure MAC address and IP address with Ethernet interface inside the LAN. |
| + | |||
==Video== | ==Video== | ||
| − | + | ||
|} | |} | ||
Latest revision as of 09:18, 15 June 2016
| Language: | English • 中文 |
|---|
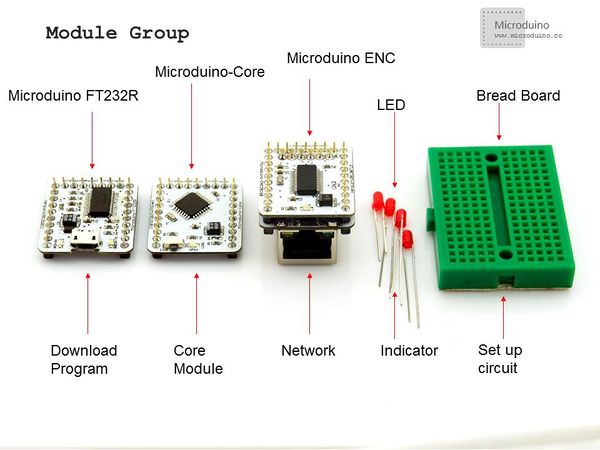
OutlineProject: Microduino-Enc Wired Networking Experiment Objective:Enable Microduihno-Core to connect with the network via Microduino-Enc and Microduino-RJ45, control four LED lights inside the LAN and achieve network control. Difficulty:Elementary Time-consuming:One hour Maker:Microduino Studio-YLB | ||||||||||||||||||||||||
Bill of Materials
| ||||||||||||||||||||||||
Document | ||||||||||||||||||||||||
DebuggingStep 1:Set up router network Power the router and connect the PC to network. Step 2: Build the hardware Install all Microduino modules needed and adopt the extension board Microduino Duo-V for easy debugging. | ||||||||||||||||||||||||
|
Step 3: Download program Start Arduino IED, open the Microduino example program and choose the board "Microduino Core (Atmega328P@16M,5V)", then download directly. Step 4:Connect the network Connect Microduino-RJ45 to the LAN port of router. Step 5:Wired control of the LED lights inside the LAN Open a new page and enter the "myip" address in the program.You can only enter the control interface when Microduino connects the internet successfully. Otherwise, it can not be opened. | ||||||||||||||||||||||||
ResultAfter connecting the Microduino core to the internet, you can control the switch of the LED through the graphical button on the Gateway Control Interface, achieving the network control via the button. | ||||||||||||||||||||||||
Note
Video |


