Difference between revisions of "Microduino-Shield Joypad"
(Created page with "{{Language|Microduino-Joypad}} {| style="width: 800px;" |- | 400px|thumb|right|Microduino-Joypad Microduino-Joypad, as an 8-bit retro game conso...") |
(→Development) |
||
| (13 intermediate revisions by 2 users not shown) | |||
| Line 4: | Line 4: | ||
| | | | ||
[[File:Microduino-Joypad.jpg|400px|thumb|right|Microduino-Joypad]] | [[File:Microduino-Joypad.jpg|400px|thumb|right|Microduino-Joypad]] | ||
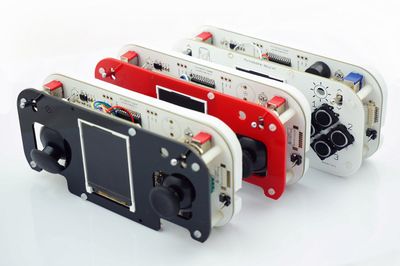
| − | + | As an 8-bit retro game console, Microduino-Joypad can bring the simplest pleasure. It is UPin27 interface integrated and AVR, STM32, MSP430 and 51 compatible,owning powerful expansion function. It is also a smart controller, which can easily control a Quadcopter, BOXZ Mini Robot or simulate a computer mouse. | |
==Features== | ==Features== | ||
*Rich sensors integrated, powerful scalability, flexible and fantastic; | *Rich sensors integrated, powerful scalability, flexible and fantastic; | ||
| Line 14: | Line 14: | ||
==Specification== | ==Specification== | ||
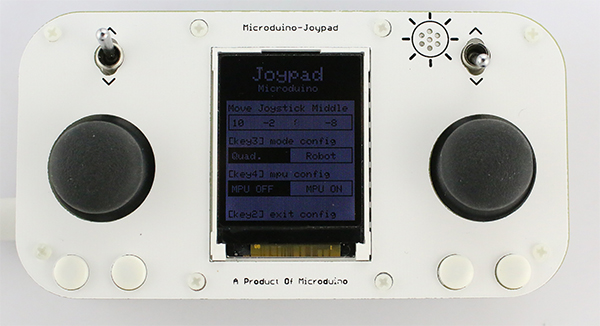
| − | + | Appearance: | |
| − | + | [[file:Joypad front.jpg|600px|thumb|center]] | |
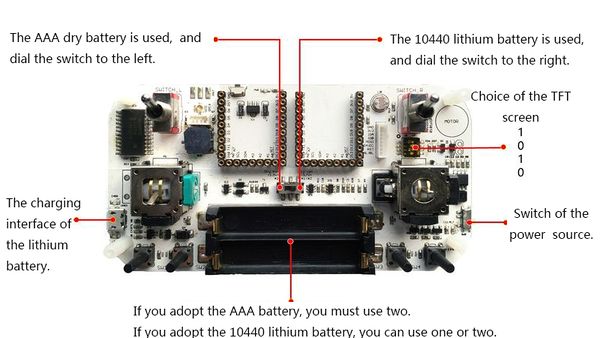
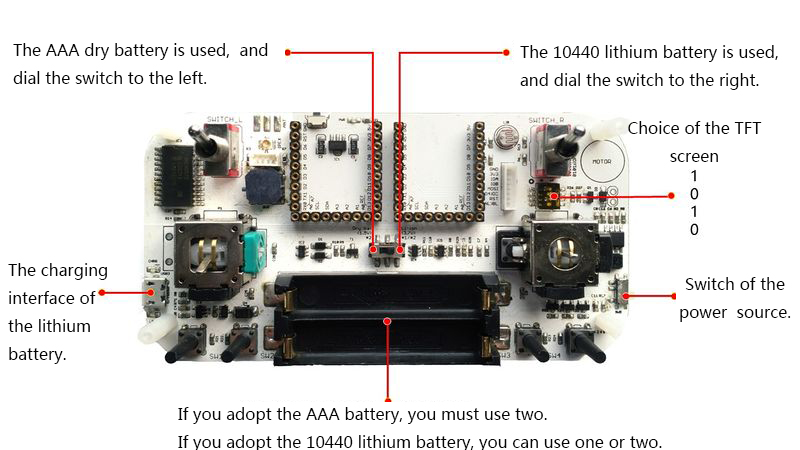
| − | + | Power supply: | |
| − | [[ | + | [[file:Joypadstep1 1.jpg|600px|thumb|center]] |
| − | + | *Other extension function: | |
| − | + | **Two parallel Upin27 bases; | |
| − | + | **Two toggle switches; | |
| − | + | **Four buttons; | |
| − | + | **MIC sound detection input; | |
| − | + | **Photosensitive detection input; | |
| − | + | **Buzzer output, connected to the D6 pin of Microduino; | |
| − | + | **Vibration motor output, connected to the D8 pin of Microduino; | |
| − | + | **With battery box onboard, optional dry battery/lithium battery for the power supply, power supply mode switch, and microusb charging interface. | |
| − | |||
| − | |||
| − | |||
| − | *Other | ||
| − | **Two parallel Upin27 | ||
| − | **Two | ||
| − | **Four | ||
| − | **MIC sound detection | ||
| − | **Photosensitive detection | ||
| − | **Buzzer | ||
| − | **Vibration motor | ||
| − | ** | ||
| − | |||
| − | |||
| − | |||
==Document== | ==Document== | ||
| Line 49: | Line 34: | ||
==Development == | ==Development == | ||
It can not only support Arduino’s AVR series but also STM32, MS430 and 51 series, covering almost all the existing popular applications. | It can not only support Arduino’s AVR series but also STM32, MS430 and 51 series, covering almost all the existing popular applications. | ||
| − | Microduino-Joypad development board integrates rich sensors and two parallel UPin27 interfaces, which makes it a flexible, powerful and interesting device capable of DIY as well as unlimited expansion possibilities. | + | Microduino-Joypad development board integrates rich sensors and two parallel UPin27 interfaces, which makes it a flexible, powerful and interesting device capable of DIY as well as unlimited expansion possibilities. |
| − | |||
| − | |||
| − | |||
| − | |||
| − | |||
| − | |||
| − | |||
| − | |||
| − | |||
| − | |||
| − | |||
| − | |||
| − | |||
| − | |||
| − | |||
| − | |||
| − | |||
| − | |||
| − | |||
| − | |||
| − | |||
| − | |||
| − | |||
| − | |||
| − | |||
| − | |||
| − | |||
| − | |||
| − | |||
| − | |||
| − | |||
| − | |||
| − | |||
| − | |||
| − | |||
| − | + | Getting Start: [[Microduino-Joypad Getting start]] | |
| − | == | + | *Related applications: |
| + | 【'''[[Open Source Electric Drive Cube Robot]]'''】 | ||
| + | 【'''[[Microduino-Quadcopter Tutorial]]'''】 | ||
| + | 【'''[[Open Source Self-balance Robot System]]'''】 | ||
| + | ====Joypad Buildup==== | ||
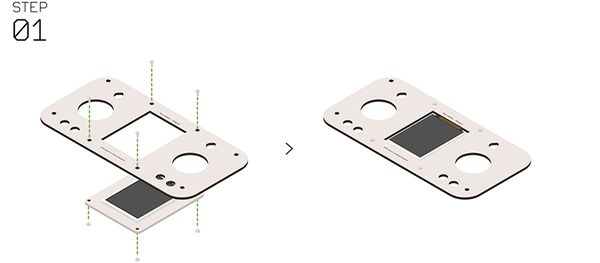
| + | *'''Step 1''':Insert Microduino-TFT into Microduino-Joypad panel from the back of panel Microduino-Joypad, and fix it with nylon screws. Pay attention to the installation direction of Microduino-TFT. | ||
| + | [[File:Joypadstep1.jpg|center|600px]] | ||
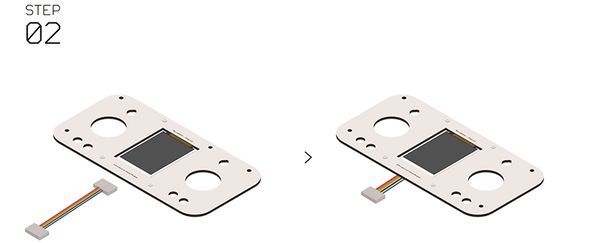
| + | *'''Step 2''':Insert the sensor wire into the interface of Microduino-TFT. | ||
| + | [[File:Joypadstep2.jpg|center|600px]] | ||
| + | '''Note:To connect different batteries, you need to turn the middle of the switch, which has been marked in the picture. Turning and then connecting, otherwise it will affect the further use''' | ||
| + | [[File:Joypadstep1_1.jpg|center|800px]] | ||
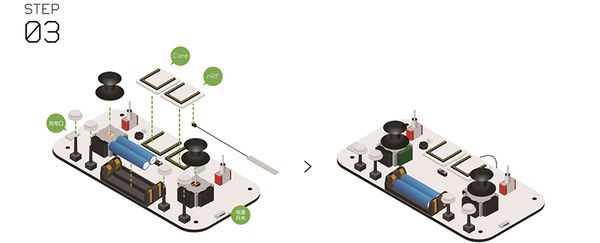
| + | *'''Step 3''':At first, put the two joystick buttons, battery, and the four white buttons on the corresponding position, and then install the nRF module which has been connected with antenna and Core to the baseboard of Joypad. | ||
| + | [[File:Joypadstep3.jpg|center|600px]] | ||
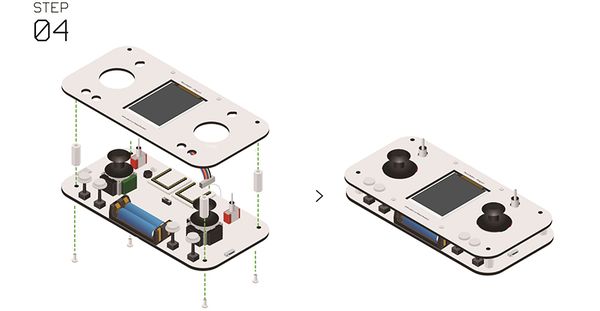
| + | *'''Step 4''':Connect the other end of the Microduino-TFT sensor wire to the corresponding position of the baseboard, and then put the four long nuts on the corresponding position on the four corners. | ||
| + | [[File:Joypadstep4.jpg|center|600px]] | ||
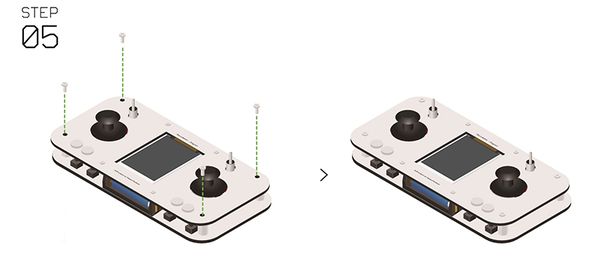
| + | *'''Step 5''':Fix the shell and baseboard of Joypad with screws and nuts. | ||
| + | [[File:Joypadstep5.jpg|center|600px]] | ||
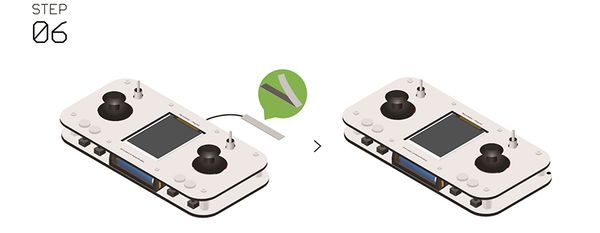
| + | *'''Step 6''':After the assembly, tear the sticker on the antenna down, and stick the antenna on any position of the back of the baseboard. So far, the assembly of Joypad is completed. | ||
| + | [[File:Joypadstep6.jpg|center|600px]] | ||
==History== | ==History== | ||
Latest revision as of 07:46, 3 August 2016
| Language: | English • 中文 |
|---|
|
As an 8-bit retro game console, Microduino-Joypad can bring the simplest pleasure. It is UPin27 interface integrated and AVR, STM32, MSP430 and 51 compatible,owning powerful expansion function. It is also a smart controller, which can easily control a Quadcopter, BOXZ Mini Robot or simulate a computer mouse. ContentsFeatures
SpecificationAppearance: Power supply:
Document
DevelopmentIt can not only support Arduino’s AVR series but also STM32, MS430 and 51 series, covering almost all the existing popular applications. Microduino-Joypad development board integrates rich sensors and two parallel UPin27 interfaces, which makes it a flexible, powerful and interesting device capable of DIY as well as unlimited expansion possibilities. Getting Start: Microduino-Joypad Getting start
【Open Source Electric Drive Cube Robot】 【Microduino-Quadcopter Tutorial】 【Open Source Self-balance Robot System】 Joypad Buildup
Note:To connect different batteries, you need to turn the middle of the switch, which has been marked in the picture. Turning and then connecting, otherwise it will affect the further use
HistoryPicturesVideo |
