Difference between revisions of "Microduino-NEO-6M"
From Microduino Wiki
(→Download and debug program with FT232R and Core Module) |
|||
| Line 6: | Line 6: | ||
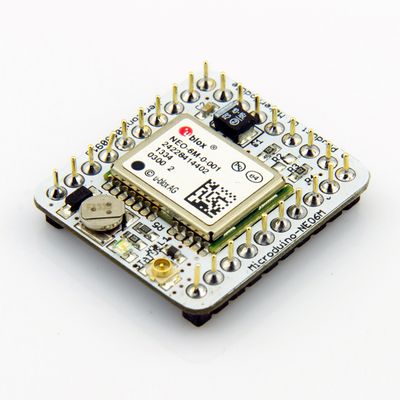
Microduino-NEO module maybe the most beautiful GPS module that you've seen. Its core module use UBLOX NEO-6M, high sensitivity, update rate up to 5Hz, using mini ceramic antenna with IPEX interface, and build-in a rechargeable battery backup. | Microduino-NEO module maybe the most beautiful GPS module that you've seen. Its core module use UBLOX NEO-6M, high sensitivity, update rate up to 5Hz, using mini ceramic antenna with IPEX interface, and build-in a rechargeable battery backup. | ||
| − | |||
| − | |||
==Feature== | ==Feature== | ||
*High sensitivity; | *High sensitivity; | ||
| Line 14: | Line 12: | ||
*PPS indicator,easily determine the current status of the module; | *PPS indicator,easily determine the current status of the module; | ||
*Built-in rechargeable backup battery (to support warm start or hot start); | *Built-in rechargeable backup battery (to support warm start or hot start); | ||
| − | *Small, cheap, stackable, opened platform; | + | *Small, cheap, stackable, opened platform; |
*Open source hardware circuit design, compatible with the Arduino IDE development environment for programming; ; | *Open source hardware circuit design, compatible with the Arduino IDE development environment for programming; ; | ||
| − | *Define unified interface Microduino specification and contain rich peripheral modules. Set up the quick connection with other Microduino modules and sensors easily and flexibly. | + | *Define unified interface Microduino specification and contain rich peripheral modules. Set up the quick connection with other Microduino modules and sensors easily and flexibly. |
*2.54 pitch row female connector for easy integration into breadboard. | *2.54 pitch row female connector for easy integration into breadboard. | ||
| Line 48: | Line 46: | ||
**TTL,compatible 3.3V/5V microcontroller system | **TTL,compatible 3.3V/5V microcontroller system | ||
**Serial communication baud rate: | **Serial communication baud rate: | ||
| − | ***Microduino NEO-6M module supports several baud | + | ***Microduino NEO-6M module supports several baud rate:4800,9600,38400(defult),57600; |
* Set the baud rate by two resistors (R3,R4,recommend value is 1k): | * Set the baud rate by two resistors (R3,R4,recommend value is 1k): | ||
| Line 71: | Line 69: | ||
| RX || TX1(or D3) || Module serial receive pin (TTL level), connect to microcontroller's MCU TXD | | RX || TX1(or D3) || Module serial receive pin (TTL level), connect to microcontroller's MCU TXD | ||
|} | |} | ||
| + | |||
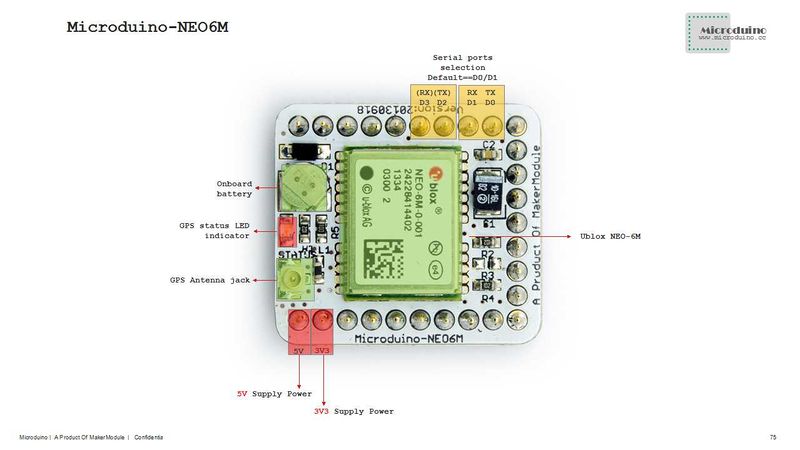
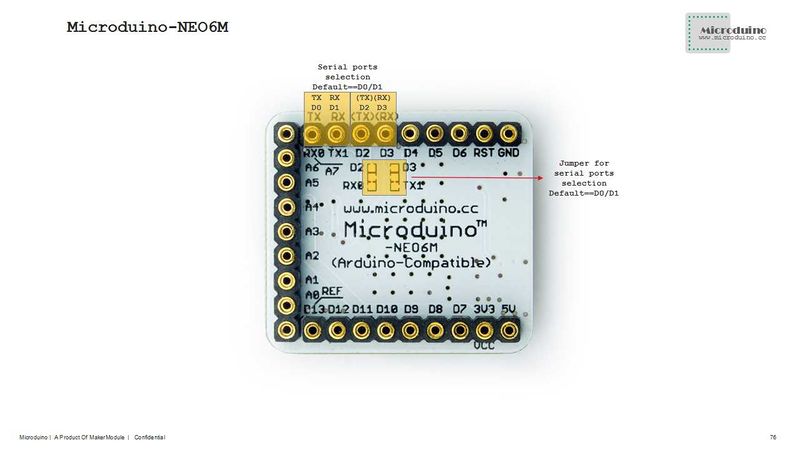
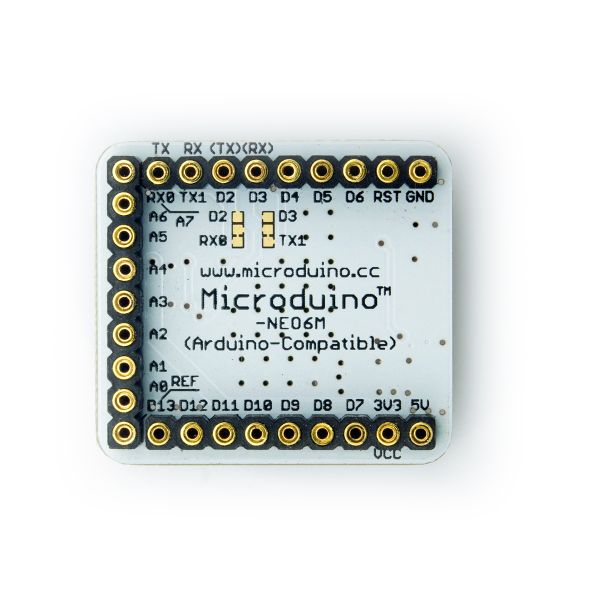
[[File:NEO6M-Pinout-2.jpg|800px|thumb|center|Microduino-NEO6M-Pinout]] | [[File:NEO6M-Pinout-2.jpg|800px|thumb|center|Microduino-NEO6M-Pinout]] | ||
| Line 89: | Line 88: | ||
* Make sure the +3.3 v power supply current can reach 200ma, not recommended use FT232R debugging directly, because FT232R's output +3.3 v current is too small. | * Make sure the +3.3 v power supply current can reach 200ma, not recommended use FT232R debugging directly, because FT232R's output +3.3 v current is too small. | ||
| − | === | + | ===Arduino库及支持包=== |
| − | * | + | *【Adafruit_GPS库'''[https://github.com/adafruit/Adafruit-GPS-Library github download ]''' 】 |
| − | * | + | *【U8glib库'''[http://code.google.com/p/u8glib/ google download ]''' 】 |
*[http://www.u-blox.com/en/evaluation-tools-a-software/u-center/u-center.html u-center-8.0] | *[http://www.u-blox.com/en/evaluation-tools-a-software/u-center/u-center.html u-center-8.0] | ||
| − | + | ===How to use the library=== | |
| − | + | *For Adafruit_GPS library: | |
| − | === | + | **Make sure the GPS baud rate is 38400 in function "void setup()",that is:GPS.begin(38400); |
| − | * | + | **If you don't change the jumper cable: |
| − | ** | + | ***Unplug the Microduino NEO-6M module when downloading program; |
| − | + | ***Use the Core or Core+ to debug, make sure include "Adafruit_GPS GPS(&Serial)" in program; | |
| − | + | **If you have changed the jumper cable: | |
| − | *If you | + | ***When use Core+ to debug,make sure include "Adafruit_GPS GPS(&Serial1)" in program; |
| − | **Unplug the Microduino NEO-6M module when downloading program; | + | ***When use Core to debug, make sure include "SoftwareSerial mySerial(3, 2)" and "Adafruit_GPS GPS(&mySerial)" in program; |
| − | * | ||
| − | **If you changed the jumper | ||
===PPS State indicator=== | ===PPS State indicator=== | ||
| Line 114: | Line 111: | ||
*Easy to identify the state of module by PPS indicator. | *Easy to identify the state of module by PPS indicator. | ||
| − | |||
| − | |||
| − | |||
| − | |||
| − | |||
==Application== | ==Application== | ||
| − | === | + | ===Download program=== |
| − | + | Tesp Program:'''[[File:Program Test NEO-6M.zip]]''' | |
| − | ===Test Microduino NEO-6M module=== | + | ===Test Microduino NEO-6M using FT232 and core module=== |
*Prepared hardware:Microduino FT232R、Microduino Core、Microduino OLED、Microduino NEO-6M; | *Prepared hardware:Microduino FT232R、Microduino Core、Microduino OLED、Microduino NEO-6M; | ||
*Prepared software:Arduino IDE(1.0 release upper)、Adafruit_GPS library、Microduino provides test program(Arduino part); | *Prepared software:Arduino IDE(1.0 release upper)、Adafruit_GPS library、Microduino provides test program(Arduino part); | ||
| Line 130: | Line 122: | ||
*Put the downloaded library to the libraries folder of Arduino IDE installation fold; | *Put the downloaded library to the libraries folder of Arduino IDE installation fold; | ||
*Start Arduino IED,open the test program,card type chooses "Microduino Core (Atmega328P@16M,5V)",download directly; | *Start Arduino IED,open the test program,card type chooses "Microduino Core (Atmega328P@16M,5V)",download directly; | ||
| + | *Use the default jumper pin (RX0,TX1): | ||
| + | **Unplug the Microduino NEO-6M module when downloading program;Microduino NEO-6M module has the same RX0/TX1 pin position with Microduino FT232R, if superimpose these two module directly, the download process will be impact. | ||
| + | *After finished download, then superimpose the NE0 modult the core module and FT232 module again. | ||
*Observed the OLED after the download completed: | *Observed the OLED after the download completed: | ||
**After half of minute,display data and time; | **After half of minute,display data and time; | ||
**Go on waiting,when you see PPS indicators of Microduino NEO-6M flashing, then the speed, latitude and longitude indicators can be displayed,if not, please restart Microduino Core. | **Go on waiting,when you see PPS indicators of Microduino NEO-6M flashing, then the speed, latitude and longitude indicators can be displayed,if not, please restart Microduino Core. | ||
| + | *Player changes the back jumper cable:Cut off the connection between the middle of bonding pad and RX0/TX1, then welding the middle of bonding pad to D2 and D3. The purpose of change jumper is download program easily. Once changed the jumper, you superimpose three board together to download program. | ||
| + | **If you use the change jumper connection method, it will change the serial connection from TX-RX0,RX-TX1 to TX-D2,RX-D3 between Microduino NEO-6M and Core module. | ||
| − | + | ===Test Mocroduino NEO-6M using PC=== | |
| − | === | + | ====Connection method==== |
| − | + | There are two connection methods: | |
| − | + | 1. Use the default pin (RX0、TX1): | |
| − | ** | + | *You need the Microduino FT232R module to connect the PC, but can't superimpose the FT232R, NEO-6M and Core module directly. Because the FT232 and NEO-6M has the same RX/TX defination and position on board, but the normal serial communication should be cross connect RX/TX. |
| − | ** | + | **Superimpose the FT232 and microduino core, then conects to PC with microUSB to download program; |
| − | ** | + | **Using the jumper cable cross connect the RX0/TX1 for FT232 and NEO-6M, that is the RX0 of NEO-6M connects to the TX1 of FT232, and the TX1 of NEO-6M connects to RX0 of FT232. |
| − | + | **Connect the 3V3 pin of NEO-6M module to 3V3 pin of FT232, and connects the GND together. | |
| − | + | 2. Use the changed jumper mode | |
| − | + | If you have changed the jumper as upper described, you can supperipose FT232, NEO-6M and Core module together, then connect to PC to debug directly. | |
| − | + | ====Use u-center configuration module to update rage==== | |
| − | |||
| − | ===Use u-center configuration module to update rage=== | ||
*Firstly, place the Microduino NEO-6M into an open area, and then connects to PC by Microduino FT232R; | *Firstly, place the Microduino NEO-6M into an open area, and then connects to PC by Microduino FT232R; | ||
*Start "u-center" software: | *Start "u-center" software: | ||
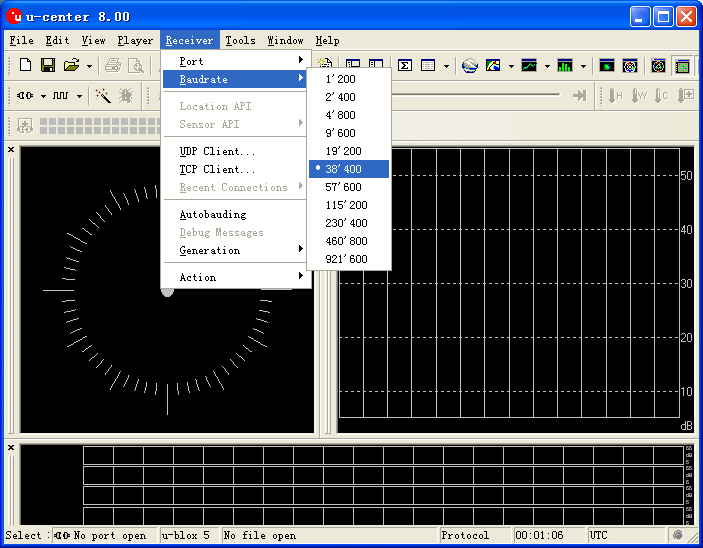
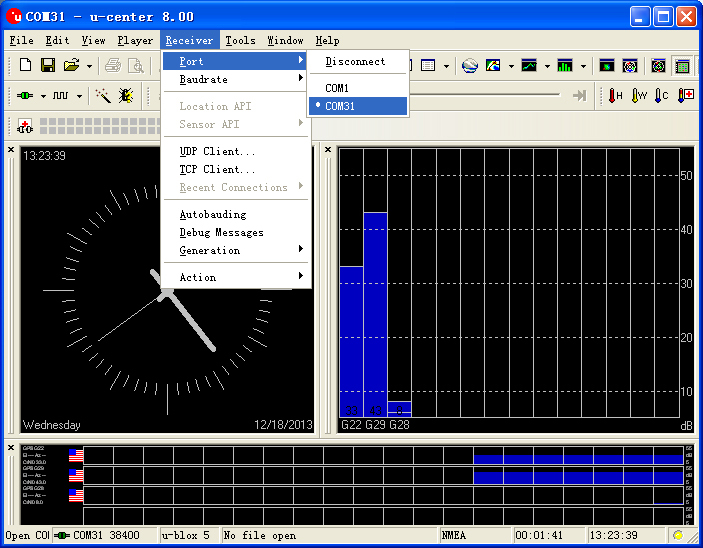
| − | ** | + | **Set the baud rate:Menu:“Receiver”-“Baudrate”-“38400”; |
[[File:U-center 01.jpg|thumb|703px|center|set baud rate]] | [[File:U-center 01.jpg|thumb|703px|center|set baud rate]] | ||
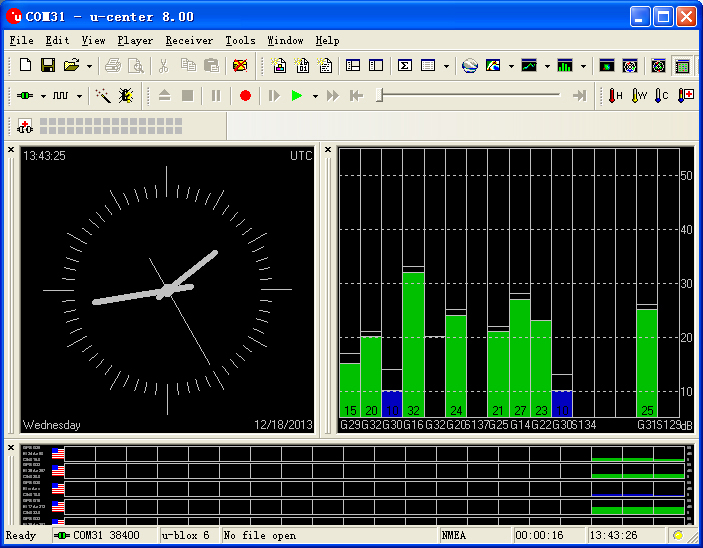
**Open the serial to start the communication:Menu:“Receiver”-“Port”- choose the port that Microduino FT232R using. | **Open the serial to start the communication:Menu:“Receiver”-“Port”- choose the port that Microduino FT232R using. | ||
| Line 161: | Line 156: | ||
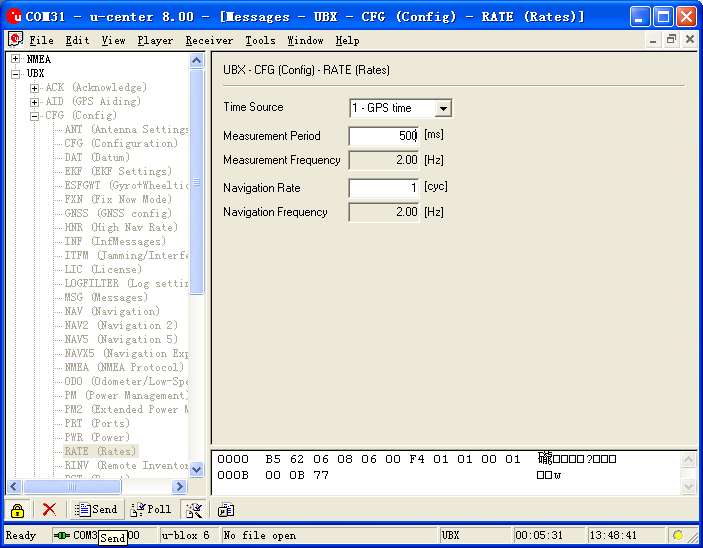
[[File:U-center 04.jpg|thumb|703px|center|Configure window]] | [[File:U-center 04.jpg|thumb|703px|center|Configure window]] | ||
| − | == | + | ==Bug== |
| + | |||
| + | ==History== | ||
| + | |||
| + | ==Picture== | ||
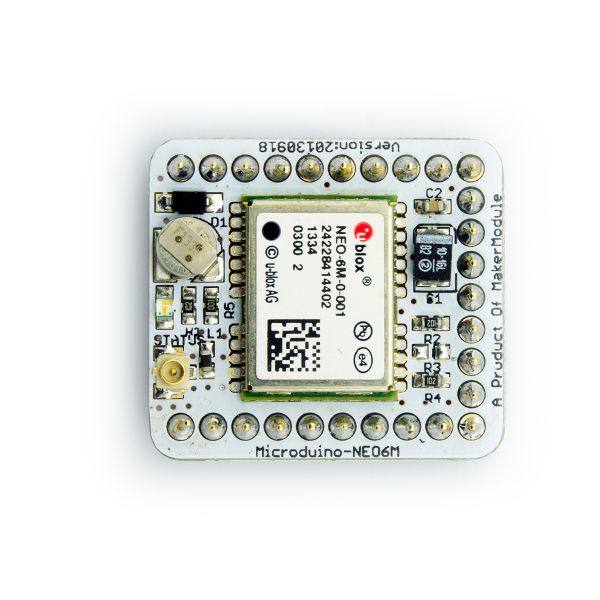
:[[file:Microduino-NEO-t.jpg|thumb|600px|center|Microduino NEO Front]] | :[[file:Microduino-NEO-t.jpg|thumb|600px|center|Microduino NEO Front]] | ||
<br style="clear: left"/> | <br style="clear: left"/> | ||
| Line 167: | Line 166: | ||
<br style="clear: left"/> | <br style="clear: left"/> | ||
| − | + | ==Video== | |
| − | |||
|} | |} | ||
Revision as of 04:38, 18 March 2014
| Language: | English • 中文 |
|---|
|
Microduino-NEO module maybe the most beautiful GPS module that you've seen. Its core module use UBLOX NEO-6M, high sensitivity, update rate up to 5Hz, using mini ceramic antenna with IPEX interface, and build-in a rechargeable battery backup. ContentsFeature
| |||||||||||||||||||||||||||||
Specifications
Pin Description
DocumentEagle PCB File:Microduino-NEO6M.zip
Main components
Development
Arduino库及支持包
How to use the library
PPS State indicator
ApplicationDownload programTesp Program:File:Program Test NEO-6M.zip Test Microduino NEO-6M using FT232 and core module
Test Mocroduino NEO-6M using PCConnection methodThere are two connection methods: 1. Use the default pin (RX0、TX1):
2. Use the changed jumper mode If you have changed the jumper as upper described, you can supperipose FT232, NEO-6M and Core module together, then connect to PC to debug directly. Use u-center configuration module to update rage
BugHistoryPicture
Video |
