Outline
- Project: Open Source Electric Drive Cube Robot
- Objective: To make a Cube Robot car
- Can be controlled by Joypad.
- Also can support Bluetooth APP control.
- Difficulty: Middle
- Time-consuming: 2-Hour
- Maker: PKJ
Bill of Material
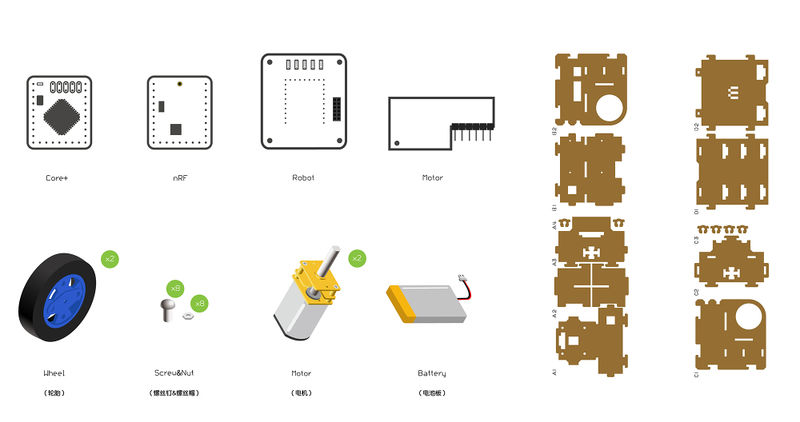
Bill of Modules(Joypad mode)
Bill of Module(Bluetooth mode)
Other Material
| Component |
Number |
Function
|
| Frame of the Robot car |
1 |
Body of the car
|
| Screw |
18 |
Fixation
|
| Nut |
8 |
Fixation
|
| Micro-USB cable |
1 |
Download program
|
| 47mm wheel+ motor fixing seat |
2 |
Car wheels
|
| N20DC speed-down motor |
2 |
Drive wheels
|
| 3.7V Li-ion battery |
1 |
Power supply
|
Principle of the Experiment
- There are various kinds of Robot cars, such as robot car of tracking, barrier, Bluetooth control, which with different functions and need to adopt different sensors.
- However, all those Robot cars are basically controlled in the same way, that is, moving in four directions.
- Here we adopt two-wheel drive structure. By control the rotation of two wheels, we can achieve moving forward and backward, or spinning. Of course, it needs auxiliary wheel to keep balance.
- This car has a simple structure, including wheels, body and control system.
- 1)The wheels adopt two speed-down motors with large torque, which can have PWM speed adjustment to make sure easy control.
- 2)The body of the car adopts wood with a size of 8cm*8cm*8cm.
- 3)The whole control system contains four parts:
- CPU
- Adopt Microduino-Core as the core. Just like the CPU of a computer, it can analyze and process complicated things.
- Wireless commmunciation
- Adopt Microduino-Module nRF wireless communication scheme with fast communication response and the control range of about 50m in the open area.
- Or adopt Microduino-Module BLE wireless communication scheme, which can work with phone APP to directly control. The control range is about 20m in the open area.
- Motor control
- Power supply system
- Adopt a built-in sing-cell Li-ion battery management unit on the Microduino-Shield Robot to manage charging and discharging function.
Program Download
Programming
- Stack Microduino-Core and Microduino-USBTTL together, then use the USB cable to connect the USBTTL module for program uploading.
- Note: Please upload programs before stacking all modules together.
- Open Arduino IDE for Microduino development environment. (For the buildup, please refer to: AVR Core:Getting started )
- Make sure the right board(Microduino-Core Atmega328P@16M,5V) and the relevant port number(COMX)
- Open the " Robot_Microduino.ino " program in the downloaded projects.
- Click "→" and upload the program to the development board.
Installation
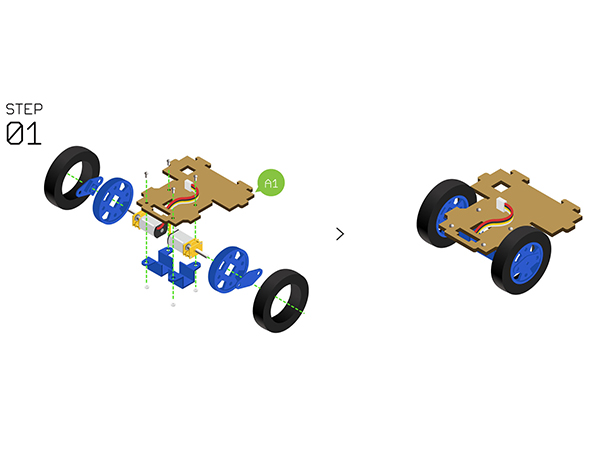
- Step1:Firstly, assemble the wheels and motors with the frame and screws, them fixate them on A1.
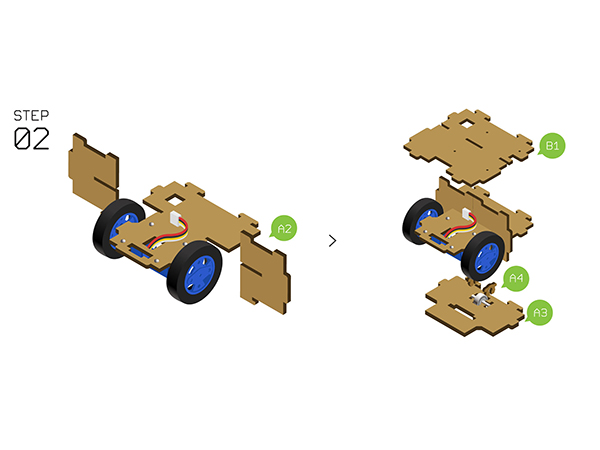
- Step2:Insert A2 into the slot of A1, connect B1 on the top of A1, connect A3 on the bottom of A1, then use A4 to fixate.
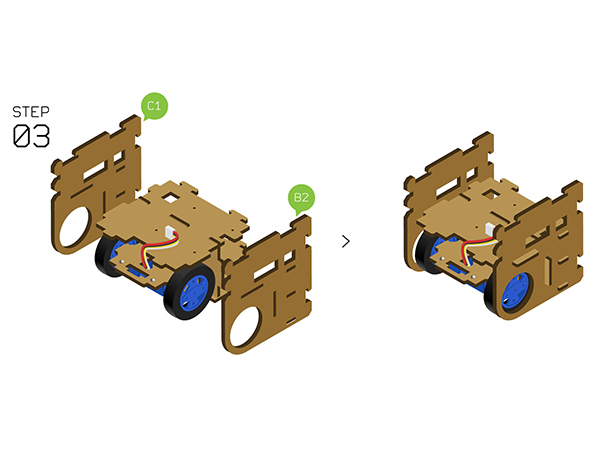
- Step3:Connect B2 and C1 on the two sides of B1 respectively.
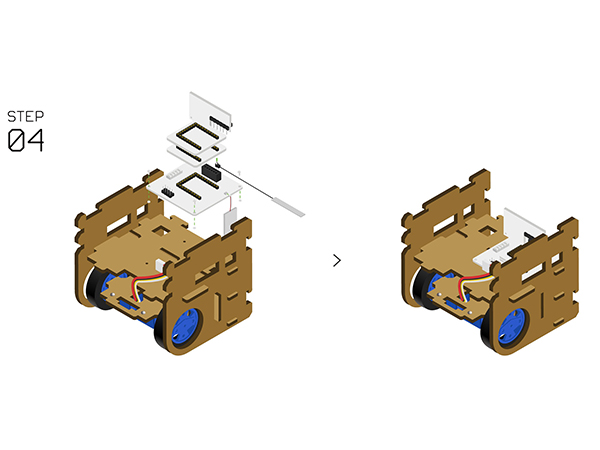
- Step4:Connect the nRF antenna, stack the nRF with the Core module, then connect them with the battery on the Robot base board; Use the screws to fixate the base board on B1.
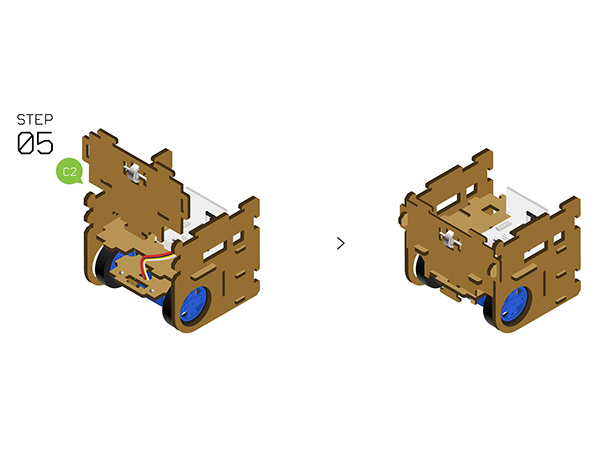
- Step5:Fixate C2 on the corresponding position of A1.
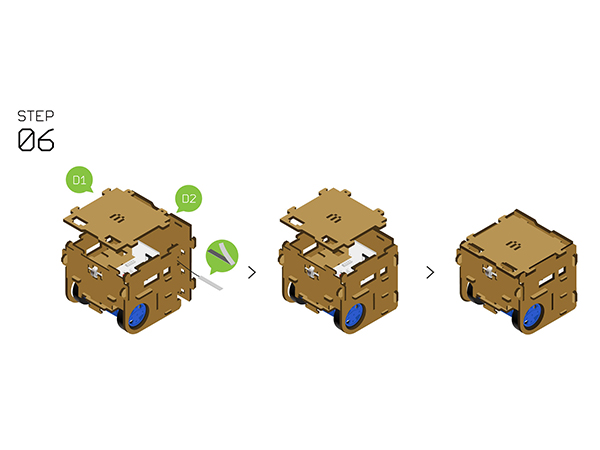
- Step6:Connect D1 into the top position where the interface of B2 and C1 lies, then connect D2 into the slot where the front of B2 and C1 lies. After the installation, you can tear off the antenna and stick it to the right position you like on the car.
Instructions of the Remote Control
- If stacking the nRF module and start, the system will enter the Joypad control mode by default, otherwise, it'll enter the Bluetooth mode.
Guide for Joypad Contro.l
- For the installation, you can refer to the following page: [1]
Guide for Bluetooth Control
Code Description
#define NRF_CHANNEL 70 //nRF channel #define CHANNEL_THROTTLE 2 //Throttle channel
#define CHANNEL_STEERING 1 //Steering channel - The following codes can revise the speed ratio of the two wheels.
- The range is between -1 and 1.
- Set as -1, the maximum speed ratio, clockwise.
- Set as 1, the maximum speed ratio, anti-clockwise.
- If the car cannot go straightly, you should reduce the speed ratio of the lower wheel.
#define motor_fixL 1  //Speed correction (-1 to 1)
#define motor_fixR 1  // Speed correction (-1 to 1)
Video
|
