Microduino-Quadcopter Tutorial
| Language: | English • 中文 |
|---|
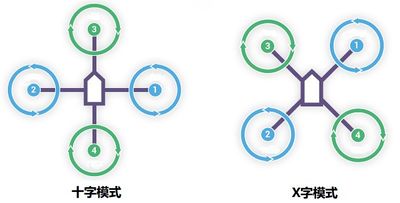
Contents[hide]OutlineQuadcopter is a kind of aircraft that is equipped with four propellers. Similar to the helicopter, it can finish the action of hover and flight. A traditional helicopter uses a main rotor to generate thrust and a tail rotor to offset the torque from the main rotor, namely, locking the tail. While the quadcopter adopts positive and negative propeller design and therefore, needs no extra structure to lock the tail. For propellers distribute symmetrically in the shape of a cross. The No. 1 and No. 2 propellers rotate anticlockwise while the No.3 and No.4 rotate clockwise. When the four propellers generate the same thrust, the anti-torque imposed on the body by the two groups offset, balancing in the vertical direction and making sure flight stability. | |||||||||||||||||||||||||||||||||||||||||||||
| According to the user-defined fore and aft direction of the aircraft, the quadcopter can be divided into the cross mode and X mode. The cross mode means that the fore and aft direction points to a certain propeller and the X mode refers to that the fore and aft direction points to the middle of two propellers. | |||||||||||||||||||||||||||||||||||||||||||||
For most aircraft adopting X mode, the X mode is harder to control but more flexible.
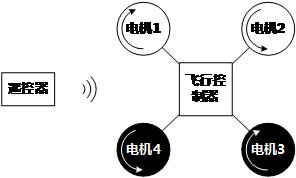
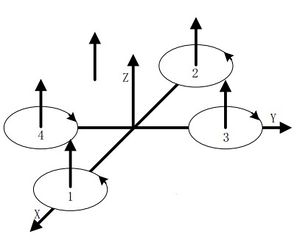
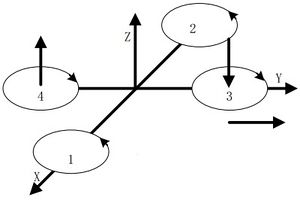
PrincipleSystem StructureAs the picture shows, the quadopcter consists of a remote controller, a flight controller and four motors. And for the flight controller includes a microcontrller, a remote control signal reciing module, a sensor(A gyroscope, an accelerator, an electronic compass and a GPS module.) and a motor driving module. Flying PrincipleVertical MotionVertical motion includes rising or falling vertically. As the text mentioned previously, the quadcopter can keep balance horizontally by four motors maintaining the same rotation rate. As you can see from picture 2.2.1, if the four motors increase to the same speed, the generated thrust will be large enough to overcome the quadcopter weight and rise, and vice versa. Under the condition of no surrounding interruption, the four motors can generate enough thrust to overcome the weight and therefore, the quadcopter can suspend in the air. | |||||||||||||||||||||||||||||||||||||||||||||
| The quadcopter can fly steadily in the vertical direction as long as the four motors maintain the same speed.
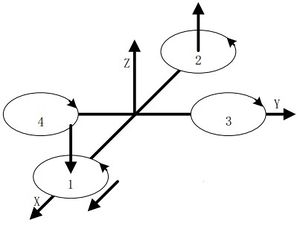
Front & Lateral MotionThe motor 1 is the head of the aircraft and the motor 2 is the rear.
Yawing MotionThe three kinds of motion mentioned above all happen in the directions of the three axes. Next, we'll introduce the motion around the three axes. | |||||||||||||||||||||||||||||||||||||||||||||
| Yawing motion is the rotation in the horizontal direction, nanely rotation around the Z-axis.
During the rotation, it will form an anti-torque opposite to the rotation due to air resistance. Yawing rotation is realized by using the reverse torque. When the aircraft suspends, the speed of the four motors is the same, which can offset torque in both horizontal and vertical direction, and achieve balance. When the speed of the four motors is different, unbalanced anti-torque will cause horizontal rotation and the aircraft will deviate from the route. As the picture shows, by increasing the speed of the motor 1 and 2, and decreasing that of the motor 3 and 4, the clockwise anti-torque generated by the motor 1 and 2 will be larger than the counter clockwise anti-torque generated by the motor 3 and 4, causing clockwise rotation of the aircraft horizontally and generating no vertical displacement when there is no change in the thrust upside. Pitch and Roll MotionPitch motion refers to the rotation in the Y-axis direction while the roll motion refers to the rotation in the X-axis direction. | |||||||||||||||||||||||||||||||||||||||||||||
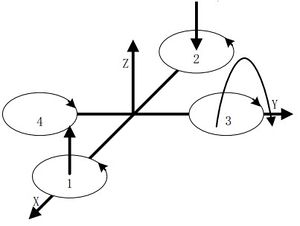
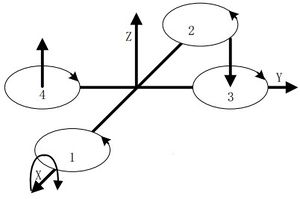
| As the picture shows, by increasing the speed of the motor 1 and decreasing that of the motor 2, and keeping the same of the variable quantity as well as the speed of the motor 3 and 4: The thrust of the head is larger than that of the rear. The unbalanced torque makes the body rise. Similarly, the roll motion is realized by reducing the speed of the motor 1 and increasing that of the motor 2, generating a torque forward. | |||||||||||||||||||||||||||||||||||||||||||||
The principle of the roll and pitch motion is the same due to symmetry in the middle. By keeping the speed of the motor 1 and 2 unchanged, and changing the speed of motor 3 and 4, it'll generate unbalanced torque and make the aircraft rotate around the X-axis direction.
Control ProcedureThe remote controller sends out control command, such as take-off or flying left. The control signal is received wirelessly.
| |||||||||||||||||||||||||||||||||||||||||||||
| Since the four-motor combination control can only reach to six directions, which is an under actuated system. So here we must have a flight controller to control the whole system. | |||||||||||||||||||||||||||||||||||||||||||||
| In the flight controllers, sensors such as gyroscope and accelerator are dispensable. Micro controller can calculate data from the two sensors, get the current aircraft's attitude and then adjust the rotation rate with algorithms such PID to keep the stability. Sure you can add an electronic compass to get the direction or a GPS module to get the geographic location. Simply speaking, the quadcopter is system with two closed-loops to control---the large loop gets input volume from the remote receiving device and the small loop aquires input volume from the attitude sensor. | |||||||||||||||||||||||||||||||||||||||||||||
| Generally speaking, the quadcopter kit includes an aircraft and a remote controller, the two of which controls instructions through the CoreRF transmission. | |||||||||||||||||||||||||||||||||||||||||||||
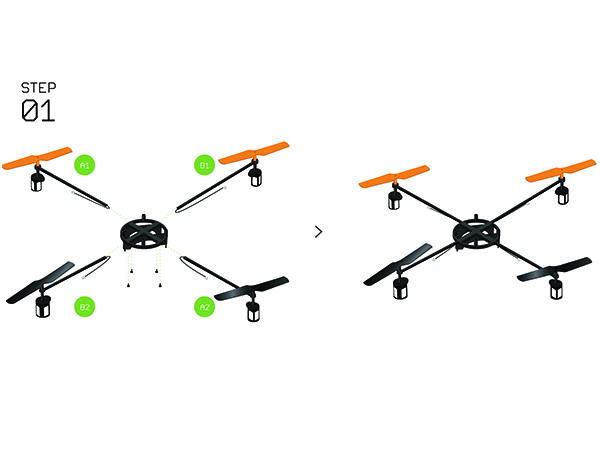
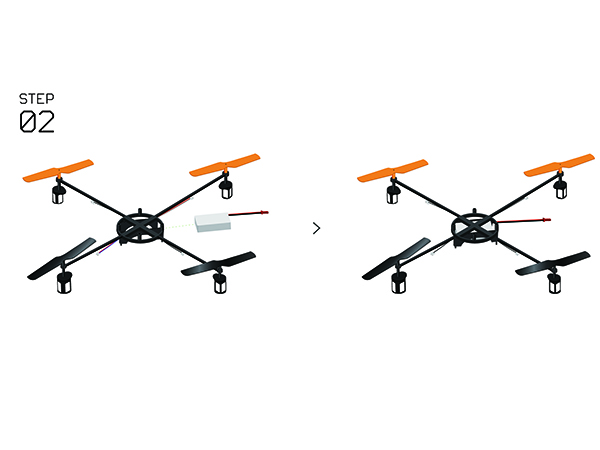
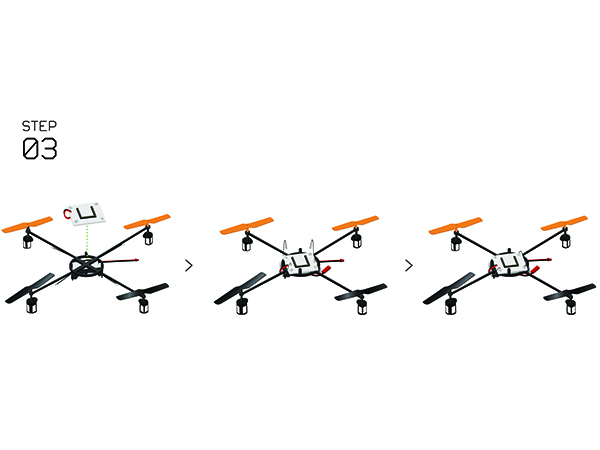
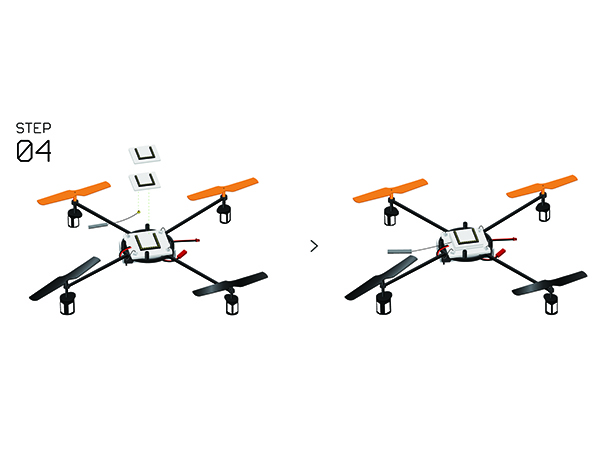
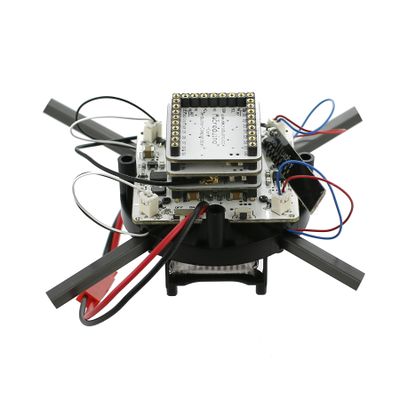
| The quadcopter is composed of a frame, Microduino-CoreRF , Microduino-Motion and other modules. For Microduino-motion, it integrates a three-axis gyroscope + a three-axis accelerator(MPU6040), a magnetic field intensity sensor(HMC5883L) and a digital pressure sensor(BMP180), and have communication through IIC. | |||||||||||||||||||||||||||||||||||||||||||||
MPU6050 is the most important attitude sensor with a three-axis accelerator and a three-axis gyroscope integrated inside, which not only offsets adjustment errors for the combination of a three-axis accelerator and a three-axis gyroscope, and also has a built-in low pass filter.
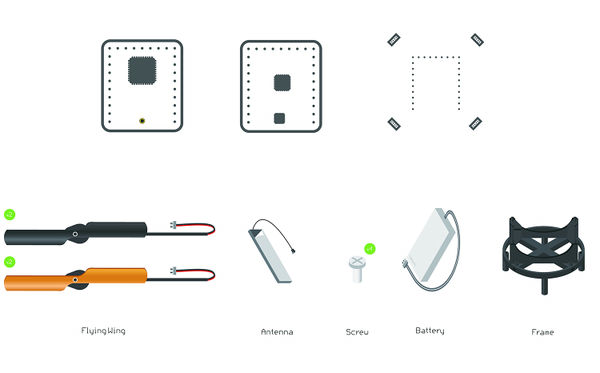
Buildup and DebuggingBill of Materials
Program Download Debugging
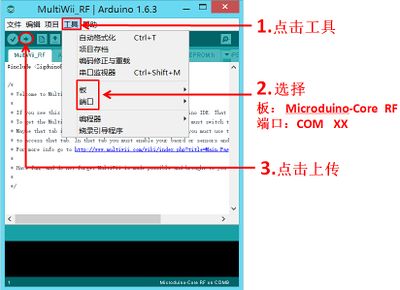
*Open Arduino IDE, click【File】->【File】, open the program 【MultiWii_RF】 of MultiWii_CoreRF and select Microduino-CoreRF from the Board under Tools.
The Microduino-USBTTL download module can only be used in program download, serial debugging and calibration of the Quadcopter, which needn't be stacked at other times. Quadcopter AdjustmentPreperation
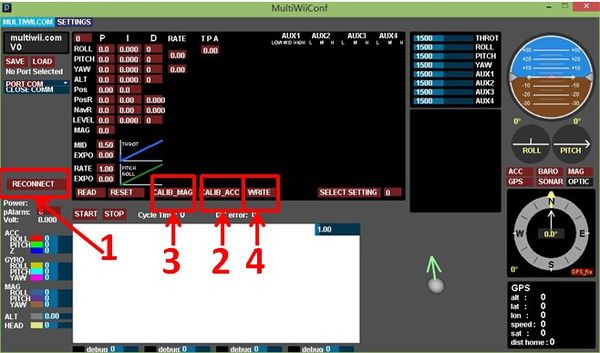
Note: The file needs to be opened under JAVA development environment or adopt Microduino_Joypad_QuadCopter\java to install. Sensor Calibration
PID Parameter SettingClick LOAD to load setting files and select pku.mwi to input, as shown below: Flying Mode Setting | |||||||||||||||||||||||||||||||||||||||||||||
|
| |||||||||||||||||||||||||||||||||||||||||||||
| The setting method is to click the left mouse button in the square. The gray square will become white, such as the figure below by clicking three white squares (this should be gray). | |||||||||||||||||||||||||||||||||||||||||||||
| This specifies the corresponding flight mode in such a switch position. ANGLE is a steady mode, which helps us to fly the Quadcopter. You can click WRITE to set up the numerical control writing.
Close the MultiWiiConf serial port after setting up the flight mode, you can take down the Microduino-USBTTL module, completing the assembly and debugging of the whole flight controller. Troubleshooting with Sensor ValuesThis method can help to eliminate the problem of aircraft in direction. It can be used to display the correct direction of the control board installation or if there is no proper control board type in "config.h".
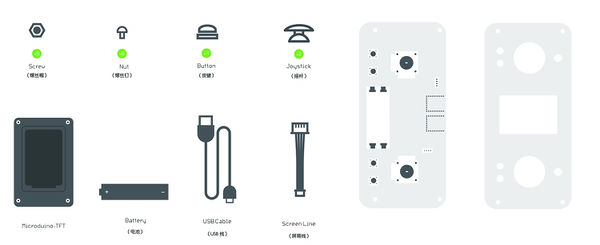
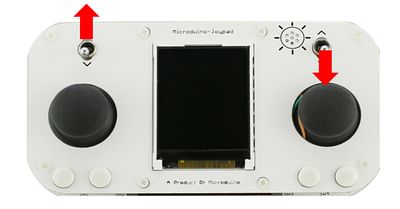
Remote Controller(Microduino-Joypad)Buildup & DebuggingAs it mentioned previously, the remote controller is composed of the control board (Microduino-Joypad), the microcontroller (Microduino-CoreRF), thedisplay module (Microduino-TFT) as well as download and debugging module (Microduino-USBTTL).
Joypad Buildup &DebuggingJoypad Buildup
| |||||||||||||||||||||||||||||||||||||||||||||
| You can also not use the battery. The power supply can also be achieved through a USB cable.
Joypad Buildup Debugging
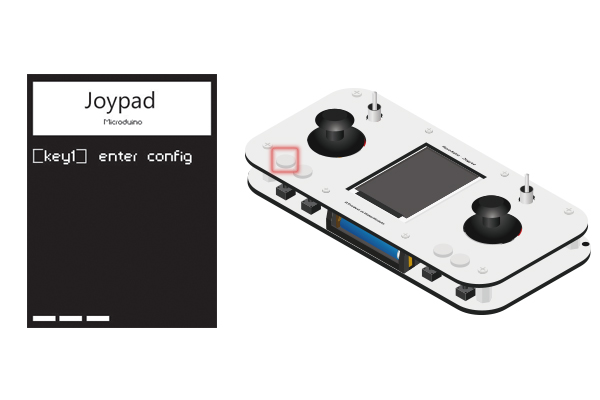
Press the Key 1 in 4s after opening the Joypad and enter (Config) mode.
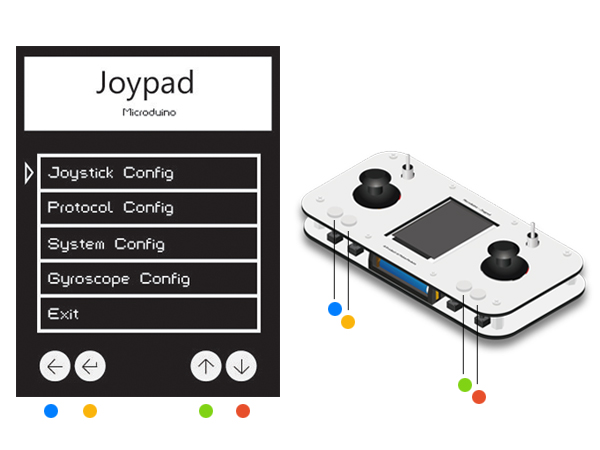
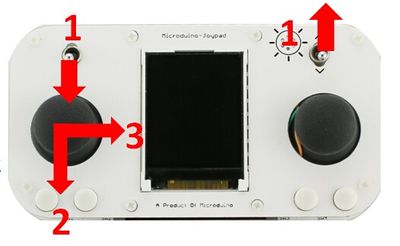
Key1 to Key 4 from the left to the right as shown below: Note: Make sure setting before entering the OS interface.
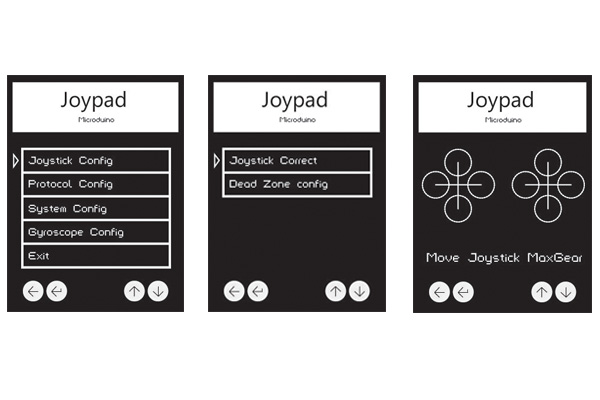
Press Key3 and Key4 to move the cursor. The Key 1 refers to "Return" and the Key 2 refers to "Confirm". Select the first item Joystick Config to enter the setting mode and the Joystick Correct to enter the calibration mode. After that, you'll see interface shown in the third picture. At this time, you can swing the rocker to the upmost and watch the results.
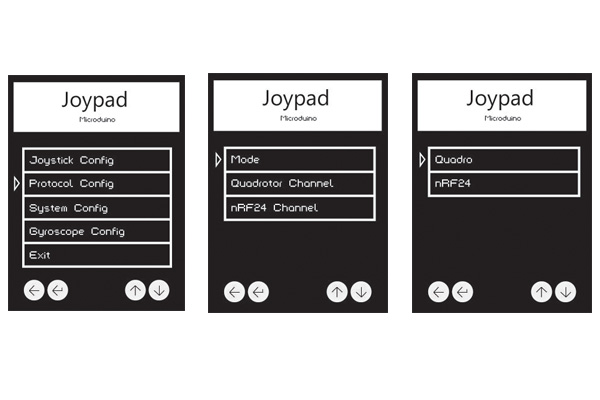
Press Key1 to return to the main interface and select Protocol Config to enter mode selection. Choose Mode and then Quadcopter mode, press Key 2 to confirm and return.
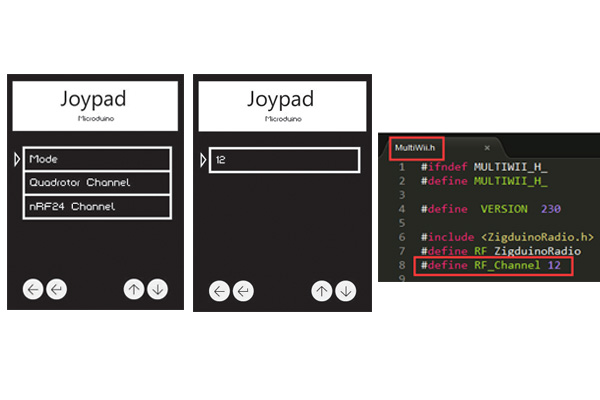
Return to the secondary menu, choose Quadcopter Channel and press Key 2 to confirm. Select 12, which corresponds to the setting of "#define RF_Channel 12" under MultiWii. At this point, the flight controller and remote control has been assembled and the next is to combine the two and begin to test flying. Not only to practice using the joystick, but also to observe the actual flight of the aircraft to further optimize the parameters of PID. Overall Debugging
Phone Bluetooth Control
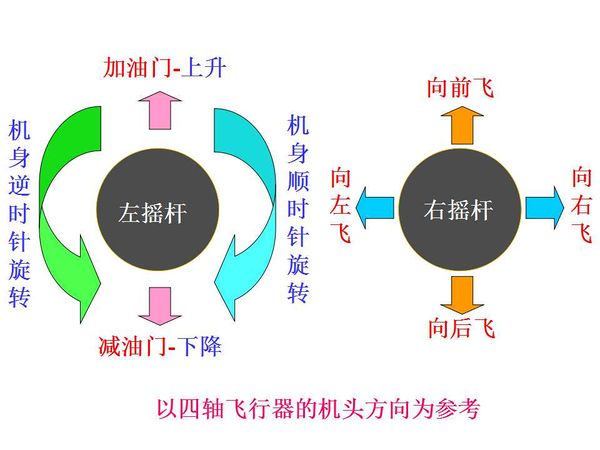
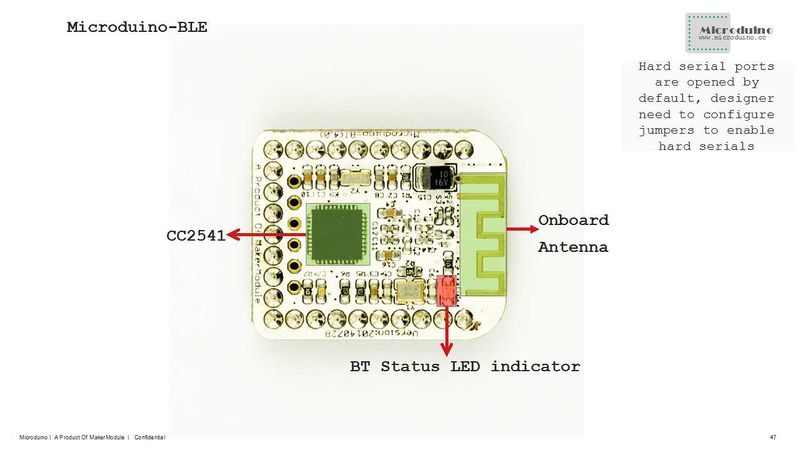
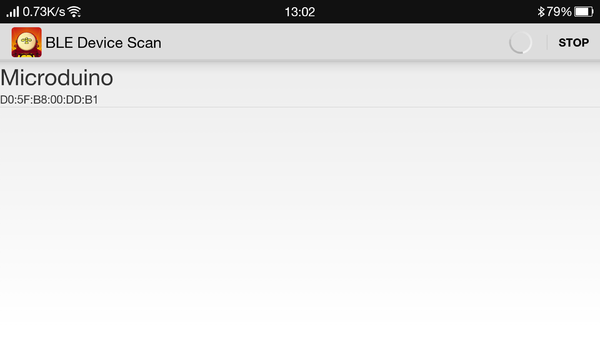
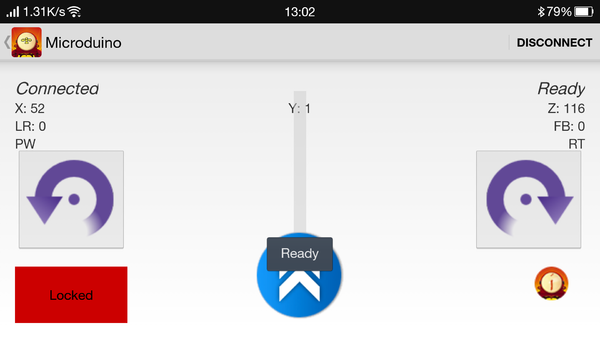
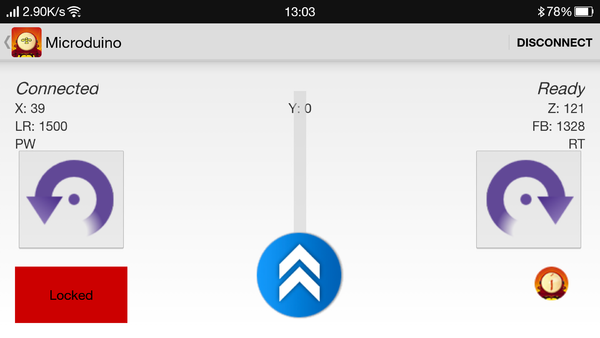
Connect the BT module onto the calibrated Quadcopter, then put them on a smooth place and wait for Bluetooth connection. Open the phone Bluetooth and the Quadcopter control APP, you'll see Microduino Bluetooth device. Click Microduino, connect the Bluetooth and enter the control interface. After the connection, it'll show "Ready" to remind you to unlock the Quadcopter. Unlock the Quadcopter: If the Bluetooth indicator on the bottom of the Quadcopter goes on, it means unlocked successfully. If you see "Unlocked" on the screen, please try to unlock again. After unlocking, the middle rod can push up to speed up and the Quadcopter can fly. Code & NotesProgram DescriptionJoypad Program & DescriptionJoypad_RC.ino #include "Arduino.h"
#include "def.h"
#include "time.h"
#include "bat.h"
#if defined(__AVR_ATmega1284P__) || defined(__AVR_ATmega644P__) || defined(__AVR_ATmega128RFA1__)
#include "mpu.h"
#endif
#include "joy.h"
#include "key.h"
#include "data.h"
#include "nrf.h"
#include "mwc.h"
#include "tft.h"
#include "eep.h"
#if defined(__AVR_ATmega128RFA1__)
#include <ZigduinoRadio.h>
#endif
//joypad================================
#include <Joypad.h>
//eeprom================================
#include <EEPROM.h>
//TFT===================================
#include <Adafruit_GFX.h> // Core graphics library
#include <Adafruit_ST7735.h> // Hardware-specific
#include <SPI.h>
//rf====================================
#include <RF24Network.h>
#include <RF24.h>
#if defined(__AVR_ATmega1284P__) || defined(__AVR_ATmega644P__) || defined(__AVR_ATmega128RFA1__)
//MPU===================================
#include "Wire.h"
#include "I2Cdev.h"
#include "MPU6050_6Axis_MotionApps20.h"
#endif
//spi===================================
#include <SPI.h>
void setup()
{
// initialize serial communication at 115200 bits per second:
#ifdef Serial_DEBUG
Serial.begin(115200);
delay(100);
Serial.println("========hello========");
#endif
//---------------
key_init();
//---------------
#ifdef Serial_DEBUG
Serial.println("\n\r EEPROM READ...");
#endif
eeprom_read();
//---------------
#ifdef Serial_DEBUG
Serial.println("\n\r TFT INIT...");
#endif
TFT_init(true, tft_rotation);
//---------------
#ifdef Serial_DEBUG
Serial.println("\n\r TFT BEGIN...");
#endif
TIME1 = millis();
while (millis() - TIME1 < interval_TIME1)
{
TFT_begin();
if (!Joypad.readButton(CH_SWITCH_1))
{
#ifdef Serial_DEBUG
Serial.println("\n\rCorrect IN...");
#endif
//---------------
#ifdef Serial_DEBUG
Serial.println("\n\r TFT INIT...");
#endif
TFT_init(false, tft_rotation);
while (1)
{
if (!TFT_config())
break;
}
#ifdef Serial_DEBUG
Serial.println("\n\rCorrect OUT...");
#endif
//---------------
#ifdef Serial_DEBUG
Serial.println("\n\r EEPROM WRITE...");
#endif
eeprom_write();
}
}
//---------------
#ifdef Serial_DEBUG
Serial.println("\n\r TFT CLEAR...");
#endif
TFT_clear();
//---------------
#ifdef Serial_DEBUG
Serial.println("\n\r TFT READY...");
#endif
TFT_ready();
//---------------.l
if (mode_protocol) //Robot
{
SPI.begin(); //Initialize SPI
radio.begin();
network.begin(/*channel*/ nrf_channal, /*node address*/ this_node);
}
else //QuadCopter
{
unsigned long _channel;
#if !defined(__AVR_ATmega128RFA1__)
switch (mwc_channal)
{
case 0:
_channel = 9600;
break;
case 1:
_channel = 19200;
break;
case 2:
_channel = 38400;
break;
case 3:
_channel = 57600;
break;
case 4:
_channel = 115200;
break;
}
#else if
_channel = mwc_channal;
#endif
mwc_port.begin(_channel);
}
//---------------
#ifdef Serial_DEBUG
Serial.println("===========start===========");
#endif
#if defined(__AVR_ATmega1284P__) || defined(__AVR_ATmega644P__) || defined(__AVR_ATmega128RFA1__)
if (mode_mpu) initMPU(); //initialize device
#endif
}
void loop()
{
// unsigned long time = millis();
#if defined(__AVR_ATmega1284P__) || defined(__AVR_ATmega644P__) || defined(__AVR_ATmega128RFA1__)
//MPU--------------------------------
if (mode_mpu)
getMPU();
#endif
//DATA_begin------------------------------
data_begin();
//DATA_send-------------------------------
if (millis() < time2) time2 = millis();
if (millis() - time2 > interval_time2)
{
if (mode_protocol) nrf_send(); //Robot
else data_send(); //QuadCopter
time2 = millis();
}
//Node checking -------------------------------
vodebug();
//BAT--------------------------------
if (time3 > millis()) time3 = millis();
if (millis() - time3 > interval_time3)
{
vobat();
time3 = millis();
}
//TFT------------------------------------
TFT_run();
//===================================
// time = millis() - time;
// Serial.println(time, DEC); //loop time
}
</cpp>
BAT.h
<source lang="cpp">
int8_t _V_bat = _V_min;
boolean mcu_voltage = true; // 5.0 or 3.3
#define _V_fix 0.2 //fix battery voltage
#define _V_math(Y) (_V_fix+((Y*analogRead(PIN_bat)/1023.0f)/(33.0f/(51.0f+33.0f))))
void vobat()
{
//_V_bat=10*((voltage*analogRead(PIN_bat)/1023.0f)/(33.0f/(51.0f+33.0f)));
_V_bat = _V_math(mcu_voltage ? 50 : 33);
_V_bat = constrain(_V_bat, _V_min, _V_max);
#ifdef Serial_DEBUG
Serial.print("_V_bat: ");
Serial.println(_V_bat);
#endif
}data.h #include "Arduino.h"
byte inBuf[16];
int16_t outBuf[8] =
{
Joy_MID, Joy_MID, Joy_MID, Joy_MID, Joy_MID, Joy_MID, Joy_MID, Joy_MID
};
boolean AUX[4] = {0, 0, 0, 0};
//======================================
void data_begin()
{
Joy();
if (mode_protocol) //Robot
{
if (!sw_l)
{
Joy_x = Joy_MID;
Joy_y = Joy_MID;
Joy1_x = Joy_MID;
Joy1_y = Joy_MID;
}
}
else //QuadCopter
{
if (!sw_l)
Joy_y = Joy_MID - Joy_maximum;
}
//but---------------------------------
for (uint8_t a = 0; a < 4; a++)
{
if (key_get(a, 1)) AUX[a] = !AUX[a];
}
outBuf[0] = Joy1_x;
outBuf[1] = Joy1_y;
outBuf[2] = Joy_x;
outBuf[3] = Joy_y;
outBuf[4] = map(AUX[0], 0, 1, Joy_MID - Joy_maximum, Joy_MID + Joy_maximum);
outBuf[5] = map(AUX[1], 0, 1, Joy_MID - Joy_maximum, Joy_MID + Joy_maximum);
outBuf[6] = map(AUX[2], 0, 1, Joy_MID - Joy_maximum, Joy_MID + Joy_maximum);
outBuf[7] = map(AUX[3], 0, 1, Joy_MID - Joy_maximum, Joy_MID + Joy_maximum);
}def.h #include "Arduino.h"
//DEBUG-----------
#define Serial_DEBUG
//MWC-------------
uint8_t mwc_channal = 11; //RF channel
#if defined(__AVR_ATmega32U4__)
#define mwc_port Serial1 //Serial1 is D0 D1
#elif defined(__AVR_ATmega128RFA1__)
#define mwc_port ZigduinoRadio //RF
#else
#define mwc_port Serial //Serial is D0 D1
#endif
//nRF-------------
#define interval_debug 2000 //Interval for node checking.
uint8_t nrf_channal = 70; //0~125
//Battery---------
#define PIN_bat A7 //BAT
#define _V_max 41 //Maximum voltage for the lithium battery: 4.2V
#define _V_min 36 //Minimum voltage for the lithium battery: 3.7V
#if defined(__AVR_ATmega1284P__) || defined(__AVR_ATmega644P__) || defined(__AVR_ATmega128RFA1__)
//MPU-------------
#define MPU_maximum 70
#endif
//Time------------
#define interval_TIME1 2000 //setup delay
#define interval_time2 40 //send interval
#define interval_time3 1000 //battery intervaleep.h #include "Arduino.h"
#include <EEPROM.h>
#define EEPROM_write(address, p) {int i = 0; byte *pp = (byte*)&(p);for(; i < sizeof(p); i++) EEPROM.write(address+i, pp[i]);}
#define EEPROM_read(address, p) {int i = 0; byte *pp = (byte*)&(p);for(; i < sizeof(p); i++) pp[i]=EEPROM.read(address+i);}
struct config_type
{
int16_t eeprom_correct_min[4];
int16_t eeprom_correct_max[4];
uint8_t eeprom_Joy_deadzone_val;
#if defined(__AVR_ATmega1284P__) || defined(__AVR_ATmega644P__) || defined(__AVR_ATmega128RFA1__)
boolean eeprom_mode_mpu;
#endif
boolean eeprom_mode_protocol;
uint8_t eeprom_mwc_channal;
uint8_t eeprom_nrf_channal;
boolean eeprom_tft_theme;
boolean eeprom_tft_rotation;
boolean eeprom_mcu_voltage;
};
//======================================
void eeprom_read()
{
//EEPROM reads the assigned values.
config_type config_readback;
EEPROM_read(0, config_readback);
for (uint8_t a = 0; a < 4; a++)
{
joy_correct_min[a] = config_readback.eeprom_correct_min[a];
joy_correct_max[a] = config_readback.eeprom_correct_max[a];
}
Joy_deadzone_val = config_readback.eeprom_Joy_deadzone_val;
mode_protocol = config_readback.eeprom_mode_protocol;
#if defined(__AVR_ATmega1284P__) || defined(__AVR_ATmega644P__) || defined(__AVR_ATmega128RFA1__)
mode_mpu = config_readback.eeprom_mode_mpu;
#endif
mwc_channal = config_readback.eeprom_mwc_channal;
nrf_channal = config_readback.eeprom_nrf_channal;
tft_theme = config_readback.eeprom_tft_theme;
tft_rotation = config_readback.eeprom_tft_rotation;
mcu_voltage = config_readback.eeprom_mcu_voltage;
}
void eeprom_write()
{
// Define structure variable "config" as well as the content of the variable.
config_type config;
for (uint8_t a = 0; a < 4; a++)
{
config.eeprom_correct_min[a] = joy_correct_min[a];
config.eeprom_correct_max[a] = joy_correct_max[a];
}
config.eeprom_Joy_deadzone_val = Joy_deadzone_val;
config.eeprom_mode_protocol = mode_protocol;
#if defined(__AVR_ATmega1284P__) || defined(__AVR_ATmega644P__) || defined(__AVR_ATmega128RFA1__)
config.eeprom_mode_mpu = mode_mpu;
#endif
config.eeprom_mwc_channal = mwc_channal;
config.eeprom_nrf_channal = nrf_channal;
config.eeprom_tft_theme = tft_theme;
config.eeprom_tft_rotation = tft_rotation;
config.eeprom_mcu_voltage = mcu_voltage;
// Save the variable "config" into EEPROM and write in address 0.
EEPROM_write(0, config);
}joy.h #include "Arduino.h"
#include <Joypad.h>
//Joy-------------
//1000~2000
uint8_t Joy_deadzone_val = 10;
#define Joy_s_maximum 200 //MAX 300
#define Joy_maximum 450 //MAX 500
#define Joy_MID 1500 //1500
boolean mode_mpu, mode_protocol; //{(0: 0 is mwc, 1 is nrf),(1: 0 is mpu, 1 is no mpu)}
int16_t joy_correct_max[4], joy_correct_min[4];
int16_t Joy_x, Joy_y, Joy1_x, Joy1_y;
int16_t s_lig, s_mic;
boolean Joy_sw, Joy1_sw;
boolean but1, but2, but3, but4;
boolean sw_l, sw_r;
//======================================
int16_t Joy_dead_zone(int16_t _Joy_vol)
{
if (abs(_Joy_vol) > Joy_deadzone_val)
return ((_Joy_vol > 0) ? (_Joy_vol - Joy_deadzone_val) : (_Joy_vol + Joy_deadzone_val));
else
return 0;
}
int16_t Joy_i(int16_t _Joy_i, boolean _Joy_b, int16_t _Joy_MIN, int16_t _Joy_MAX)
{
int16_t _Joy_a;
switch (_Joy_i)
{
case 0:
_Joy_a = Joy_dead_zone(Joypad.readJoystickX());
break;
case 1:
_Joy_a = Joypad.readJoystickY(); //throt
break;
case 2:
_Joy_a = Joy_dead_zone(Joypad.readJoystick1X());
break;
case 3:
_Joy_a = Joy_dead_zone(Joypad.readJoystick1Y());
break;
}
if (_Joy_b)
{
if (_Joy_a < 0)
_Joy_a = map(_Joy_a, joy_correct_min[_Joy_i], 0, _Joy_MAX, Joy_MID);
else
_Joy_a = map(_Joy_a, 0, joy_correct_max[_Joy_i], Joy_MID, _Joy_MIN);
if (_Joy_a < _Joy_MIN) _Joy_a = _Joy_MIN;
if (_Joy_a > _Joy_MAX) _Joy_a = _Joy_MAX;
}
return _Joy_a;
}
void Joy()
{
sw_l = Joypad.readButton(CH_SWITCH_L);
sw_r = Joypad.readButton(CH_SWITCH_R);
//------------------------------------
//s_lig=Joypad.readLightSensor();
//s_mic=Joypad.readMicrophone();
//------------------------------------
Joy_sw = Joypad.readButton(CH_JOYSTICK_SW);
Joy1_sw = Joypad.readButton(CH_JOYSTICK1_SW);
//------------------------------------
but1 = Joypad.readButton(CH_SWITCH_1);
but2 = Joypad.readButton(CH_SWITCH_2);
but3 = Joypad.readButton(CH_SWITCH_3);
but4 = Joypad.readButton(CH_SWITCH_4);
#if defined(__AVR_ATmega1284P__) || defined(__AVR_ATmega644P__) || defined(__AVR_ATmega128RFA1__)
//====================================
int16_t y[3]; //MPU---------------------------------
if (mode_mpu) //MPU---------------------------------
{
for (uint8_t a = 0; a < 3; a++)
{
y[a] = ypr[a] * 180 / M_PI;
if (y[a] > MPU_maximum) y[a] = MPU_maximum;
if (y[a] < -MPU_maximum) y[a] = -MPU_maximum;
}
}
#endif
if (Joypad.readButton(CH_SWITCH_R))
{
Joy_x = Joy_i(0, true, Joy_MID - Joy_maximum, Joy_MID + Joy_maximum);
Joy_y = Joy_i(1, true, Joy_MID - Joy_maximum, Joy_MID + Joy_maximum);
#if defined(__AVR_ATmega1284P__) || defined(__AVR_ATmega644P__) || defined(__AVR_ATmega128RFA1__)
if (mode_mpu) //MPU---------------------------------
{
Joy1_x = map(y[2], -MPU_maximum, MPU_maximum, Joy_MID - Joy_maximum, Joy_MID + Joy_maximum);
Joy1_y = map(y[1], -MPU_maximum, MPU_maximum, Joy_MID - Joy_maximum, Joy_MID + Joy_maximum);
}
else
#endif
{
Joy1_x = Joy_i(2, true, Joy_MID - Joy_maximum, Joy_MID + Joy_maximum);
Joy1_y = Joy_i(3, true, Joy_MID - Joy_maximum, Joy_MID + Joy_maximum);
}
}
else
{
Joy_x = Joy_i(0, true, Joy_MID - Joy_s_maximum, Joy_MID + Joy_s_maximum);
Joy_y = Joy_i(1, true, mode_protocol ? Joy_MID - Joy_s_maximum : Joy_MID - Joy_maximum,
mode_protocol ? Joy_MID + Joy_s_maximum : Joy_MID + Joy_maximum); // Robot,QuadCopter
#if defined(__AVR_ATmega1284P__) || defined(__AVR_ATmega644P__) || defined(__AVR_ATmega128RFA1__)
if (mode_mpu) //MPU---------------------------------
{
Joy1_x = map(y[2], -MPU_maximum, MPU_maximum, Joy_MID - Joy_s_maximum, Joy_MID + Joy_s_maximum);
Joy1_y = map(y[1], -MPU_maximum, MPU_maximum, Joy_MID - Joy_s_maximum, Joy_MID + Joy_s_maximum);
}
else
#endif
{
Joy1_x = Joy_i(2, true, Joy_MID - Joy_s_maximum, Joy_MID + Joy_s_maximum);
Joy1_y = Joy_i(3, true, Joy_MID - Joy_s_maximum, Joy_MID + Joy_s_maximum);
}
}
}key.h #include "arduino.h"
uint8_t key_pin[4] = {CH_SWITCH_1, CH_SWITCH_2, CH_SWITCH_3, CH_SWITCH_4}; //Key (1,2,3,4)
boolean key_status[4]; //Key
boolean key_cache[4]; //Detect the key releasing cache.
void key_init()
{
for (uint8_t a = 0; a < 4; a++)
{
key_status[a] = LOW;
key_cache[a] = HIGH;
}
}
boolean key_get(uint8_t _key_num, boolean _key_type)
{
key_cache[_key_num] = key_status[_key_num]; //Cache as a judge
key_status[_key_num] = !Joypad.readButton(key_pin[_key_num]); //When it is triggered
switch (_key_type)
{
case 0:
if (!key_status[_key_num] && key_cache[_key_num]) //After pressing down and releasing
return true;
else
return false;
break;
case 1:
if (key_status[_key_num] && !key_cache[_key_num]) // After pressing down and releasing
return true;
else
return false;
break;
}
}mpu.h #if defined(__AVR_ATmega1284P__) || defined(__AVR_ATmega644P__) || defined(__AVR_ATmega128RFA1__)
#include "Wire.h"
#include "I2Cdev.h"
#include "MPU6050_6Axis_MotionApps20.h"
MPU6050 mpu;
//MPU-------------
#define MPU_maximum 70
// MPU control/status vars
boolean dmpReady = false; // set true if DMP init was successful
uint8_t mpuIntStatus; // holds actual interrupt status byte from MPU
uint8_t devStatus; // return status after each device operation (0 = success, !0 = error)
uint16_t packetSize; // expected DMP packet size (default is 42 bytes)
uint16_t fifoCount; // count of all bytes currently in FIFO
uint8_t fifoCache[64]; // FIFO storage cache
// orientation/motion vars
Quaternion q; // [w, x, y, z] quaternion container
VectorInt16 aa; // [x, y, z] accel sensor measurements
VectorFloat gravity; // [x, y, z] gravity vector
float ypr[3]; // [yaw, pitch, roll] yaw/pitch/roll container and gravity vector
void initMPU()
{
Wire.begin();
#ifdef Serial_DEBUG
Serial.println(F("Initializing I2C devices..."));
#endif
mpu.initialize();
// verify connection
#ifdef Serial_DEBUG
Serial.println(F("Testing device connections..."));
#endif
if (mpu.testConnection())
{
#ifdef Serial_DEBUG
Serial.println("MPU6050 connection successful");
#endif
}
#ifdef Serial_DEBUG
else
Serial.println(F("MPU6050 connection failed"));
#endif
// load and configure the DMP
#ifdef Serial_DEBUG
Serial.println(F("Initializing DMP..."));
#endif
devStatus = mpu.dmpInitialize();
// make sure it worked (returns 0 if so)
if (devStatus == 0) {
// turn on the DMP, now that it's ready
#ifdef Serial_DEBUG
Serial.println(F("Enabling DMP..."));
#endif
mpu.setDMPEnabled(true);
mpuIntStatus = mpu.getIntStatus();
// set our DMP Ready flag so the main loop() function knows it's okay to use it
// Serial.println(F("DMP ready! Waiting for first interrupt..."));
dmpReady = true;
// get expected DMP packet size for later comparison
packetSize = mpu.dmpGetFIFOPacketSize();
}
else {
// ERROR!
// 1 = initial memory load failed
// 2 = DMP configuration updates failed
// (if it's going to break, usually the code will be 1)
#ifdef Serial_DEBUG
Serial.print(F("DMP Initialization failed (code "));
Serial.print(devStatus);
Serial.println(F(")"));
#endif
}
}
void getMPU()
{
if (!dmpReady) return;
{
// reset interrupt flag and get INT_STATUS byte
mpuIntStatus = mpu.getIntStatus();
// get current FIFO count
fifoCount = mpu.getFIFOCount();
// check for overflow (this should never happen unless our code is too inefficient)
if ((mpuIntStatus & 0x10) || fifoCount == 1024)
{
// reset so we can continue cleanly
mpu.resetFIFO();
#ifdef Serial_DEBUG
Serial.println(F("FIFO overflow!"));
#endif
// otherwise, check for DMP data ready interrupt (this should happen frequently)
}
else if (mpuIntStatus & 0x02)
{
// wait for correct available data length, should be a VERY short wait
while (fifoCount < packetSize) fifoCount = mpu.getFIFOCount();
// read a packet from FIFO
mpu.getFIFOBytes(fifoCache, packetSize);
// track FIFO count here in case there is > 1 packet available
// (this lets us immediately read more without waiting for an interrupt)
fifoCount -= packetSize;
// display ypr angles in degrees
mpu.dmpGetQuaternion(&q, fifoCache);
mpu.dmpGetGravity(&gravity, &q);
mpu.dmpGetYawPitchRoll(ypr, &q, &gravity);
//Serial.print("ypr\t");
//Serial.print(ypr[0] * 180/M_PI);
//Serial.print("\t");
//Serial.print(ypr[1] * 180/M_PI);
//Serial.print("\t");
// Serial.println(ypr[2] * 180/M_PI);
}
}
}
#endifmwc.h #include "Arduino.h"
#if defined(__AVR_ATmega128RFA1__)
#include <ZigduinoRadio.h>
#endif
int16_t RCin[8], RCoutA[8], RCoutB[8];
int16_t p;
uint16_t read16()
{
uint16_t r = (inBuf[p++] & 0xFF);
r += (inBuf[p++] & 0xFF) << 8;
return r;
}
uint16_t t, t1, t2;
uint16_t write16(boolean a)
{
if (a)
{
t1 = outBuf[p++] >> 8;
t2 = outBuf[p - 1] - (t1 << 8);
t = t1;
}
else
t = t2;
return t;
}
typedef unsigned char byte;
byte getChecksum(byte length, byte cmd, byte mydata[])
{
//Three parameters including data length, instruction code and the actual data array.
byte checksum = 0;
checksum ^= (length & 0xFF);
checksum ^= (cmd & 0xFF);
for (uint8_t i = 0; i < length; i++)
{
checksum ^= (mydata[i] & 0xFF);
}
return checksum;
}
void data_rx()
{
// s_struct_w((int*)&inBuf,16);
p = 0;
for (uint8_t i = 0; i < 8; i++)
{
RCin[i] = read16();
/*
Serial.print("RC[");
Serial.print(i+1);
Serial.print("]:");
Serial.print(inBuf[2*i],DEC);
Serial.print(",");
Serial.print(inBuf[2*i+1],DEC);
Serial.print("---");
Serial.println(RCin[i]);
*/
// delay(50); // delay in between reads for stability
}
}
void data_tx()
{
p = 0;
for (uint8_t i = 0; i < 8; i++)
{
RCoutA[i] = write16(1);
RCoutB[i] = write16(0);
/*
Serial.print("RC[");
Serial.print(i+1);
Serial.print("]:");
Serial.print(RCout[i]);
Serial.print("---");
Serial.print(RCoutA[i],DEC);
Serial.print(",");
Serial.print(RCoutB[i],DEC);
Serial.println("");
*/
// delay(50); // delay in between reads for stability
}
}
/*
if Core RF
[head,2byte,0xAA 0xBB] [type,1byte,0xCC] [data,16byte] [body,1byte(from getChecksum())]
Example:
AA BB CC 1A 01 1A 01 1A 01 2A 01 3A 01 4A 01 5A 01 6A 01 0D **
*/
void data_send()
{
data_tx();
#if !defined(__AVR_ATmega128RFA1__)
static byte buf_head[3];
buf_head[0] = 0x24;
buf_head[1] = 0x4D;
buf_head[2] = 0x3C;
#endif
#define buf_length 0x10 //16
#define buf_code 0xC8 //200
static byte buf_data[buf_length];
for (uint8_t a = 0; a < (buf_length / 2); a++)
{
buf_data[2 * a] = RCoutB[a];
buf_data[2 * a + 1] = RCoutA[a];
}
static byte buf_body;
buf_body = getChecksum(buf_length, buf_code, buf_data);
//----------------------
#if defined(__AVR_ATmega128RFA1__)
mwc_port.beginTransmission();
mwc_port.write(0xaa);
mwc_port.write(0xbb);
mwc_port.write(0xcc);
#else
for (uint8_t a = 0; a < 3; a++) {
mwc_port.write(buf_head[a]);
}
mwc_port.write(buf_length);
mwc_port.write(buf_code);
#endif
for (uint8_t a = 0; a < buf_length; a++) {
mwc_port.write(buf_data[a]);
}
mwc_port.write(buf_body);
#if defined(__AVR_ATmega128RFA1__)
mwc_port.endTransmission();
#endif
}nrf.h #include "Arduino.h"
#include <RF24Network.h>
#include <RF24.h>
#include <SPI.h>
// nRF24L01(+) radio attached using Getting Started board
RF24 radio(9, 10); //ce,cs
RF24Network network(radio);
#define this_node 0 //Set ID for the machine.
#define other_node 1
//--------------------------------
struct send_a //Send
{
uint32_t ms;
uint16_t rf_CH0;
uint16_t rf_CH1;
uint16_t rf_CH2;
uint16_t rf_CH3;
uint16_t rf_CH4;
uint16_t rf_CH5;
uint16_t rf_CH6;
uint16_t rf_CH7;
};
struct receive_a //Receive
{
uint32_t node_ms;
};
//--------------------------------
unsigned long node_clock, node_clock_debug, node_clock_cache = 0; // Node running time, node response checking time and node time cache.
//debug--------------------------
boolean node_clock_error = false; //Node response status
unsigned long time_debug = 0; //Timer
//======================================
void vodebug()
{
if (millis() - time_debug > interval_debug)
{
node_clock_error = boolean(node_clock == node_clock_debug); //Within a certain, if you find the running time of the node returning unchanged, then it has problem.
node_clock_debug = node_clock;
time_debug = millis();
}
}
void nrf_send()
{
#ifdef Serial_DEBUG
Serial.print("Sending...");
#endif
send_a sen = {
millis(), outBuf[0], outBuf[1], outBuf[2], outBuf[3], outBuf[4], outBuf[5], outBuf[6], outBuf[7]
}; //Send out the data, corresponding to the previous array.
RF24NetworkHeader header(other_node);
if (network.write(header, &sen, sizeof(sen)))
{
#ifdef Serial_DEBUG
Serial.print("Is ok.");
#endif
delay(50);
network.update();
// If it's time to send a message, send it!
while ( network.available() )
{
// If so, grab it and print it out
RF24NetworkHeader header;
receive_a rec;
network.read(header, &rec, sizeof(rec));
node_clock = rec.node_ms; //Assign values for the running time.
}
}
#ifdef Serial_DEBUG
else
Serial.print("Is failed.");
Serial.println("");
#endif
}tft.h #include "Arduino.h"
#include <Adafruit_GFX.h> // Core graphics library
#include <Adafruit_ST7735.h> // Hardware-specific library
#include <SPI.h>
Adafruit_ST7735 tft = Adafruit_ST7735(5, 4, -1); //cs,dc,rst
//-------Set front(Large, medium, small)
#define setFont_M tft.setTextSize(2)
#define setFont_S tft.setTextSize(0)
#define tft_width 128
#define tft_height 160
boolean tft_theme = false; //0 is white,1 is black
boolean tft_rotation = 1;
#define TFT_TOP ST7735_BLACK
#define TFT_BUT ST7735_WHITE
uint16_t tft_colorA = TFT_BUT;
uint16_t tft_colorB = TFT_TOP;
uint16_t tft_colorC = 0x06FF;
uint16_t tft_colorD = 0xEABF;
#define tft_bat_x 24
#define tft_bat_y 12
#define tft_bat_x_s 2
#define tft_bat_y_s 6
#define tft_font_s_height 8
#define tft_font_m_height 16
#define tft_font_l_height 24
#define _Q_x 33
#define _Q_y 36
#define _W_x 93
#define _W_y 5
#define _Q_font_x 2
#define _Q_font_y (_Q_y - 1)
int8_t tft_cache = 1;
//======================================
void TFT_clear()
{
tft.fillScreen(tft_colorB);
}
void TFT_init(boolean _init, boolean _rot)
{
tft_colorB = tft_theme ? TFT_TOP : TFT_BUT;
tft_colorA = tft_theme ? TFT_BUT : TFT_TOP;
if (_init) {
tft.initR(INITR_BLACKTAB); // initialize a ST7735S chip, black tab
// Serial.println("init");
tft.fillScreen(tft_colorB);
if (_rot)
tft.setRotation(2);
}
tft.fillRect(0, 0, tft_width, 40, tft_colorA);
tft.setTextColor(tft_colorB);
setFont_M;
tft.setCursor(26, 6);
tft.print("Joypad");
setFont_S;
tft.setCursor(32, 24);
tft.print("Microduino");
tft.fillRect(0, 40, tft_width, 120, tft_colorB);
}
void TFT_begin()
{
setFont_S;
tft.setTextColor(tft_colorA);
tft.setCursor(_Q_font_x, 44);
tft.println("[key1] enter config");
setFont_M;
tft.setCursor(4, 150);
for (uint8_t a = 0; a < (millis() - TIME1) / (interval_TIME1 / 10); a++) {
tft.print("-");
}
}
int8_t menu_num_A = 0;
int8_t menu_num_B = 0;
int8_t menu_sta = 0;
#if defined(__AVR_ATmega1284P__) || defined(__AVR_ATmega644P__) || defined(__AVR_ATmega128RFA1__)
char *menu_str_a[5] = {
"Joystick Config", "Protocol Config", "System Config", "Gyroscope Config", "Exit"
};
#else
char *menu_str_a[4] = {
"Joystick Config", "Protocol Config", "System Config", "Exit"
};
#endif
#if defined(__AVR_ATmega1284P__) || defined(__AVR_ATmega644P__) || defined(__AVR_ATmega128RFA1__)
char *menu_str_b[4][3] = {
{"Joystick Correct.", "Dead Zone config"},
{"Mode", "Quadrotor Channel", "nRF24 Channel"},
{"TFT Theme", "TFT Rotation", "MCU Voltage"},
{"Gyroscope OFF", "Gyroscope ON"}
};
#else
char *menu_str_b[3][3] = {
{"Joystick Correct.", "Dead Zone config"},
{"Mode", "Quadrotor Channel", "nRF24 Channel"},
{"TFT Theme", "TFT Rotation", "MCU Voltage"},
};
#endif
void TFT_menu(int8_t _num, char *_data)
{
tft.drawRect(7, 49 + 15 * _num, 114, 16, tft_colorA);
tft.setCursor(10, 54 + 15 * _num);
tft.print(_data);
}
void TFT_menu(int8_t _num, int16_t _data)
{
tft.drawRect(7, 49 + 15 * _num, 114, 16, tft_colorA);
tft.setCursor(10, 54 + 15 * _num);
tft.print(_data);
}
void TFT_cursor(int8_t _num)
{
tft.drawLine(1, 51 + 15 * _num, 4, 56 + 15 * _num, tft_colorA);
tft.drawLine(4, 57 + 15 * _num, 1, 62 + 15 * _num, tft_colorA);
tft.drawLine(1, 51 + 15 * _num, 1, 62 + 15 * _num, tft_colorA);
}
boolean return_menu = false;
boolean TFT_config()
{
tft.setTextColor( tft_colorA);
if (key_get(0, 1)) {
menu_sta --;
tft_cache = 1;
if (menu_sta <= 0)
menu_num_B = 0; //zero
}
if (key_get(1, 1)) {
if (return_menu)
menu_sta --;
else
menu_sta ++;
tft_cache = 1;
}
if (menu_sta > 2)
menu_sta = 2;
if (menu_sta < 0)
menu_sta = 0;
return_menu = false;
//-------------------------------
if (tft_cache)
tft.fillRect(0, 40, tft_width, 100, tft_colorB);
if (menu_sta == 2) {
switch (menu_num_A) {
case 0: {
switch (menu_num_B) {
case 0: {
if (tft_cache)
{
for (uint8_t a = 0; a < 4; a++)
{
joy_correct_min[a] = 0;
joy_correct_max[a] = 0;
}
}
for (uint8_t a = 0; a < 4; a++) {
tft.setCursor(2, 120);
tft.print("Move Joystick MaxGear");
int16_t _c = Joy_i(a, false, Joy_MID - Joy_maximum, Joy_MID + Joy_maximum);
if (_c > joy_correct_max[a]) {
tft.fillRect(0, 40, tft_width, 100, tft_colorB);
joy_correct_max[a] = _c;
}
// joy_correct_max[a] = constrain(joy_correct_max[a], 0, Joy_maximum);
if (_c < joy_correct_min[a]) {
tft.fillRect(0, 40, tft_width, 100, tft_colorB);
joy_correct_min[a] = _c;
}
// joy_correct_min[a] = constrain(joy_correct_min[a], -Joy_maximum, 0);
}
for (uint8_t d = 0; d < 2; d++) {
tft.drawFastHLine(12 + 70 * d, 80, 33, tft_colorA);
tft.drawFastVLine(28 + 70 * d, 64, 33, tft_colorA);
// tft.fillRect(2, 90-4, 20, 12, tft_colorB);
tft.drawCircle(44 + 70 * d, 80, map(joy_correct_min[0 + 2 * d], 0, -512, 1, 10), tft_colorA);
tft.drawCircle(12 + 70 * d, 80, map(joy_correct_max[0 + 2 * d], 0, 512, 1, 10), tft_colorA);
tft.drawCircle(28 + 70 * d, 64, map(joy_correct_min[1 + 2 * d], 0, -512, 1, 10), tft_colorA);
tft.drawCircle(28 + 70 * d, 96, map(joy_correct_max[1 + 2 * d], 0, 512, 1, 10), tft_colorA);
}
return_menu = true;
}
break;
case 1: {
if (key_get(2, 1)) {
Joy_deadzone_val--;
tft.fillRect(0, 40, tft_width, 100, tft_colorB);
}
if (key_get(3, 1)) {
Joy_deadzone_val++;
tft.fillRect(0, 40, tft_width, 100, tft_colorB);
}
Joy_deadzone_val = constrain(Joy_deadzone_val, 0, 25);
TFT_menu(0, Joy_deadzone_val);
TFT_cursor(0);
return_menu = true;
}
break;
}
}
break;
case 1: {
switch (menu_num_B) {
case 0: {
char *menu_str_c[2] = { "Quadro.", "nRF24"};
if (key_get(2, 1) || key_get(3, 1)) {
mode_protocol = !mode_protocol;
tft.fillRect(0, 40, tft_width, 100, tft_colorB);
}
for (uint8_t c = 0; c < 2; c++) {
TFT_menu(c, menu_str_c[c]);
}
TFT_cursor(mode_protocol);
return_menu = true;
}
break;
case 1: {
#if !defined(__AVR_ATmega128RFA1__)
char *menu_str_c[5] = {"9600", "19200", "38400", "57600", "115200"};
#endif
if (key_get(2, 1)) {
mwc_channal--;
tft.fillRect(0, 40, tft_width, 100, tft_colorB);
}
if (key_get(3, 1)) {
mwc_channal++;
tft.fillRect(0, 40, tft_width, 100, tft_colorB);
}
#if !defined(__AVR_ATmega128RFA1__)
mwc_channal = constrain(mwc_channal, 0, 4);
TFT_menu(0, menu_str_c[mwc_channal]);
#else
mwc_channal = constrain(mwc_channal, 11, 26);
TFT_menu(0, mwc_channal);
#endif
TFT_cursor(0);
return_menu = true;
}
break;
case 2: {
if (key_get(2, 1)) {
nrf_channal--;
tft.fillRect(0, 40, tft_width, 100, tft_colorB);
}
if (key_get(3, 1)) {
nrf_channal++;
tft.fillRect(0, 40, tft_width, 100, tft_colorB);
}
nrf_channal = constrain(nrf_channal, 0, 125);
TFT_menu(0, nrf_channal);
TFT_cursor(0);
return_menu = true;
}
break;
}
}
break;
case 2: {
switch (menu_num_B) {
case 0: {
tft_theme = !tft_theme;
TFT_init(true, tft_rotation);
tft_cache = 1;
tft.setTextColor(tft_colorA);
menu_sta --;
}
break;
case 1: {
tft_rotation = !tft_rotation;
TFT_init(true, tft_rotation);
tft_cache = 1;
tft.setTextColor(tft_colorA);
menu_sta --;
}
break;
case 2: {
char *menu_str_c[2] = { "3.3V", "5.0V"};
return_menu = true;
if (key_get(2, 1) || key_get(3, 1)) {
mcu_voltage = !mcu_voltage;
tft.fillRect(0, 40, tft_width, 100, tft_colorB);
}
TFT_cursor(mcu_voltage);
for (uint8_t c = 0; c < 2; c++) {
TFT_menu(c, menu_str_c[c]);
}
// tft.fillRect(0, 40, tft_width, 100,tft_colorB);
}
break;
}
}
break;
#if !(defined(__AVR_ATmega1284P__) || defined(__AVR_ATmega644P__))
case 3: { //mpu
mode_mpu = menu_num_B;
tft_cache = 1;
menu_sta = 0; //back main menu
menu_num_B = 0; //zero
}
break;
#endif
}
}
/*
Serial.print(menu_sta);
Serial.print(",");
Serial.print(menu_num_A);
Serial.print(",");
Serial.println(menu_num_B);
*/
//----------------------------
if (menu_sta == 1) {
#if defined(__AVR_ATmega1284P__) || defined(__AVR_ATmega644P__) || defined(__AVR_ATmega128RFA1__)
int8_t meun_b_max[5] = {1, 2, 2, 1, 0};
#else
int8_t meun_b_max[4] = {1, 2, 2, 0};
#endif
if (!meun_b_max[menu_num_A])
return false;
else {
if (key_get(2, 1)) {
tft.fillRect(0, 40, 5, 100, tft_colorB);
menu_num_B--;
}
if (key_get(3, 1)) {
tft.fillRect(0, 40, 5, 100, tft_colorB);
menu_num_B++;
}
menu_num_B = constrain(menu_num_B, 0, meun_b_max[menu_num_A]);
TFT_cursor(menu_num_B);
if (tft_cache) {
for (uint8_t b = 0; b < (meun_b_max[menu_num_A] + 1); b++) {
TFT_menu(b, menu_str_b[menu_num_A][b]);
}
}
}
}
//main menu
if (menu_sta == 0) {
//custer
if (key_get(2, 1)) {
tft.fillRect(0, 40, 5, 100, tft_colorB);
menu_num_A--;
}
if (key_get(3, 1)) {
tft.fillRect(0, 40, 5, 100, tft_colorB);
menu_num_A++;
}
#if defined(__AVR_ATmega1284P__) || defined(__AVR_ATmega644P__) || defined(__AVR_ATmega128RFA1__)
menu_num_A = constrain(menu_num_A, 0, 4);
#else
menu_num_A = constrain(menu_num_A, 0, 3);
#endif
TFT_cursor(menu_num_A);
if (tft_cache) {
#if defined(__AVR_ATmega1284P__) || defined(__AVR_ATmega644P__) || defined(__AVR_ATmega128RFA1__)
for (uint8_t a = 0; a < 5; a++) {
#else
for (uint8_t a = 0; a < 4; a++) {
#endif
TFT_menu(a, menu_str_a[a]);
}
}
}
if (tft_cache) {
//BACK
tft.fillCircle(12, 149, 8, tft_colorA);
tft.drawLine(11, 145, 7, 149, tft_colorB);
tft.drawLine(7, 149, 11, 153, tft_colorB);
tft.drawLine(7, 149, 17, 149, tft_colorB);
//ENTER
tft.fillCircle(12 + 20, 149, 8, tft_colorA);
tft.drawLine(10 + 20, 146, 7 + 20, 149, tft_colorB);
tft.drawLine(7 + 20, 149, 10 + 20, 152, tft_colorB);
tft.drawLine(7 + 20, 149, 15 + 20, 149, tft_colorB);
tft.drawLine(15 + 20, 146, 15 + 20, 149, tft_colorB);
//PREV
tft.fillCircle(127 - 12, 149, 8, tft_colorA);
tft.drawLine(127 - 12, 153, 127 - 8, 149, tft_colorB);
tft.drawLine(127 - 12, 153, 127 - 16, 149, tft_colorB);
tft.drawLine(127 - 12, 153, 127 - 12, 145, tft_colorB);
//NEXT
tft.fillCircle(127 - 32, 149, 8, tft_colorA);
tft.drawLine(127 - 32, 145, 127 - 28, 149, tft_colorB);
tft.drawLine(127 - 32, 145, 127 - 36, 149, tft_colorB);
tft.drawLine(127 - 32, 145, 127 - 32, 153, tft_colorB);
}
tft_cache --;
if (tft_cache < 0) tft_cache = 0;
return true;
}
//------------------
#define _C_x_S (_Q_x + 1)
#define _C_x_M (_Q_x + ((_W_x + 1) / 2))
#define _C_x_E (_Q_x + _W_x - 1)
char *NAME[8] = {
"ROLL", "PITCH", "YAW", "THROT", "AUX1", "AUX2", "AUX3", "AUX4"
};
void TFT_ready()
{
tft.fillRect(0, 0, 128, 26, tft_colorA);
tft.drawRect(tft_width - tft_bat_x - tft_bat_x_s - 2, 2, tft_bat_x, tft_bat_y, tft_colorB);
tft.drawRect(tft_width - tft_bat_x_s - 2, 2 + (tft_bat_y - tft_bat_y_s) / 2, tft_bat_x_s, tft_bat_y_s, tft_colorB);
tft.setTextColor(tft_colorB);
setFont_S;
tft.setCursor(_Q_font_x, 3);
tft.print(mode_protocol ? "nRF24" : "Quadr");
tft.print(" CHAN.");
tft.print(mode_protocol ? nrf_channal : mwc_channal);
tft.setCursor(_Q_font_x, 16);
tft.print("Time:");
tft.setTextColor(tft_colorA);
for (uint8_t a = 0; a < 8; a++) {
tft.setCursor(_Q_font_x, _Q_font_y + a * 15);
tft.print(NAME[a]);
//------------------------------------------
tft.drawRect(_Q_x, _Q_y + a * 15, _W_x, _W_y, tft_colorA);
}
}
boolean _a = false, _b = false;
void TFT_run()
{
if (outBuf[3] > (Joy_MID - Joy_maximum)) {
if (_a) {
Joy_time[0] = millis() - Joy_time[1];
_a = false;
}
Joy_time[1] = millis() - Joy_time[0];
}
else
_a = true;
if (!_b && ((Joy_time[1] / 1000) % 2)) {
_b = !_b;
tft.fillRect(_Q_font_x + 30, 16, 50, 7, tft_colorA);
tft.setTextColor(tft_colorB);
tft.setCursor(_Q_font_x + 30, 16);
tft.print((Joy_time[1] / 1000) / 60);
tft.print("m");
tft.print((Joy_time[1] / 1000) % 60);
tft.print("s");
}
_b = boolean((Joy_time[1] / 1000) % 2);
//battery------------------
tft.fillRect(tft_width - tft_bat_x - 3, 3, map(_V_bat, _V_min, _V_max, 0, tft_bat_x - 2) , tft_bat_y - 2, tft_colorB);
tft.fillRect(tft_width - tft_bat_x - 3 + map(_V_bat, _V_min, _V_max, 0, tft_bat_x - 2), 3,
map(_V_bat, _V_min, _V_max, tft_bat_x - 2, 0) , tft_bat_y - 2,tft_colorA);
for (uint8_t a = 0; a < 8; a++) {
int8_t _C_x_A0, _C_x_B0, _C_x_A, _C_x_B, _C_x_A1, _C_x_B1;
int8_t _C_x;
if (outBuf[a] < Joy_MID) {
_C_x = map(outBuf[a], Joy_MID - Joy_maximum, Joy_MID, _C_x_S, _C_x_M);
_C_x_A0 = _C_x_S;
_C_x_B0 = _C_x - _C_x_S;
_C_x_A = _C_x;
_C_x_B = _C_x_M - _C_x;
_C_x_A1 = _C_x_M;
_C_x_B1 = _C_x_E - _C_x_M;
} else if (outBuf[a] > Joy_MID) {
_C_x = map(outBuf[a], Joy_MID, Joy_MID + Joy_maximum, _C_x_M, _C_x_E);
_C_x_A0 = _C_x_S;
_C_x_B0 = _C_x_M - _C_x_S;
_C_x_A = _C_x_M;
_C_x_B = _C_x - _C_x_M;
_C_x_A1 = _C_x;
_C_x_B1 = _C_x_E - _C_x;
} else {
_C_x_A0 = _C_x_S;
_C_x_B0 = _C_x_M - _C_x_S;
_C_x_A = _C_x_M;
_C_x_B = 0;
_C_x_A1 = _C_x_M;
_C_x_B1 = _C_x_E - _C_x_M;
}
tft.fillRect(_C_x_A0, _Q_y + a * 15 + 1, _C_x_B0, _W_y - 2, tft_colorB);
tft.fillRect(_C_x_A, _Q_y + a * 15 + 1, _C_x_B, _W_y - 2, tft_colorC);
tft.fillRect(_C_x_A1, _Q_y + a * 15 + 1, _C_x_B1, _W_y - 2, tft_colorB);
tft.fillRect(_C_x_M, _Q_y + a * 15 - 1, 1, _W_y + 2, tft_colorD);
}
//netsta------------------
tft.fillRect(0, 158, 128, 2, node_clock_error ? tft_colorD : tft_colorC);
}time.h #include "Arduino.h"
//unsigned long time;
unsigned long TIME1; //setup delay
unsigned long time2; //send data
unsigned long time3; //battery
unsigned long Joy_time[2] = {0, 0}; //joyCaution
|
