Difference between revisions of "LPC Core:Project Transplanting Note"
From Microduino Wiki
(→Notes of Transplanting Codes from Arduino to Mbed) |
|||
| Line 2: | Line 2: | ||
*'''[[Microduino-Module Core LPC]]''' is a M0 framework Core based on the LPC824M201JHI33 of NXP. This article realizes some application development transplantation work based on mbed. | *'''[[Microduino-Module Core LPC]]''' is a M0 framework Core based on the LPC824M201JHI33 of NXP. This article realizes some application development transplantation work based on mbed. | ||
*This article is realized on the basis of transplanting '''[[Open Source Electric Drive Cube Robot]]''', '''[[Open Source LED Dot Matrix Screen]]''', '''[[Open Source Self-balance Robot System ]]''' and '''[[Open Source WiFi Weather Station System]]'''. | *This article is realized on the basis of transplanting '''[[Open Source Electric Drive Cube Robot]]''', '''[[Open Source LED Dot Matrix Screen]]''', '''[[Open Source Self-balance Robot System ]]''' and '''[[Open Source WiFi Weather Station System]]'''. | ||
| − | *Except the self-balance robot, the other 3 can all work on LPC824. The self-balance robot has the currency of standing up, but it | + | *Except the self-balance robot, the other 3 can all work on LPC824. The self-balance robot has the currency of standing up, but it can't really stand up yet. |
==Steps of Development== | ==Steps of Development== | ||
| − | * | + | *1. Enter [https://developer.mbed.org mbed Mainpage], and register. |
| − | * | + | *2. After the registration, return to [https://developer.mbed.org Mainpage], and click the "Compiler" on the top right corner, to enter the online compiling mode. |
| − | * | + | *3. After compiling, clicking "Compile" can automatically download the file bin after the success of compiling and linking. |
| − | * | + | *4. Download JFlash: https://www.segger.com/jflash.html |
| − | * | + | *5. Download bin to LPC824 through JFlash to run it. |
==Program Code== | ==Program Code== | ||
| − | *Cube | + | *Cube robot: '''[[Open Source Electric Drive Cube Robot]]''' |
https://developer.mbed.org/users/lixianyu/code/CubeFine/ | https://developer.mbed.org/users/lixianyu/code/CubeFine/ | ||
| − | *Dot matrix | + | *Dot matrix screen: '''[[Open Source LED Dot Matrix Screen]]''' |
https://developer.mbed.org/users/lixianyu/code/LED_DZ/ | https://developer.mbed.org/users/lixianyu/code/LED_DZ/ | ||
| − | *Balance | + | *Balance robot: '''[[Open Source Self-balance Robot System]]''' |
https://developer.mbed.org/users/lixianyu/code/BalanceCar/ | https://developer.mbed.org/users/lixianyu/code/BalanceCar/ | ||
| − | *WIFI weather | + | *WIFI weather station: '''[[Open Source WiFi Weather Station System]]''' |
https://developer.mbed.org/users/lixianyu/code/Io_moon/ | https://developer.mbed.org/users/lixianyu/code/Io_moon/ | ||
==Notes of Transplanting Codes from Arduino to Mbed== | ==Notes of Transplanting Codes from Arduino to Mbed== | ||
| − | *Study guide about mbed | + | *Study guide about mbed won't be said here any more, because there are many materials online. |
*You can see '''[[File:mBed Study Guide.pdf]]''' here. | *You can see '''[[File:mBed Study Guide.pdf]]''' here. | ||
| − | ''' | + | '''Notes: |
*The entry of Arduino is the setup and loop functions in .ino file, and the entry of mbed is the main function in main.cpp. While(true) can be used to realize the function of function loop in Arduino in main function. | *The entry of Arduino is the setup and loop functions in .ino file, and the entry of mbed is the main function in main.cpp. While(true) can be used to realize the function of function loop in Arduino in main function. | ||
* PinMode in Arduino needs to be changed into the instance of classes such as AnalogIn, AnalogOut, DigitalOut and DigitalIn of mbed. | * PinMode in Arduino needs to be changed into the instance of classes such as AnalogIn, AnalogOut, DigitalOut and DigitalIn of mbed. | ||
* In Arduino, analogWrite can be used to realize the output of PWM, and it should be changed into the instance of class PwmOut in mbed. In mbed, the output frequency and width of PWM both can be dynamically set through API. | * In Arduino, analogWrite can be used to realize the output of PWM, and it should be changed into the instance of class PwmOut in mbed. In mbed, the output frequency and width of PWM both can be dynamically set through API. | ||
* In Arduino, class Serial is used to output serial port, and the instance of class Serial should be used to take place of it in mbed | * In Arduino, class Serial is used to output serial port, and the instance of class Serial should be used to take place of it in mbed | ||
| − | * Function millis and micros in Arduino should be altered into the instance of class Timer in mbed.Besides, in mbed, the effects of class Timeout and Ticker are respectively to realize single operation and timed repeat operation. | + | * Function millis and micros in Arduino should be altered into the instance of class Timer in mbed. Besides, in mbed, the effects of class Timeout and Ticker are respectively to realize single operation and timed repeat operation. |
| − | * Function pgm_read_byte in Arduino is to read data from flash. And you can directly operate pointer uint8_t in mbed, and | + | * Function pgm_read_byte in Arduino is to read data from flash. And you can directly operate pointer uint8_t in mbed, and don't need single function to read data from flash. |
*Wire is be used for the operation of the I2C in Arduino, and it should be taken place by the instance of class I2C in mbed. | *Wire is be used for the operation of the I2C in Arduino, and it should be taken place by the instance of class I2C in mbed. | ||
* The interval of taking the temperature of AM2321 is must bigger than 2s, or i2c won’t work. | * The interval of taking the temperature of AM2321 is must bigger than 2s, or i2c won’t work. | ||
* SimpleTimer has a bug, which will result in a quick calling of two timing function. For example, setInterval(4000, sendCH4), execute function sendCH4 once every 4s, but in the actual runtime, the execution interval of sendCH4 will be less than 4s. | * SimpleTimer has a bug, which will result in a quick calling of two timing function. For example, setInterval(4000, sendCH4), execute function sendCH4 once every 4s, but in the actual runtime, the execution interval of sendCH4 will be less than 4s. | ||
| − | '''You can sen an email to me if you have any | + | '''You can sen an email to me if you have any questions: lixianyu@toweer.com, and let us talk about the word of mbed. |
* About the definition of pins, you can clone mbed source code to local:https://github.com/mbedmicro/mbed.git | * About the definition of pins, you can clone mbed source code to local:https://github.com/mbedmicro/mbed.git | ||
| Line 44: | Line 44: | ||
| − | *mbed has offered support for the MCU of the following manufacturer | + | *mbed has offered support for the MCU of the following manufacturer: |
[[File:tupian1.jpg]] | [[File:tupian1.jpg]] | ||
| − | *Enter the directory of TARGET_NXP, you can see mbed has realized the following specific | + | *Enter the directory of TARGET_NXP, you can see mbed has realized the following specific MCU: |
[[File:tupian2.jpg]] | [[File:tupian2.jpg]] | ||
| − | *MCU not listed | + | *MCU not listed can't use mbed platform now. |
Latest revision as of 07:15, 12 September 2016
Contents
Outline
- Microduino-Module Core LPC is a M0 framework Core based on the LPC824M201JHI33 of NXP. This article realizes some application development transplantation work based on mbed.
- This article is realized on the basis of transplanting Open Source Electric Drive Cube Robot, Open Source LED Dot Matrix Screen, Open Source Self-balance Robot System and Open Source WiFi Weather Station System.
- Except the self-balance robot, the other 3 can all work on LPC824. The self-balance robot has the currency of standing up, but it can't really stand up yet.
Steps of Development
- 1. Enter mbed Mainpage, and register.
- 2. After the registration, return to Mainpage, and click the "Compiler" on the top right corner, to enter the online compiling mode.
- 3. After compiling, clicking "Compile" can automatically download the file bin after the success of compiling and linking.
- 4. Download JFlash: https://www.segger.com/jflash.html
- 5. Download bin to LPC824 through JFlash to run it.
Program Code
- Cube robot: Open Source Electric Drive Cube Robot
https://developer.mbed.org/users/lixianyu/code/CubeFine/
- Dot matrix screen: Open Source LED Dot Matrix Screen
https://developer.mbed.org/users/lixianyu/code/LED_DZ/
- Balance robot: Open Source Self-balance Robot System
https://developer.mbed.org/users/lixianyu/code/BalanceCar/
- WIFI weather station: Open Source WiFi Weather Station System
https://developer.mbed.org/users/lixianyu/code/Io_moon/
Notes of Transplanting Codes from Arduino to Mbed
- Study guide about mbed won't be said here any more, because there are many materials online.
- You can see File:MBed Study Guide.pdf here.
Notes:
- The entry of Arduino is the setup and loop functions in .ino file, and the entry of mbed is the main function in main.cpp. While(true) can be used to realize the function of function loop in Arduino in main function.
- PinMode in Arduino needs to be changed into the instance of classes such as AnalogIn, AnalogOut, DigitalOut and DigitalIn of mbed.
- In Arduino, analogWrite can be used to realize the output of PWM, and it should be changed into the instance of class PwmOut in mbed. In mbed, the output frequency and width of PWM both can be dynamically set through API.
- In Arduino, class Serial is used to output serial port, and the instance of class Serial should be used to take place of it in mbed
- Function millis and micros in Arduino should be altered into the instance of class Timer in mbed. Besides, in mbed, the effects of class Timeout and Ticker are respectively to realize single operation and timed repeat operation.
- Function pgm_read_byte in Arduino is to read data from flash. And you can directly operate pointer uint8_t in mbed, and don't need single function to read data from flash.
- Wire is be used for the operation of the I2C in Arduino, and it should be taken place by the instance of class I2C in mbed.
- The interval of taking the temperature of AM2321 is must bigger than 2s, or i2c won’t work.
- SimpleTimer has a bug, which will result in a quick calling of two timing function. For example, setInterval(4000, sendCH4), execute function sendCH4 once every 4s, but in the actual runtime, the execution interval of sendCH4 will be less than 4s.
You can sen an email to me if you have any questions: lixianyu@toweer.com, and let us talk about the word of mbed.
- About the definition of pins, you can clone mbed source code to local:https://github.com/mbedmicro/mbed.git
- In the directory hal\targets\hal\TARGET_NXP\TARGET_LPC82X\TARGET_LPC824, the PinNames.h file has the definition of all pins of LPC824.
- mbed has realizes the TARGET LPC824.
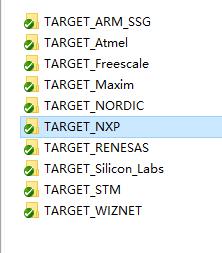
- mbed has offered support for the MCU of the following manufacturer:
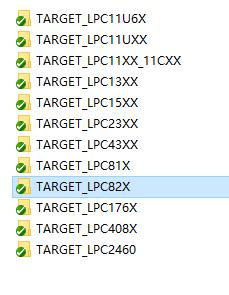
- Enter the directory of TARGET_NXP, you can see mbed has realized the following specific MCU:
- MCU not listed can't use mbed platform now.

