Difference between revisions of "Microduino-Module SD"
From Microduino Wiki
| (11 intermediate revisions by 2 users not shown) | |||
| Line 5: | Line 5: | ||
[[File:Microduino-SD-T.jpg|400px|thumb|right|Microduino-SD]] | [[File:Microduino-SD-T.jpg|400px|thumb|right|Microduino-SD]] | ||
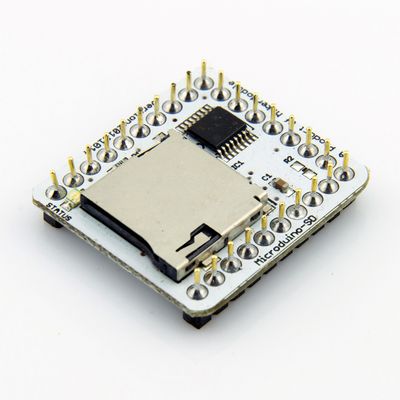
| − | Microduino-SD | + | Microduino-SD aims to read and write data of a memory card. |
| Line 19: | Line 19: | ||
==Features== | ==Features== | ||
| − | * | + | *Adopt high reliable contact structure as well as a 2.2mm or 2.4mm-thick microsd card holder; |
| − | *Open | + | *Small, cheap, stackable and open; |
| − | * | + | *Open hardware circuit design and Arduino compatible programming development environment; |
| − | *2. | + | *Uniform Microduino interface standard and rich peripheral modules, capable of having a fast and flexible connection and extension with other modules and sensors in accord with Microduino interface standard; |
| − | + | *Easy to be integrated to pegboards with a 2.45-pitch female header connector interface. | |
==Specifications== | ==Specifications== | ||
| − | * | + | *The memory card it supports:MicroSD(TF); |
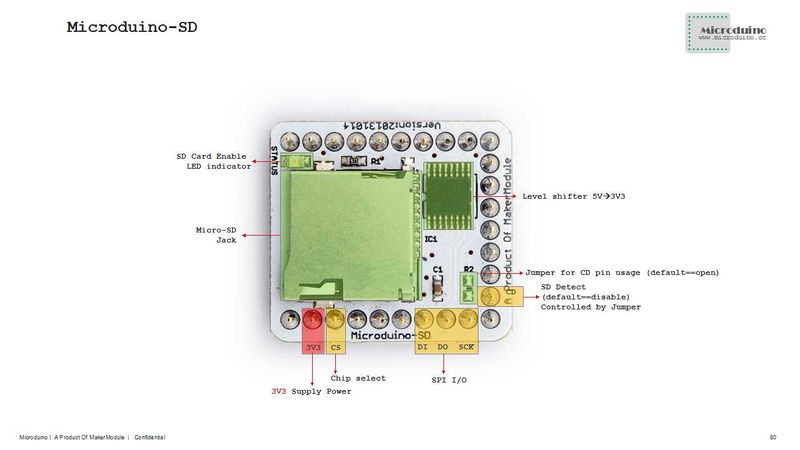
[[File:SD-Pinout-1.jpg|800px|thumb|center|Microduino-SD-Pinout]] | [[File:SD-Pinout-1.jpg|800px|thumb|center|Microduino-SD-Pinout]] | ||
| Line 33: | Line 33: | ||
===Main components=== | ===Main components=== | ||
| − | * | + | * Card holder: microsd '''[[File:MicroSD.pdf]]''' |
| − | * | + | * Level conversion chip: TC74HC4050 '''[[File:TC74HC4050AF.pdf]]''' |
==Development== | ==Development== | ||
===Arduino library and supported package=== | ===Arduino library and supported package=== | ||
| − | * | + | *Adopt adfaruit SD library: |
| − | **Original library: | + | **Original library:(Core+ can't be used directly)【'''[https://github.com/adafruit/SD github download]'''】 |
| − | **Changed | + | **Changed library: (The spi pin of Core+ has been changed)【'''[[File:Lib SD.zip]]'''】 |
| + | **SimpleSDAudio: https://github.com/Microduino/Microduino_Tutorials/tree/master/Microduino_Libraries/_06_Microduino_SD_SimpleSDAudio | ||
*Microduino core module can be combined with the sensor module to store and read data,and then analyze, process these data. | *Microduino core module can be combined with the sensor module to store and read data,and then analyze, process these data. | ||
| Line 46: | Line 47: | ||
===Program Download=== | ===Program Download=== | ||
| − | + | Program test: '''[[File:Program Test SD.zip]]''' | |
===Microduino-SD file read,write,delete test=== | ===Microduino-SD file read,write,delete test=== | ||
| − | * | + | *All hardware needed: Microduino FT232R, Microduino Core and Microduino SD; |
| − | * | + | *All software needed: Microduino test program(Arduino terminal), Arduino IDE(version 1.0 and higher) and SD library; |
| − | *Put the | + | *Put all the download library file into the libraries of Arduino IDE installation folder; |
| − | *Start Arduino | + | *Start Arduino IED, open Microduino test program and choose Microduino Core(Atmega328p@15M,5V), then download; |
| − | * | + | *Below are four parts, which can be checked with OLED(If you don't have OLED, you can check with the serial monitor): |
| − | **CS pin | + | **Check whether the CS pin is ok |
| − | ** | + | **Write data into SD card; |
| − | **Read specified file | + | **Read out the data of the specified file inside SD card; |
| − | **Delete file | + | **Delete the specified file inside SD card; |
==Buy== | ==Buy== | ||
Latest revision as of 10:11, 9 September 2016
| Language: | English • 中文 |
|---|
|
Microduino-SD aims to read and write data of a memory card.
ContentsFeatures
Specifications
DocumentEagle PCB File:Microduino-SD.zip Main components
DevelopmentArduino library and supported package
ApplicationProgram DownloadProgram test: File:Program Test SD.zip Microduino-SD file read,write,delete test
BuyHistoryPictures |


