Difference between revisions of "Quadcopter Kit: Quickstart Guide"
From Microduino Wiki
(→Programming the Quadcopter) |
(→Programming the Quadcopter) |
||
| Line 34: | Line 34: | ||
The Microduino CoreRF must be programmed with the "Quadcopter" code using the Microduino USBTTLC. | The Microduino CoreRF must be programmed with the "Quadcopter" code using the Microduino USBTTLC. | ||
| − | + | *Download the code for the Quadcopter: <big>[[File:MultiWii_for_Core.zip]]</big> | |
| − | + | *Extract the .zip folder somewhere. Ensure, you know where the folder is as you will need to navigate to it. | |
| − | + | *Open the '''Arduino for Microduino''' software (follow the [[#Software Setup]] section if you have not yet). | |
| − | + | *In the software, go to '''File > Open...''' and navigate to the extracted folder. Select and open the '''MultiWii_for_CoreRF.ino''' file. The code should now appear in the software. | |
| + | *Configure the software to program the CoreRF module: | ||
| + | **'''Tools > Board''' and select '''Microduino/mCookie-device'''. | ||
| + | **'''Tools > Processor''' and select '''Microduino/mCookie-Core RF (127rfa1) | ||
| + | *Stack the '''Microduino CoreRF''' module onto the '''Microduino USBTTL''' module. Plug one end of the MicroUSB into the '''Microduino USBTTL''' and the other end to the computer. | ||
| + | *Go back to the software and select the port: | ||
| + | **'''Tools > Port''' and select what is usually selectable. (Note: if on Mac, the port is NOT the Bluetooth.) | ||
Revision as of 15:44, 1 October 2018
This quick start guide is intended to get the reader started with the Quadcopter (w/ Joypad) kit.
This guide will cover the following:
- Setting up the programming software.
- Programming and assembling the Quadcopter.
- Programming and assembling the Joypad.
- Joypad usage and basic control of the Quadcopter.
Software Setup
Please follow the guide to ensure your software is correctly setup. The software is required to program both the Quadcopter and Joypad.
Download the latest software for your operating system and follow the getting started guides:


Programming the Quadcopter
In the Quadcopter box should be two modules:
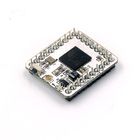
- Microduino CoreRF - the brains of the Quadcopter. A tiny CPU with RF communication capabilities.
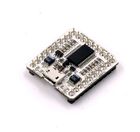
- Microduino USBTTL - programmer which writes the program from your computer to the Microduino CoreRF module.
The Microduino CoreRF must be programmed with the "Quadcopter" code using the Microduino USBTTLC.
- Download the code for the Quadcopter: File:MultiWii for Core.zip
- Extract the .zip folder somewhere. Ensure, you know where the folder is as you will need to navigate to it.
- Open the Arduino for Microduino software (follow the #Software Setup section if you have not yet).
- In the software, go to File > Open... and navigate to the extracted folder. Select and open the MultiWii_for_CoreRF.ino file. The code should now appear in the software.
- Configure the software to program the CoreRF module:
- Tools > Board and select Microduino/mCookie-device.
- Tools > Processor and select Microduino/mCookie-Core RF (127rfa1)
- Stack the Microduino CoreRF module onto the Microduino USBTTL module. Plug one end of the MicroUSB into the Microduino USBTTL and the other end to the computer.
- Go back to the software and select the port:
- Tools > Port and select what is usually selectable. (Note: if on Mac, the port is NOT the Bluetooth.)