Difference between revisions of "Sensor-Buzzer"
(→Usage) |
(→Programming) |
||
| Line 60: | Line 60: | ||
<tab name="Arduino for Microduino" style="width:100%;"> | <tab name="Arduino for Microduino" style="width:100%;"> | ||
==Introduction== | ==Introduction== | ||
| − | The LED Trinket is used as a | + | The LED Trinket is used as a output pin. Special functions on the Core module is used to generate a frequency signal to the Buzzer. |
==Key Functions== | ==Key Functions== | ||
*Required Libraries: None | *Required Libraries: None | ||
*Key Functions: | *Key Functions: | ||
| − | ** ''' | + | ** '''tone(pin_number, frequency)''' - starts generating a frequency signal on the pin |
***'''pin_number''' - is the pin number that the trinket is connected to | ***'''pin_number''' - is the pin number that the trinket is connected to | ||
| − | ***''' | + | ***'''frequency''' - a frequency value to generate on the pin |
| − | ** ''' | + | ** '''noTone(pin_number)''' - stops generating a frequency on the pin |
***'''pin_number''' - is the pin number that the trinket is connected to | ***'''pin_number''' - is the pin number that the trinket is connected to | ||
| + | ** '''tone(pin_number, frequency, duration)''' - Generates a frequency signal on the pin for a set amount of time | ||
| + | ***'''pin_number''' - is the pin number that the trinket is connected to | ||
| + | ***'''frequency''' - a frequency value to generate on the pin | ||
| + | ***'''duration''' - the duration in milliseconds to generate the frequency signal | ||
==Example== | ==Example== | ||
| Line 109: | Line 113: | ||
Download the above example: n/a | Download the above example: n/a | ||
</tab> | </tab> | ||
| + | |||
===Program Download=== | ===Program Download=== | ||
*Download and unzip the program '''[[File:Sensor-Buzzer_Test.zip]]''' | *Download and unzip the program '''[[File:Sensor-Buzzer_Test.zip]]''' | ||
Revision as of 19:39, 18 August 2017
| Language: | English • 中文 |
|---|
|
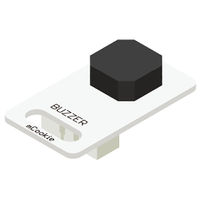
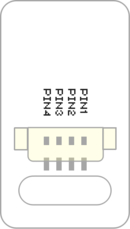
The product number of Sensor-Buzzer is: MSDO11 Sensor-Buzzer is a passive buzzer. Like a magnetic speaker, it needs voltage with different frequency so that it can make sound accordingly. The pitch becomes louder when the frequency gets higher. ContentsIntroduction of Pins
Features
Specification
Document
UsageBasic FunctionalityThe Buzzer Trinket is a simple trinket which emits sound when passed with a frequency. A Core module can control the frequency of the Buzzer output.
ProgrammingIntroductionThe LED Trinket is used as a output pin. Special functions on the Core module is used to generate a frequency signal to the Buzzer. Key Functions
ExampleThis is a simple example which turns on and off the LED at 1 second intervals. Note: Important lines of code are highlighted. //Define the pin the sensor is connected to
const int LED_PIN = 6;
void setup() {
// put your setup code here, to run once:
//Initial serial communication port at 9600 baud
Serial.begin(9600);
//Configure the pin into output mode
pinMode(LED_PIN, OUTPUT);
}
void loop() {
// put your main code here, to run repeatedly:
//Perform a digitalWrite with HIGH to turn on the LED
digitalWrite(LED_PIN, HIGH);
//Delay 1 second
delay(1000);
//Perform a digitalWrite with LOW to turn off the LED
digitalWrite(LED_PIN, LOW);
//Delay 1 second
delay(1000);
}Copy and paste the code above to the Arduino IDE or Download the above example: n/a Program Download
Programming
Hardware Setup
Result
ApplicationThe buzzer can produce many weird sound. Maybe you can add some keys to it to compose a piece of wonderful music. ProjectsPurchaseHistoryGallery
|
Purchase
History
Image
- Front
- Back


