Difference between revisions of "Lesson 2--Microduino "Multiple LEDs""
From Microduino Wiki
m (Changliu818@yahoo.com moved page Lesson 2--"Microduino "Multiple LEDs" to Lesson 2--Microduino "Multiple LEDs") |
(→Result) |
||
| (2 intermediate revisions by the same user not shown) | |||
| Line 4: | Line 4: | ||
| | | | ||
==Objective== | ==Objective== | ||
| − | + | After Lesson 1, you now know how to control a single LED. In this lesson, we will learn how to light up multiple LEDs in awesome patterns. | |
==Equipment== | ==Equipment== | ||
| Line 10: | Line 10: | ||
*'''[[Microduino-FT232R]]''' | *'''[[Microduino-FT232R]]''' | ||
*Other hardware equipment | *Other hardware equipment | ||
| − | ** | + | **1x Box of breadboard jumper wires |
| − | **Breadboard | + | **1x Breadboard |
| − | ** | + | **8x LEDs (Light-Emitting Diodes) |
| − | **220ohm resistor | + | **1x 220ohm resistor |
| − | **USB Data cable | + | **1x USB Data cable |
[[File:lesson2All.jpg|600px|center|thumb]] | [[File:lesson2All.jpg|600px|center|thumb]] | ||
| − | == | + | ==Experiment Schematic== |
| − | * | + | As you may recall from Lesson 1, there are two ways of connecting the LEDs. |
| − | * | + | *Method One: Connect the negative ends (cathodes) of the LEDs to the GND port of Microduino and connect the positive ends (anodes) to digital I/O ports D3~D10. High level connection. |
| − | + | *Method Two: Connect the cathodes to the digital I/O ports D3~D10 and the anodes to VCC. Low level connection. | |
[[File:schematic2.jpg|600px|center|thumb]] | [[File:schematic2.jpg|600px|center|thumb]] | ||
| Line 44: | Line 44: | ||
</source> | </source> | ||
| − | *Using | + | *Using a hexadecimal-based array, the output data is shifted to each I/O port, allowing the user to create countless patterns with ease. |
<source lang="cpp"> | <source lang="cpp"> | ||
/*=============================================== | /*=============================================== | ||
| − | + | 1 means LED is on. 0 means LED is off. | |
| − | Example | + | Example: |
0x81:10000001 | 0x81:10000001 | ||
10,9,8,7,6,5,4,3 | 10,9,8,7,6,5,4,3 | ||
| − | + | ↓ ↓ ↓ ↓ ↓ ↓ ↓ ↓ | |
| − | 1 0 0 0 0 0 0 1 | + | 1 0 0 0 0 0 0 1 |
| − | + | The LEDs connected to ports 10 and 3 in this case would be on. | |
| − | + | ||
=================================================*/ | =================================================*/ | ||
long data[]= | long data[]= | ||
| Line 91: | Line 91: | ||
x represents the microduino I/O port corresponding hexadecimal bit, | x represents the microduino I/O port corresponding hexadecimal bit, | ||
0 is the lowest bit, bit 7 is the highest bit. | 0 is the lowest bit, bit 7 is the highest bit. | ||
| − | Then the | + | Then, use the bitwise AND operation with the shifted data and 0x01 to get the corresponding binary digit at port x (0 or 1). |
| − | |||
====================================================================*/ | ====================================================================*/ | ||
digitalWrite(3, ((num>>0)&0x01)); | digitalWrite(3, ((num>>0)&0x01)); | ||
| Line 104: | Line 103: | ||
} | } | ||
</source> | </source> | ||
| − | + | Comparing the two programs, the first looks simple, has only one pattern, and is very limited.The second program is optimized. Using an array, the hexadecimal number's each bit is assigned to the specified I/O port. Waterfall LED designs can be created using the second program. | |
| − | |||
| − | |||
| − | |||
==Result== | ==Result== | ||
*Program 1 | *Program 1 | ||
| − | + | LED lights are turned on and off from left to right one at a time. | |
*Program 2 | *Program 2 | ||
| − | + | A total of five patterns: | |
| + | #LEDs turn on and off from left to right | ||
| + | #LEDs turn on and off from right to left | ||
| + | #LEDs turn on and off from both ends to the middle and middle to both ends | ||
| + | #LEDs are all lit from left to right | ||
| + | #LEDs are extinguished from right to left. | ||
[[File:lesson2Result1.jpg|600px|center|thumb]] | [[File:lesson2Result1.jpg|600px|center|thumb]] | ||
| Line 120: | Line 121: | ||
==Video== | ==Video== | ||
| − | + | http://v.youku.com/v_show/id_XNzA5OTk3MjI4.html | |
|} | |} | ||
Latest revision as of 18:03, 14 July 2015
| Language: | English • 中文 |
|---|
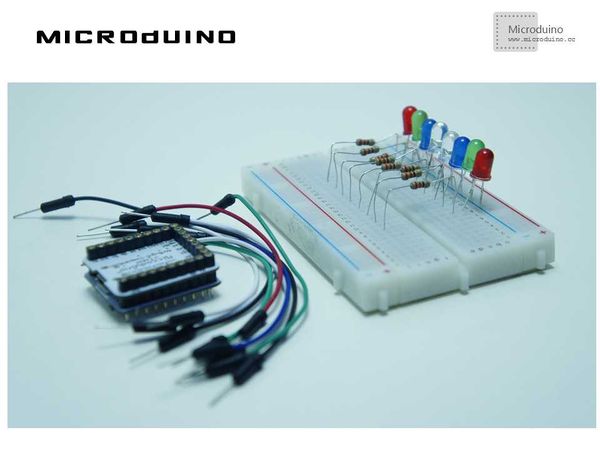
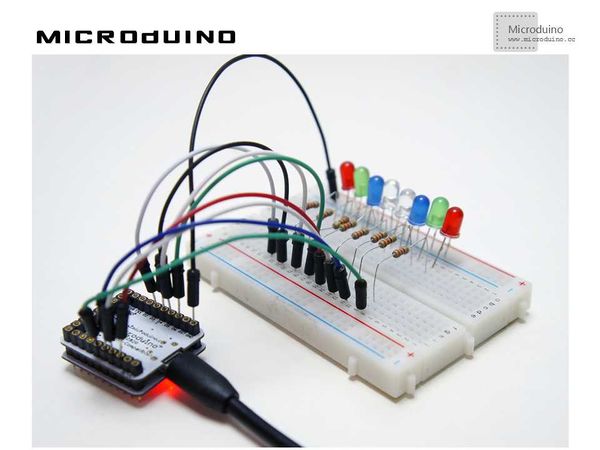
ObjectiveAfter Lesson 1, you now know how to control a single LED. In this lesson, we will learn how to light up multiple LEDs in awesome patterns. Equipment
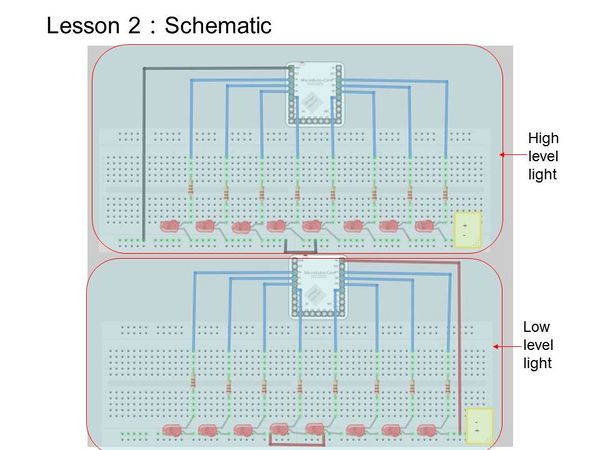
Experiment SchematicAs you may recall from Lesson 1, there are two ways of connecting the LEDs.
Program
void setup() {
//Define microduino digital I/O port D3~D10 as output
  for(int i=3;i<11;i++)
  pinMode(i, OUTPUT);
}
void loop() {
  for(int i=3;i<11;i++)
  {
  digitalWrite(i, HIGH); // Digital I/O port i(D3~D10) outputs high
  delay(50);            //delay 50ms
  digitalWrite(i, LOW); //// Digital I/O port i(D3~D10) outputs low
  delay(50);           //delay 50ms
  }
}
/*===============================================
1 means LED is on. 0 means LED is off.
Example:
0x81:10000001
10,9,8,7,6,5,4,3
 ↓ ↓ ↓ ↓ ↓ ↓ ↓ ↓
 1 0 0 0 0 0 0 1
The LEDs connected to ports 10 and 3 in this case would be on.

=================================================*/
long  data[]=
{
  0x01,0x02,0x04,0x08,0x10,0x20,0x40,0x80,//From left to right light
  0x80,0x40,0x20,0x10,0x08,0x04,0x02,0x01,//From right to left light
  0x81,0x42,0x24,0x18,0x18,0x24,0x42,0x81,//Both sides to the middle and middle to both sides bright light
  0x01,0x03,0x07,0x0f,0x1f,0x3f,0x7f,0xff,//Lit from left to right
  0xff,0x7f,0x3f,0x1f,0x0f,0x07,0x03,0x01,//From right to left extinguished
};

void setup()
{
  for(int x=3;x<11;x++)
  {
    pinMode(x,OUTPUT);//Set the output pin
  }
}


void loop()
{
  for(int x=0;x<40;x++)//Reading different pattern's lights
  {
    leddisplay(data[x]);
    delay(200); //Every state displays 200ms
  }
  leddisplay(0x00);//Cycle is completed, then all extinguished
  delay(200);
}

void leddisplay(int num)    // Mapping the pattern matrix to the port display
{
/*====================================================================
Firstly right shift the hexadecimal number x bits (num >> x),
x represents the microduino I/O port corresponding hexadecimal bit,
0 is the lowest bit, bit 7 is the highest bit.
Then, use the bitwise AND operation with the shifted data and 0x01 to get the corresponding binary digit at port x (0 or 1).
 ====================================================================*/
  digitalWrite(3, ((num>>0)&0x01));
  digitalWrite(4, ((num>>1)&0x01));
  digitalWrite(5, ((num>>2)&0x01));
  digitalWrite(6, ((num>>3)&0x01));
  digitalWrite(7, ((num>>4)&0x01));
  digitalWrite(8, ((num>>5)&0x01));
  digitalWrite(9,((num>>6)&0x01));
  digitalWrite(10,((num>>7)&0x01));
}
Comparing the two programs, the first looks simple, has only one pattern, and is very limited.The second program is optimized. Using an array, the hexadecimal number's each bit is assigned to the specified I/O port. Waterfall LED designs can be created using the second program. Result
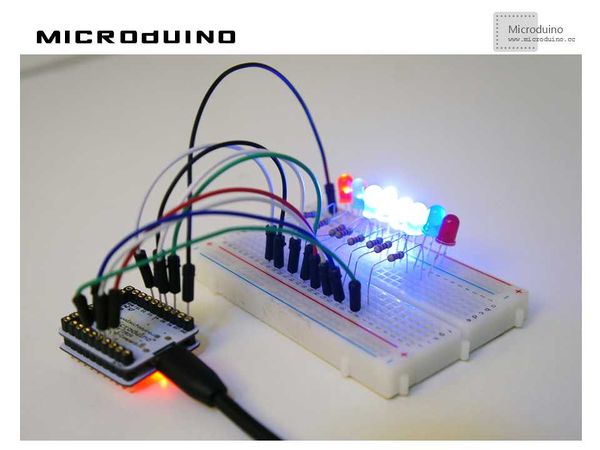
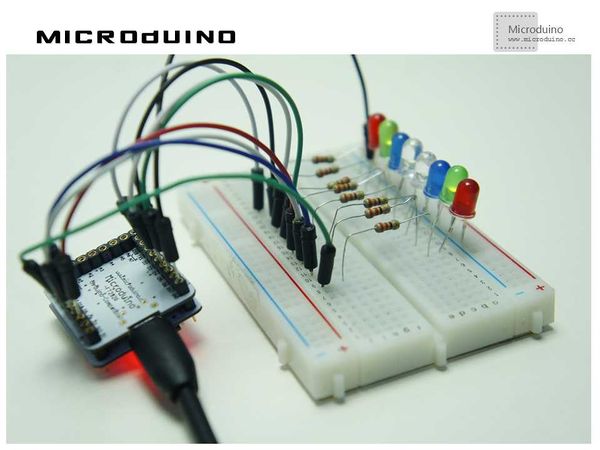
LED lights are turned on and off from left to right one at a time.
A total of five patterns:
Video |
