Difference between revisions of "Introduction to Mixly"
From Microduino Wiki
(→Interface Layout) |
(→Interface Layout) |
||
| Line 16: | Line 16: | ||
*Open Mixly by opening the '''mixly.jar'''. | *Open Mixly by opening the '''mixly.jar'''. | ||
| − | + | [[File:Mixly_Interface.png]] | |
Revision as of 00:13, 1 February 2017
This guide provides an introduction to Mixly. A drag and drop programming software (IDE) for Microduino and Arduino boards.
Setup
Please follow the setup guide for Mixly before proceeding the rest of this guide.
Interface Layout
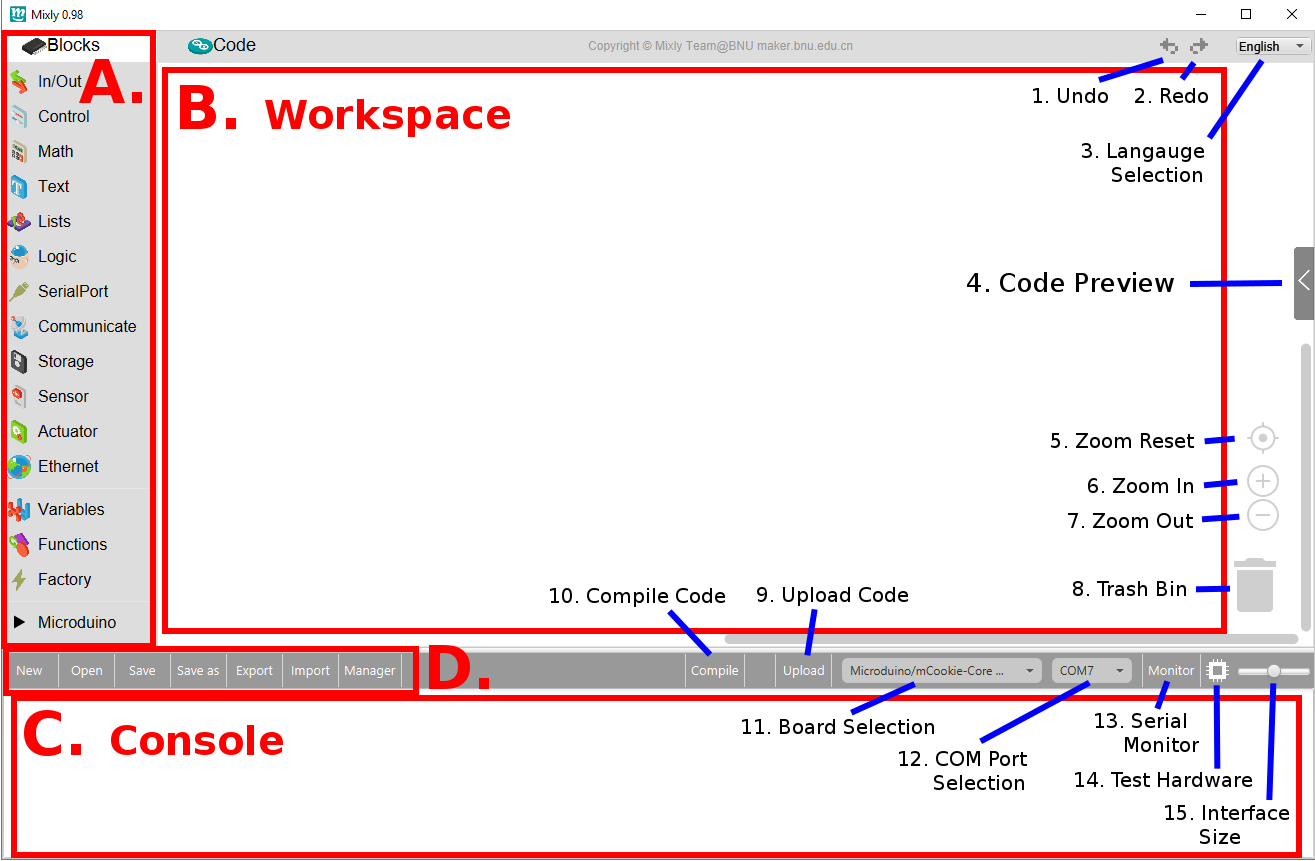
- Open Mixly by opening the mixly.jar.
- Section A. - Blocks.
- Section B. - Workspace.
- Section C. - Console.
- Section D. - File Options.
- 1. Undo - Reverts the last change.
- 2. Redo - Reverts the last undo.
- 3. Language Selection - Select the language of Mixly. Select-able languages are English, Spanish & Chinese
- 4. Code Preview - Opens a panel which shows the generated code from the Workspace blocks.
- 5. Zoom Reset - Resets the zoom to the default level.
- 6. Zoom In - Zoom in on the Workspace.
- 7. Zoom Out - Zoom out on the Workspace.
- 8. Trash Bin - Drag to the trash bin to delete blocks from the Workspace.
- 9. Upload Code - Compiles and uploads the code generated from the Workspace.
- 10. Compile Code - Compiles the code generated from the Workspace, but DOESN'T upload the code. Used to test if the code compiles without uploading it to a Core module afterwards.
- 11. Board Selection - Select the type of Core module/Arduino from this drop down menu that will be programmed.
- 12. COM Port Selection - Select the COM Port that the Core module/Arduino is connected to.
- 13. Serial Monitor - Opens the serial monitor that is used to send and receive data from the Core module/Arduino.
- 14. Test Hardware - Uploads a program to the attached board and tests to see if it is functional.
- 15. Interface Size - Scales the size of the interface of Mixly.


