Difference between revisions of "Lesson 13--Microduino Single Digital Display with A Point"
(Created page with "{{Language | 第十三课--Microduino 单个数码管带点显示}} {| style="width: 800px;" |- | ==Objective== This lesson will teach you how to use digital tube to display ...") |
|||
| (2 intermediate revisions by 2 users not shown) | |||
| Line 51: | Line 51: | ||
==Program== | ==Program== | ||
| + | Download program: | ||
| + | https://github.com/Microduino/Microduino_Tutorials/tree/master/Microduino_Advanced/MicroduinoDigitalShowPoint | ||
| + | |||
<source lang="cpp"> | <source lang="cpp"> | ||
| Line 109: | Line 112: | ||
==Debug== | ==Debug== | ||
| − | + | Firstly download the library, unzip it and put to libraries folder of Arduino IDE, then restart Arduino IDE to load library. | |
| − | Library | + | Library link: https://docs.google.com/file/d/0Bwrp4uluZCpNN1Q4dmFZX1MzWVE/edit |
This library can drive 4bits digital tube and support number, decimal point and easy to use. | This library can drive 4bits digital tube and support number, decimal point and easy to use. | ||
| − | Step | + | Step 1: Copy the code to IDE and compile it. |
| − | Step | + | Step 2: Set up circuit, as follows: |
[[File:第十三课-Microduino单个数码管带点显示连接图.jpg|600px|center|thumb]] | [[File:第十三课-Microduino单个数码管带点显示连接图.jpg|600px|center|thumb]] | ||
| − | Step | + | Step 3: Run program |
| Line 130: | Line 133: | ||
==Video== | ==Video== | ||
| − | |||
| − | |||
Latest revision as of 08:11, 12 September 2016
| Language: | English • 中文 |
|---|
ObjectiveThis lesson will teach you how to use digital tube to display numbers and the decimal point by Microduino. EquipmentMicroduino-Core Microduino-FT232R
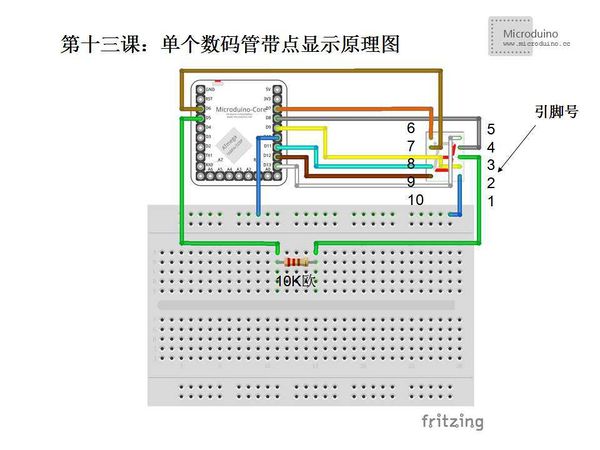
Schematiclight the decimal point using sevseg.NewNum(9, 0), the second paramter uses to control the postion of decimal point. Pin Table:
ProgramDownload program: https://github.com/Microduino/Microduino_Tutorials/tree/master/Microduino_Advanced/MicroduinoDigitalShowPoint /*
7 segment digital tube:
A
____
| |
F |____| B
| G |
E |____| C
o DP
D
Pin distribution:
10 9 8 7 6
________
| __ |
| |__| |
| |__|o |
|________|
1 2 3 4 5
* How to connect to Microduino?
* Check the Pin 3 and 9 firstly, generally they are grade-level, the digital tube in kit is common anode, so they both are anode, we can use any of them.
* 1 (E) Connect to Microduino Pin 10
* 2 (D) Connect to Microduino Pin 9
* 3 Because only use one digital tube, so this pin or pin 8 connects to Microduino Pin 5
* 4 (C) Connect to Microduino Pin 8
* 5 (DP) Connect to Microduino Pin 13
* 6 (B) Connect to Microduino Pin 7
* 7 (A) Connect to Microduino Pin 6
* 8 Because only use one digital tube, so this pin or pin 3 connects to Microduino Pin 5
* 9 (F) Connect to Microduino Pin 11
* 10 (G) Connect to Microduino Pin 12
*/
#include "SevSeg.h"
SevSeg sevseg;
void setup() {
//Define the used pin
sevseg.Begin(1,2,3,4,5,6,7,8,9,10,11,12,13);
}
void loop() {
//Enable output function
sevseg.PrintOutput();
sevseg.NewNum(9, 0); //Digital tube function outputs number, the second parameter is the positon of decimal point.
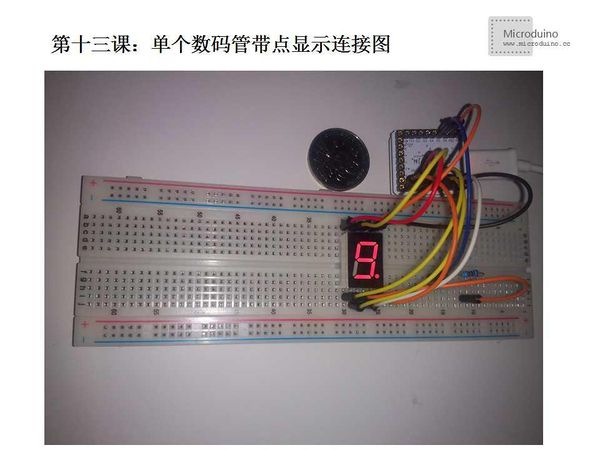
}DebugFirstly download the library, unzip it and put to libraries folder of Arduino IDE, then restart Arduino IDE to load library. Library link: https://docs.google.com/file/d/0Bwrp4uluZCpNN1Q4dmFZX1MzWVE/edit This library can drive 4bits digital tube and support number, decimal point and easy to use. Step 1: Copy the code to IDE and compile it. Step 2: Set up circuit, as follows: Step 3: Run program
ResultDigital will display number and decimal point. Video |

