Difference between revisions of "Lesson 16--Microduino Digital Tube Experiment 3 - Display Infrared Remote Control Button Value"
From Microduino Wiki
(Created page with "{{Language | 第十六课--Microduino 数码管实验三-显示红外遥控器按键值}} {| style="width: 800px;" |- | ==Objective== This lesson will show you how to use digi...") |
|||
| (One intermediate revision by one other user not shown) | |||
| Line 9: | Line 9: | ||
*'''[[Microduino-Core]]''' | *'''[[Microduino-Core]]''' | ||
*'''[[Microduino-FT232R]]''' | *'''[[Microduino-FT232R]]''' | ||
| − | *Other | + | *Other equipment: |
**Breadboard Jumper one box | **Breadboard Jumper one box | ||
**Breadboard one piece | **Breadboard one piece | ||
| Line 21: | Line 21: | ||
==Program== | ==Program== | ||
| + | Download program: | ||
| + | https://github.com/Microduino/Microduino_Tutorials/tree/master/Microduino_Advanced/MicroduinoDigitalTubeExperiments3 | ||
| + | |||
<source lang="cpp"> | <source lang="cpp"> | ||
| Line 99: | Line 102: | ||
==Debug== | ==Debug== | ||
| − | Using the SevSeg | + | Using the SevSeg library |
| − | Library | + | Library link: [https://docs.google.com/file/d/0Bwrp4uluZCpNN1Q4dmFZX1MzWVE/edit] |
| − | Step | + | Step 1: Copy code to IDE |
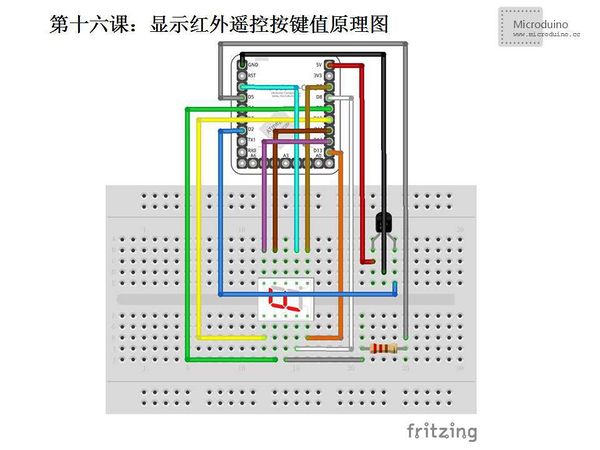
| − | Step | + | Step 2: Set up circuit, as follows: |
[[File:第十六课-Microduino显示红外按键值连接图.jpg|600px|center|thumb]] | [[File:第十六课-Microduino显示红外按键值连接图.jpg|600px|center|thumb]] | ||
| − | Step | + | Step 3: Run program |
==Result== | ==Result== | ||
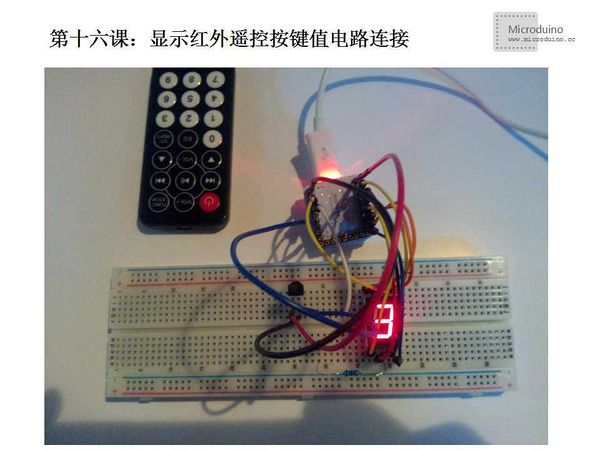
Press the 1~9 button on remote control, the digital tube will display corresponding number. The infrared received encoding are in source code, but different remote control may have different encoding, need to change code. | Press the 1~9 button on remote control, the digital tube will display corresponding number. The infrared received encoding are in source code, but different remote control may have different encoding, need to change code. | ||
==Video== | ==Video== | ||
Latest revision as of 08:17, 12 September 2016
| Language: | English • 中文 |
|---|
ObjectiveThis lesson will show you how to use digital tube on Microduino and use the infrared remote control to control the number display. Equipment
SchematicProgramDownload program: https://github.com/Microduino/Microduino_Tutorials/tree/master/Microduino_Advanced/MicroduinoDigitalTubeExperiments3 #include <IRremote.h>
#include <SevSeg.h>
SevSeg sevseg;
int RECV_PIN = 2;//Define infrared receive pin 2
IRrecv irrecv(RECV_PIN);
decode_results results;
int t;
int action;
int deckey(unsigned long t)
{
switch(t){
case 0xFD08F7://Button 1 encoding
return 1;
break;
case 0xFD8877://Button 2 encoding
return 2;
break;
case 0xFD48B7://Button 3 encoding
return 3;
break;
case 0xFD28D7://Button 4 encoding
return 4;
break;
case 0xFDA857://Button 5 encoding
return 5;
break;
case 0xFD6897://Button 6 encoding
return 6;
break;
case 0xFD18E7://Button 7 encoding
return 7;
break;
case 0xFD9867://Button 8 encoding
return 8;
break;
case 0xFD58A7://Button 9 encoding
return 9;
break;
default:
return 0;
break;
}
}
void setup() {
//Define used pin
sevseg.Begin(1,2,3,4,5,6,7,8,9,10,11,12,13);
irrecv.enableIRIn(); // Initrize the infrared receive
//sevseg.PrintOutput();
//sevseg.NewNum(0, 4);
}
void loop() {
//Enable the output function
sevseg.PrintOutput();
if (irrecv.decode(&results)) {
Serial.println(results.value, HEX);//In hexadecimal output the receive code in a new line
action=deckey(results.value);
Serial.println(action);
Serial.println();//Add a blank line and easy to observe the result
sevseg.NewNum(action, 4); //Digital tube function outputs number, the second parameter is the positon of decimal point. Because it is 4, so won't dispaly decimal point
irrecv.resume(); // Receive next value
}
}DebugUsing the SevSeg library Library link: [1] Step 1: Copy code to IDE Step 2: Set up circuit, as follows: Step 3: Run program ResultPress the 1~9 button on remote control, the digital tube will display corresponding number. The infrared received encoding are in source code, but different remote control may have different encoding, need to change code. Video |

