Difference between revisions of "Lesson 24--Microduino Digital Tube Thermometer"
(Created page with "{{Language|第二十四课--Microduino 数码管温度计}} {| style="width: 800px;" |- | ==Objective== This tutorial will teach you how to use the DS18B20 temperature sensor ...") |
|||
| Line 149: | Line 149: | ||
==Debug== | ==Debug== | ||
| − | Step | + | Step 1: Copy the code to IDE and compile it |
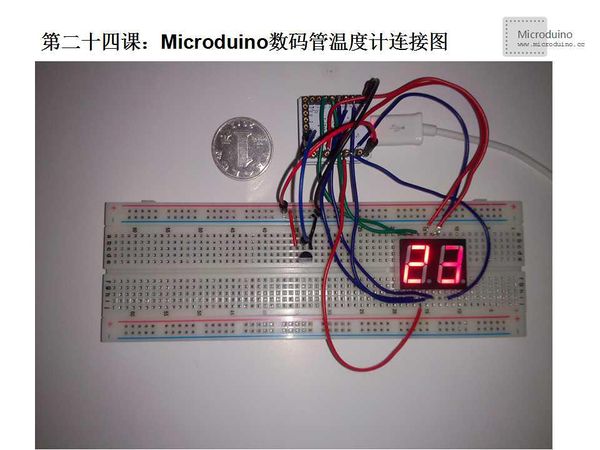
| − | Step | + | Step 2: Set up circuit, as follows: |
[[File:第二十四课-Microduino数码管温度计连接图.jpg|600px|center|thumb]] | [[File:第二十四课-Microduino数码管温度计连接图.jpg|600px|center|thumb]] | ||
| − | Step | + | Step 3: Run program |
| − | Step | + | Step 4: Observe the digital tube, find a hot object close to the temperature sensor, the value on digital tube will change. |
Latest revision as of 08:30, 12 September 2016
| Language: | English • 中文 |
|---|
ObjectiveThis tutorial will teach you how to use the DS18B20 temperature sensor get the temperature value and display on digital tube. Equipment
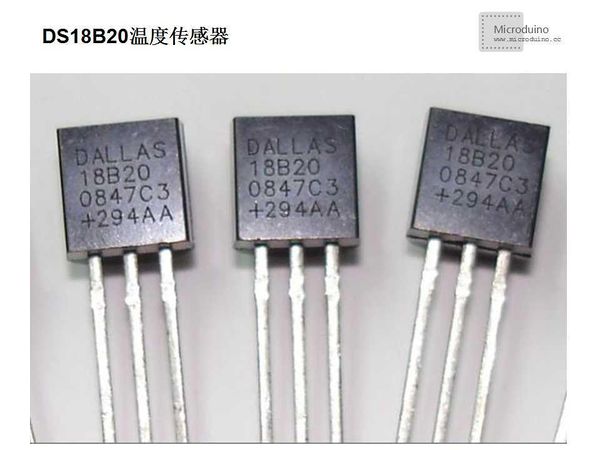
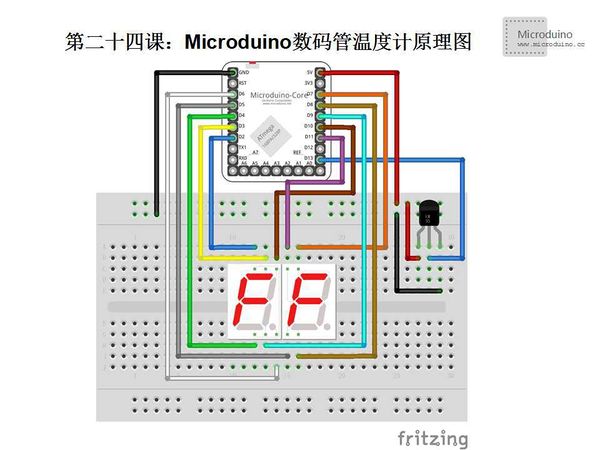
Speaker DS18B20 is a commonly used temperature sensor, it has the the advantages of small volume, low hardware overhead, strong anti-jamming capability and high precision. Correct connection: Facing the flat side, left is the negative and right is positive. Once the connection is wrong, it will heat up immediately, may burn! At the same time, this is also the cause of the sensor always displays 85℃. SchematicPin Table
Programbyte digit0 = 10; //Ten digits bit
byte digit1 = 11; //Single digits bit
byte dotPin = 2; //Decimal point of digital tube
byte sevenSegmentPins[] = {
2,3,4,5,6,7,8}; //A,B,C,D,E,F,G's Microduino pin
byte sevenSegment[10][7] =
{
//a b c d e f g
{
0,0,0,0,0,0,1 }
, // = 0
{
1,0,0,1,1,1,1 }
, // = 1
{
0,0,1,0,0,1,0 }
, // = 2
{
0,0,0,0,1,1,0 }
, // = 3
{
1,0,0,1,1,0,0 }
, // = 4
{
0,1,0,0,1,0,0 }
, // = 5
{
0,1,0,0,0,0,0 }
, // = 6
{
0,0,0,1,1,1,1 }
, // = 7
{
0,0,0,0,0,0,0 }
, // = 8
{
0,0,0,1,1,0,0 } // = 9
};
void setup() {
//Initialize all lights up
pinMode(dotPin, OUTPUT); //pin 2
pinMode(digit0, OUTPUT); //pin 10
pinMode(digit1, OUTPUT); //pin 11
for(int i=0; i<7; i++)
{
pinMode(sevenSegmentPins[i], OUTPUT);
}
digitalWrite(dotPin, HIGH);
digitalWrite(digit0, HIGH);
digitalWrite(digit1, HIGH);
}
//Display number
void segmentWrite(byte digit)
{
byte pin = 2;
for (byte i=0; i<7; ++i)
{
digitalWrite(pin, sevenSegment[digit][i]);
++pin;
}
}
void loop() {
int n = analogRead(A0); //Read the voltage from AO
int vol = n * (5.0 / 1023.0*100); //Use a float type variable to store temperature value which was converted from voltage value
//Get the single digits number
int sd=vol%10;
//Get the ten digits number
int td=vol/10;
digitalWrite(digit0, LOW); //Turn off ten digits bit digital tube
segmentWrite(sd); //Display single digits bit
delay(10); //Delay 10ms
digitalWrite(digit0, HIGH); //Turn on ten digits bit digital tube
digitalWrite(digit1, LOW); //Turn off single digits bit digital tube
segmentWrite(td); //Diplay ten digits bit
delay(10); //Dealy 10ms
digitalWrite(digit1, HIGH); //Turn on single digital tube
}DebugStep 1: Copy the code to IDE and compile it Step 2: Set up circuit, as follows: Step 3: Run program Step 4: Observe the digital tube, find a hot object close to the temperature sensor, the value on digital tube will change.
ResultThe temperature sensor closes to the hot object, the value will increase. Video |


