Difference between revisions of "Lesson 41--Microduino Dc Motor Rotation Control"
From Microduino Wiki
| Line 18: | Line 18: | ||
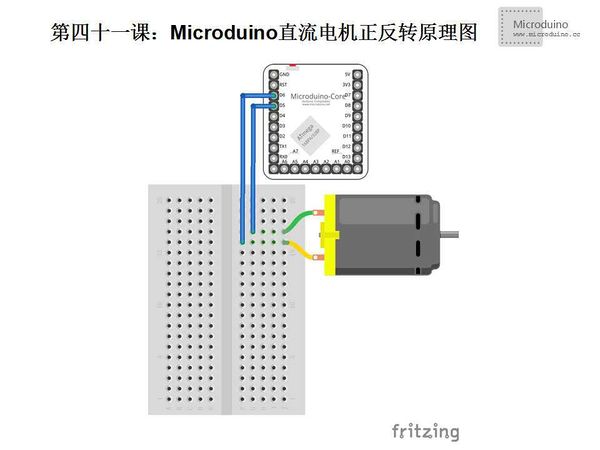
[[File:第四十一课-Microduino直流电机正反转原理图.jpg|600px|center|thumb]] | [[File:第四十一课-Microduino直流电机正反转原理图.jpg|600px|center|thumb]] | ||
| − | + | Note: This isn't one of the most safe method to control the motor, because each I/O pin only can carry 40mA current. If as a practical application, recommend using H-Bridge motor driver board. | |
==Program== | ==Program== | ||
| Line 79: | Line 79: | ||
==Debug== | ==Debug== | ||
| − | Step | + | Step 1: Copy the code to IDE and compile it |
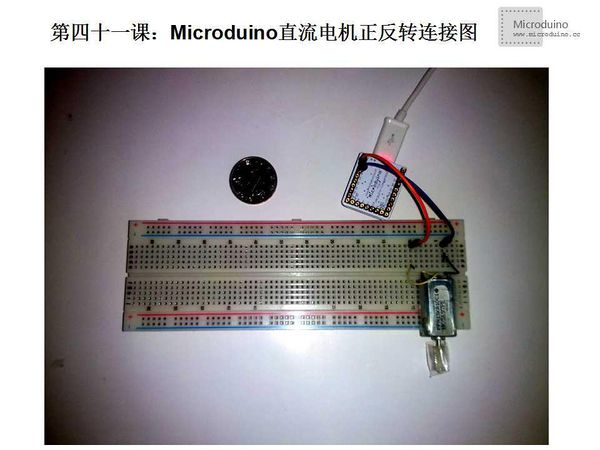
| − | Step | + | Step 2: Set up circuit, as follows: |
[[File:第四十一课-Microduino直流电机正反转连接图.jpg|600px|center|thumb]] | [[File:第四十一课-Microduino直流电机正反转连接图.jpg|600px|center|thumb]] | ||
| − | Step | + | Step 3: Run program |
| − | Step | + | Step 4: Check the rotation of motor |
==Result== | ==Result== | ||
Latest revision as of 08:57, 12 September 2016
| Language: | English • 中文 |
|---|
ObjectiveThis tutorial will teach you use a simple way to achieve the forward and backward rotation of a dc motor. Equipment
SchematicNote: This isn't one of the most safe method to control the motor, because each I/O pin only can carry 40mA current. If as a practical application, recommend using H-Bridge motor driver board. Programint motorPin1 = 5; // Motor's one end connects to digital pin 5
int motorPin2 = 6; // The other end connects to digital pin 6
void setup() {
//Initialization, set these two pins as output
pinMode(motorPin1, OUTPUT);
pinMode(motorPin2, OUTPUT);
}
void loop()
{
rotateLeft(150, 500);//Left rotate, speed=150, lasts 500ms
rotateRight(50, 1000);//Right rotate, speed=50, lasts 1000ms
rotateRight(150, 1000);//Right rotate, speed=150, lasts 1000ms
rotateRight(200, 1000);//Right rotate, speed=200, lasts 1000ms
rotateLeft(255, 500);//Left rotate, speed=255, lasts 500ms
rotateRight(10, 1500);//Right rotate, speed=10, lasts 1500ms
}
//Turn left
void rotateLeft(int speedOfRotate, int length){
analogWrite(motorPin1, speedOfRotate); //Use pwm to set the current
digitalWrite(motorPin2, LOW); // Set motorPin2 to LOW
delay(length); //waits
digitalWrite(motorPin1, LOW); // Set motorPin1 to LOW
}
//Trun right
void rotateRight(int speedOfRotate, int length){
analogWrite(motorPin2, speedOfRotate); //Use pwm to set the current
digitalWrite(motorPin1, LOW); // Set motorPin1 to LOW
delay(length); //waits
digitalWrite(motorPin2, LOW); // Set motorPin2 to LOW
}
//Full speed turn left
void rotateLeftFull(int length){
digitalWrite(motorPin1, HIGH); //Set max current
digitalWrite(motorPin2, LOW); // Set motorPin2 to LOW
delay(length); //waits
digitalWrite(motorPin1, LOW); // Set motorPin1 to LOW
}
//Full speed turn right
void rotateRightFull(int length){
digitalWrite(motorPin2, HIGH); //Set max current
digitalWrite(motorPin1, LOW); // Set motorPin1 to LOW
delay(length); //waits
digitalWrite(motorPin2, LOW); // Set motorPin2 to LOW
}DebugStep 1: Copy the code to IDE and compile it Step 2: Set up circuit, as follows: Step 3: Run program Step 4: Check the rotation of motor ResultMotor will rotate forward and backward with different speed and in circle. Video |

