Difference between revisions of "Microduino OLED thermometer(LM35, DS18b20)"
(Created page with "{{Language | Microduino OLED温度计(LM35, DS18b20)}} {| style="width: 800px;" |- | ==Objective== This tutorial will teach you using two temperature sensor, that are LM35 and...") |
|||
| Line 46: | Line 46: | ||
==Debug== | ==Debug== | ||
| − | Step | + | Step 1: Copy the code to IDE and compile it |
| − | Step | + | Step 2: Set up the circuit, as follows: |
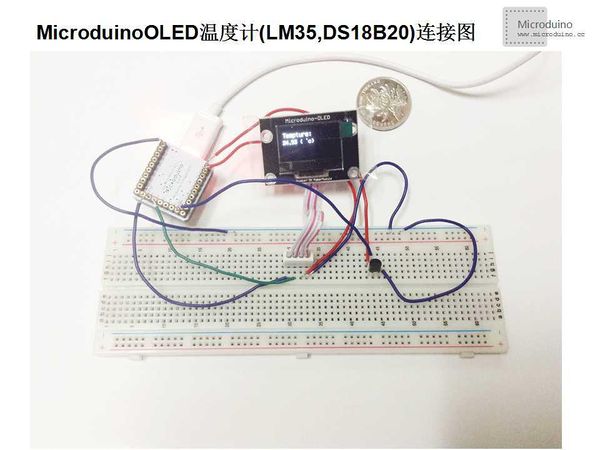
[[File:MicroduinoOLED温度计(LM35, DS18B20)连接图.jpg|600px|center|thumb]] | [[File:MicroduinoOLED温度计(LM35, DS18B20)连接图.jpg|600px|center|thumb]] | ||
| − | Step | + | Step 3: Download the program and then run it. |
| − | Step | + | Step 4: Observe the OLED module. Find a hot object to close the temperature sensor, the OLED will display the value. |
| Line 62: | Line 62: | ||
==Schematic== | ==Schematic== | ||
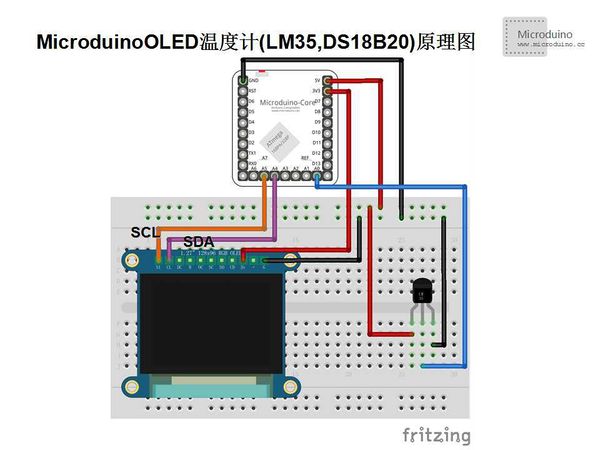
| − | [[File:MicroduinoOLED温度计(LM35,DS18B20)原理图.jpg|600px|center|thumb]] | + | [[File: MicroduinoOLED温度计(LM35,DS18B20)原理图.jpg|600px|center|thumb]] |
LM35 and DS18B20 use the same pin connection. | LM35 and DS18B20 use the same pin connection. | ||
| Line 87: | Line 87: | ||
==Debug== | ==Debug== | ||
| − | Step | + | Step 1: Copy the code to IDE and compile it |
| − | Step | + | Step 2: Set up the circuit, as follows: |
| − | [[File:MicroduinoOLED温度计(LM35, DS18B20)连接图.jpg|600px|center|thumb]] | + | [[File: MicroduinoOLED温度计(LM35, DS18B20)连接图.jpg|600px|center|thumb]] |
| − | Step | + | Step 3: Download the program and then run it. |
| − | Step | + | Step 4: Observe the OLED. Find a hot object to close the temperature sensor, the digital tube will display the value. |
==Result== | ==Result== | ||
Latest revision as of 06:18, 12 September 2016
| Language: | English • 中文 |
|---|
Contents[hide]ObjectiveThis tutorial will teach you using two temperature sensor, that are LM35 and DS18B20, and use the OLED module to display the temperature. Equipment
First experiment (LM35 temperature sensor)SchematicLM35 and DS18B20 use the same pin connection. OLED IIC connection method:
ProgramLM35 and DS18B20 use the same program. Refer to MicroduinoOLEDThermometerLM35-DS18B20.ino
DebugStep 1: Copy the code to IDE and compile it Step 2: Set up the circuit, as follows: Step 3: Download the program and then run it. Step 4: Observe the OLED module. Find a hot object to close the temperature sensor, the OLED will display the value.
ResultAfter LM35 sensor near the heat source, the OLED displayed value will rise, leave the heat source temperature will gradually reduce.
Experiment (DS18B20 temperature)SchematicLM35 and DS18B20 use the same pin connection. OLED IIC connection method:
ProgramLM35 and DS18B20 use the same program. Refers to MicroduinoOLEDThermometerLM35-DS18B20.ino
DebugStep 1: Copy the code to IDE and compile it Step 2: Set up the circuit, as follows: Step 3: Download the program and then run it. Step 4: Observe the OLED. Find a hot object to close the temperature sensor, the digital tube will display the value. ResultAfter DS18B20 sensor near the heat source, the digital tube displayed value will rise, leave the heat source temperature will gradually reduce. Video |

