Difference between revisions of "Microduino ENC Network (7)"
(Created page with "{{Language | Microduino ENC网络(七)}} {| style="width: 800px;" |- | ==Objective== This tutorial will show you how to control a LED from a web page. ==Equipment== *'''[...") |
|||
| Line 21: | Line 21: | ||
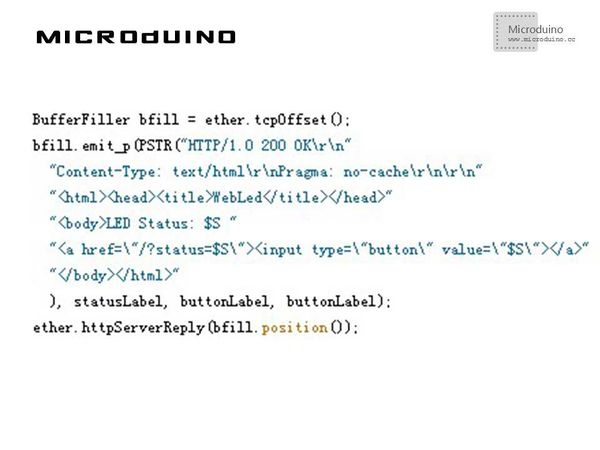
This web page is very simple: a label about LED’s actual status and a button to change it. | This web page is very simple: a label about LED’s actual status and a button to change it. | ||
| − | Looking at | + | Looking at page's HTML source, you can identify the variable elements; i.e. the elements that change according to the LED's status: |
| − | From the source, you can also understand | + | From the source, you can also understand what's going to happen when the user clicks the button: his browser will ask to Arduino a web page named: |
/?status=ON, if the LED has to be turned on | /?status=ON, if the LED has to be turned on | ||
| Line 43: | Line 43: | ||
==Debug== | ==Debug== | ||
| − | Step | + | Step 1: Download the EtherCard library and copy to your libraries fold of IDE, then restart IDE. |
https://github.com/jcw/ethercard | https://github.com/jcw/ethercard | ||
| − | Step | + | Step 2: Explain the program: |
//Two static strings (ON, OFF) and two variables are defined: the variables will be used in HTML page creation, associating to them one of the two static strings. | //Two static strings (ON, OFF) and two variables are defined: the variables will be used in HTML page creation, associating to them one of the two static strings. | ||
| Line 55: | Line 55: | ||
char* buttonLabel; | char* buttonLabel; | ||
| − | //In the setup(), in addition to EtherCard library setup, | + | //In the setup(), in addition to EtherCard library setup, LED's initial status (off) is configured. |
pinMode(ledPin, OUTPUT); | pinMode(ledPin, OUTPUT); | ||
| Line 61: | Line 61: | ||
ledStatus = false; | ledStatus = false; | ||
| − | //In the main loop(), our sketch parse | + | //In the main loop(), our sketch parse browser's request (saved in Ethernet::buffer buffer starting from pos position) looking for status ON/OFF commands. |
if(strstr((char *)Ethernet::buffer + pos, "GET /?status=ON") != 0) { | if(strstr((char *)Ethernet::buffer + pos, "GET /?status=ON") != 0) { | ||
| Line 73: | Line 73: | ||
} | } | ||
| − | //The status of ledPin ( | + | //The status of ledPin (Arduino's PIN the LED is connected to) is updated and the two string variables are associated to the correct labels: |
if(ledStatus) { | if(ledStatus) { | ||
| Line 85: | Line 85: | ||
} | } | ||
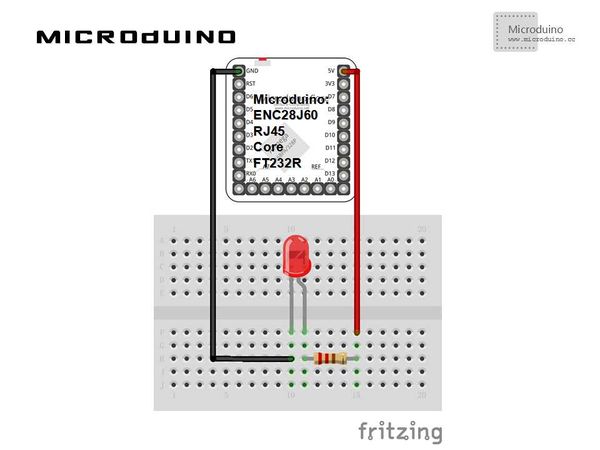
| − | Step 3: Connect the bulb, as | + | Step 3: Connect the bulb, as follows: |
[[File:connectLED.jpg|600px|center|thumb]] | [[File:connectLED.jpg|600px|center|thumb]] | ||
| − | Step | + | Step 4: Compile the code and download it. |
| − | Step | + | Step 5: Use the browser to access the Microduino's IP, then click ON/OFF, observe the bulb's state. |
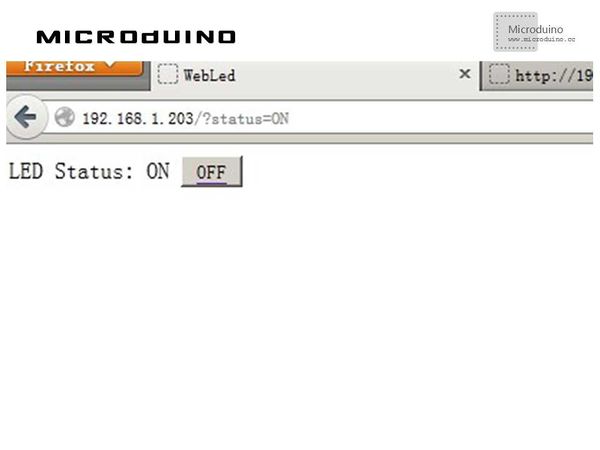
==Result== | ==Result== | ||
Latest revision as of 09:51, 12 September 2016
| Language: | English • 中文 |
|---|
ObjectiveThis tutorial will show you how to control a LED from a web page. Equipment
A bit of HTMLFirst, you need to write an HTML page that will be the web interface Arduino sends to your web browser: This web page is very simple: a label about LED’s actual status and a button to change it. Looking at page's HTML source, you can identify the variable elements; i.e. the elements that change according to the LED's status: From the source, you can also understand what's going to happen when the user clicks the button: his browser will ask to Arduino a web page named: /?status=ON, if the LED has to be turned on /?status=OFF, if the LED has to be turned off The use of ?name=value to send data to a web server reflects the standard syntax of HTML forms using the GET method. Schematic
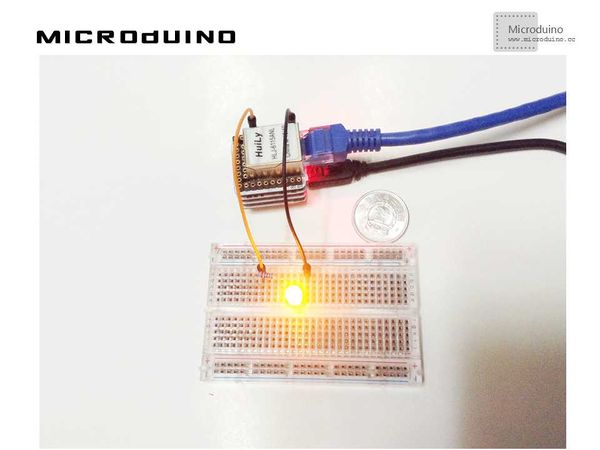
Stack all modules and then connect the ethernet cable, as follows: ProgramRefer to ENCnetworkseven DebugStep 1: Download the EtherCard library and copy to your libraries fold of IDE, then restart IDE. https://github.com/jcw/ethercard Step 2: Explain the program: //Two static strings (ON, OFF) and two variables are defined: the variables will be used in HTML page creation, associating to them one of the two static strings. char* on = "ON"; char* off = "OFF"; char* statusLabel; char* buttonLabel; //In the setup(), in addition to EtherCard library setup, LED's initial status (off) is configured. pinMode(ledPin, OUTPUT);
digitalWrite(ledPin, LOW);
ledStatus = false;
//In the main loop(), our sketch parse browser's request (saved in Ethernet::buffer buffer starting from pos position) looking for status ON/OFF commands. if(strstr((char *)Ethernet::buffer + pos, "GET /?status=ON") != 0) {
Serial.println("Received ON command");
ledStatus = true;
}
       if(strstr((char *)Ethernet::buffer + pos, "GET /?status=OFF") != 0) {
         Serial.println("Received OFF command");
         ledStatus = false;
       }
//The status of ledPin (Arduino's PIN the LED is connected to) is updated and the two string variables are associated to the correct labels: if(ledStatus) {
digitalWrite(ledPin, HIGH);
statusLabel = on;
buttonLabel = off;
} else {
digitalWrite(ledPin, LOW);
statusLabel = off;
buttonLabel = on;
}
Step 3: Connect the bulb, as follows: Step 4: Compile the code and download it. Step 5: Use the browser to access the Microduino's IP, then click ON/OFF, observe the bulb's state. ResultAccess Microduino's IP, you will see following picture: Then you can use the browser to control the bulb. Video |


