Difference between revisions of "Colored LED"
From Microduino Wiki
| (40 intermediate revisions by 5 users not shown) | |||
| Line 1: | Line 1: | ||
| − | |||
{| style="width: 800px;" | {| style="width: 800px;" | ||
|- | |- | ||
| | | | ||
| − | |||
| − | + | [[file:ColoredLed.jpg|thumb|400px|right]] | |
| + | |||
| + | ==Outline== | ||
| + | Microduino-Color LED is a colored LED light with an built-in IC control chip, which can be cascaded arbitrarily. With only one I/O port, you can control all the lights. Each light can be controlled separately. | ||
| + | ==Features== | ||
| + | *The chip adopts a 5050 package that includes a control circuit and RGB chip inside. | ||
| + | *With single bus control, you only need one I/O port to receive data and decode. | ||
| + | *Built-in IC control and serial cascading interface for cascade control. | ||
| + | *Each pixel's trichromatic color can achieve 256-levels of brightness, completing a full display of 16,777,216 colors and with a scanning frequency greater than 400Hz/s; | ||
| + | *Built-in power-on and off reset circuits; | ||
| + | *Ultra low power and ultra long life. | ||
| + | |||
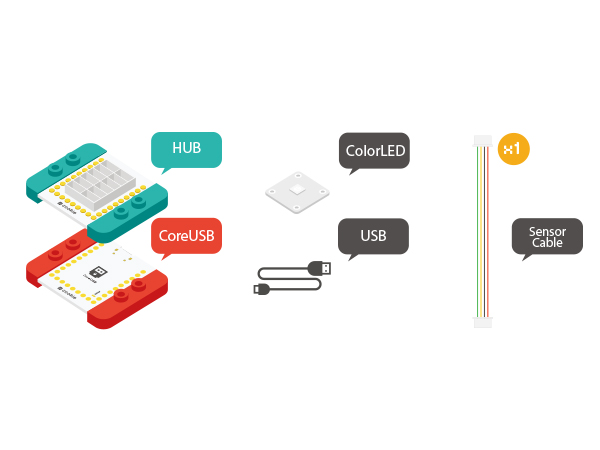
| + | ==Materials== | ||
| + | {|class="wikitable" | ||
| + | |- | ||
| + | |Module||Number||Function | ||
| + | |- | ||
| + | |[[mCookie-CoreUSB]]||1||Core board | ||
| + | |- | ||
| + | |[[mCookie-Hub]]||1||Sensor pin board | ||
| + | |- | ||
| + | |[[Microduino-Color LED]]||1||Colored LED light | ||
| + | |} | ||
| + | *Other Equipment | ||
| + | **One USB cable | ||
| + | **One sensor cable | ||
| + | [[File:color_led-module.jpg|center|600px]] | ||
| + | |||
| + | ==Instructions== | ||
| + | |||
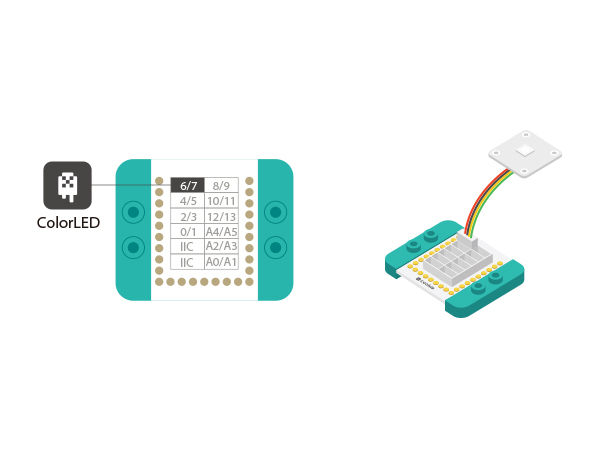
| + | *Setup 1:Connect the '''IN''' port on the back of the Color LED with the D6 port of the Hub. (D6 is the LED control pin, which can be freely changed by users.) | ||
| + | [[file:mCookie-strandtext-sensor.JPG|600px|center]] | ||
| + | *Setup 2:Connect the CoreUSB, Hub and Color LED to the computer with a USB cable. | ||
| + | [[file:mCookie-strandtext-pc.JPG|600px|center]] | ||
| − | == | + | ===Experiment One: Change LED Colors === |
| − | + | The LED will change color between red, green, and blue every 500ms. <br> | |
| − | |||
| − | |||
| + | *Open Arduino IDE and copy the following code into IDE. | ||
| + | <source lang="cpp"> | ||
| + | #include <Adafruit_NeoPixel.h> | ||
| + | #define PIN 6 //led control pin | ||
| + | #define PIN_NUM 2 //Light number allowed | ||
| − | + | Adafruit_NeoPixel strip = Adafruit_NeoPixel(PIN_NUM, PIN, NEO_GRB + NEO_KHZ800); | |
| − | |||
| + | void setup() { | ||
| + | strip.begin(); | ||
| + | strip.show(); | ||
| + | } | ||
| − | + | void loop() { | |
| + | colorWipe(strip.Color(255, 0, 0), 500); // The first light goes read and after 500ms, the second light will go red. | ||
| + | colorWipe(strip.Color(0, 255, 0), 500); // The first light goes read and after 500ms, the second light will go green. | ||
| + | colorWipe(strip.Color(0, 0, 255), 500); // The first light goes read and after 500ms, the second light will go blue. | ||
| + | } | ||
| − | + | // Fill the dots one after the other with a color | |
| − | + | void colorWipe(uint32_t c, uint8_t wait) { | |
| + | //Let each light turn to a specific color in loop. "C" indicates color; "wait" represents the time duration of each light . | ||
| + | for (uint16_t i = 0; i < strip.numPixels(); i++) { | ||
| + | strip.setPixelColor(i, c); | ||
| + | strip.show(); | ||
| + | delay(wait); | ||
| + | } | ||
| + | } | ||
| + | </source> | ||
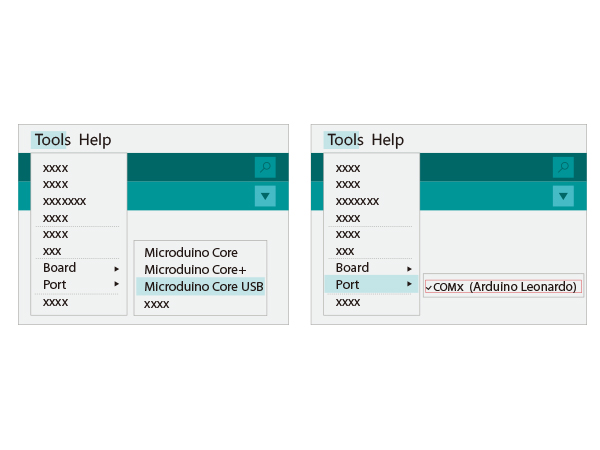
| + | *Select the right board and COM port, compile and download directly. | ||
| + | [[file:upload1.JPG|thumb|800px|center]] | ||
| + | *Compile | ||
| + | **When compiling, it'll remind you to save the project. Users can save it to your folder and name it freely. | ||
| + | *Download | ||
| + | **Download after compiling, you can see the finishing notice. | ||
| + | [[file:Picture1.png|thumb|600px|center]] | ||
| − | ==Debugging== | + | ====Program Debugging==== |
| + | *"#define PIN 6": Defines D6 as the control pin the LED is connected to. | ||
| + | *"#define PIN_NUM 2": Defines the max number of LEDs allowed in sequence. | ||
| + | *"colorWipe(uint32_t c, uint8_t wait)" - Function Description: | ||
| + | **"uint32_t c": Defines the color of the light with the format " strip.Color(R, G, B)" | ||
| + | ***R:(0-255) | ||
| + | ***G:(0-255) | ||
| + | ***B:(0-255) | ||
| + | **"uint8_t wait": Defines the duration time of each light in ms. | ||
| + | **Example: colorWipe(strip.Color(255, 0, 0), 500); Displays red light for 500ms. | ||
| + | **Users can change the color of the LED by adjusting the RGB values. | ||
| − | + | ===Experiment Two: Breathing Light === | |
| − | + | *Open Arduino IDE and copy the following code into IDE. | |
| + | <source lang="cpp"> | ||
| + | #include <Adafruit_NeoPixel.h> | ||
| + | #define PIN 6 //LED light control pin | ||
| + | #define PIN_NUM 2 //LED light number allowed | ||
| − | + | #define val_max 255 | |
| − | + | #define val_min 0 | |
| − | |||
| + | Adafruit_NeoPixel strip = Adafruit_NeoPixel(PIN_NUM, PIN, NEO_GRB + NEO_KHZ800); | ||
| − | + | void setup() { | |
| − | + | strip.begin(); | |
| − | + | strip.show(); | |
| + | } | ||
| + | void loop() { | ||
| + | rainbowCycle( 255, 0, 0, 10);//Red breathing | ||
| + | rainbowCycle( 0, 255, 0, 10);//Green breathing | ||
| + | rainbowCycle( 0, 0, 255, 10);//Blue breathing | ||
| + | } | ||
| − | + | void colorSet(uint32_t c) { | |
| − | + | for (uint16_t i = 0; i < strip.numPixels(); i++) { | |
| + | strip.setPixelColor(i, c); | ||
| + | } | ||
| + | strip.show(); | ||
| + | } | ||
| − | [[ | + | void rainbowCycle( int r, int g, int b, uint8_t wait) { |
| + | for (int val = 0; val < 255; val++) | ||
| + | { | ||
| + | colorSet(strip.Color(map(val, val_min, val_max, 0, r), map(val, val_min, val_max, 0, g), map(val, val_min, val_max, 0, b))); | ||
| + | delay(wait); | ||
| + | } | ||
| + | for (int val = 255; val >= 0; val--) | ||
| + | { | ||
| + | colorSet(strip.Color(map(val, val_min, val_max, 0, r), map(val, val_min, val_max, 0, g), map(val, val_min, val_max, 0, b))); | ||
| + | delay(wait); | ||
| + | } | ||
| + | } | ||
| + | </source> | ||
| + | *Choose the right board and COM port, compile and download. | ||
| + | [[file:upload3.JPG|thumb|800px|center]] | ||
| + | *In result, the red, green and blue lights "breath" in loop. | ||
| + | ====Program Debugging==== | ||
| + | *"rainbowCycle( int r, int g, int b, uint8_t wait)" - Function Description: | ||
| + | **r:(0-255) | ||
| + | **g:(0-255) | ||
| + | **b:(0-255) | ||
| + | **"uint8_t wait": Define breathing speed in ms. The smaller the value is, the faster the LED will "breathe". | ||
| − | == | + | ==Specifications== |
| + | * Electrical specifications | ||
| + | **Operation voltage: 3.3V~5V | ||
| + | **Output device | ||
| + | *Tech parameter | ||
| + | **Utilizes WS2812 integrated light source control; | ||
| + | **Each pixel's RGB is capable of a 256-level brightness display. | ||
| + | **When the refresh rate is 30 frame/s, the cascade number is at least 1,024 points. | ||
| + | **When the transmission distance of any two points is within three meters, there is no need to add any circuitry. | ||
| + | *Size | ||
| + | **Size of LED: 5mm*5mm, | ||
| + | **Size of the board: 20mm*20mm | ||
| + | **1.27mm-pitch 4Pin interface connects to Sensorhub. | ||
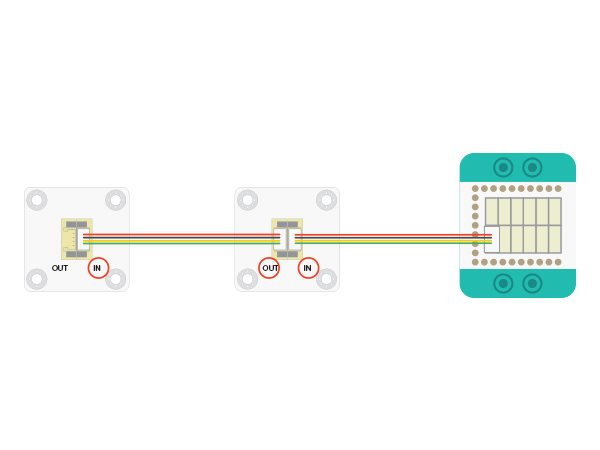
| + | *Connection method | ||
| + | **System and LED (<big>IN</big>): The LED control needs to connect the Sensorhub to the "<big>IN</big>" base board of the LED. | ||
| + | **LED Cascade (<big>OUT</big>): The first LED's <big>OUT</big> connects to the next LED's <big>IN</big>. | ||
| + | [[File: CoreUSB_Ble_steup11.jpg|600px|center]] | ||
| − | + | Additional Specs: | |
| + | [[File:ws2812.pdf]] | ||
| − | |||
| + | ==Applications== | ||
| + | *LED full-color character string, LED full-color module and LED guardrail tube. | ||
| + | *LED point light source, LED pixel screen and LED shaped screen. | ||
|} | |} | ||
Latest revision as of 06:33, 30 September 2016
ContentsOutlineMicroduino-Color LED is a colored LED light with an built-in IC control chip, which can be cascaded arbitrarily. With only one I/O port, you can control all the lights. Each light can be controlled separately. Features
Materials
Instructions
Experiment One: Change LED ColorsThe LED will change color between red, green, and blue every 500ms.
#include <Adafruit_NeoPixel.h>

#define PIN 6   //led control pin
#define PIN_NUM 2 //Light number allowed

Adafruit_NeoPixel strip = Adafruit_NeoPixel(PIN_NUM, PIN, NEO_GRB + NEO_KHZ800);

void setup() {
  strip.begin();
  strip.show();
}

void loop() {
  colorWipe(strip.Color(255, 0, 0), 500); // The first light goes read and after 500ms, the second light will go red.
  colorWipe(strip.Color(0, 255, 0), 500); // The first light goes read and after 500ms, the second light will go green.
  colorWipe(strip.Color(0, 0, 255), 500); // The first light goes read and after 500ms, the second light will go blue.
}

// Fill the dots one after the other with a color
void colorWipe(uint32_t c, uint8_t wait) {
  //Let each light turn to a specific color in loop. "C" indicates color; "wait" represents the time duration of each light .
  for (uint16_t i = 0; i < strip.numPixels(); i++) {
    strip.setPixelColor(i, c);
    strip.show();
    delay(wait);
  }
}
Program Debugging
Experiment Two: Breathing Light
#include <Adafruit_NeoPixel.h>

#define PIN 6   //LED light control pin
#define PIN_NUM 2 //LED light number allowed

#define val_max 255
#define val_min 0

Adafruit_NeoPixel strip = Adafruit_NeoPixel(PIN_NUM, PIN, NEO_GRB + NEO_KHZ800);

void setup() {
  strip.begin();
  strip.show();
}

void loop() {
  rainbowCycle( 255, 0, 0, 10);//Red breathing
  rainbowCycle( 0, 255, 0, 10);//Green breathing
  rainbowCycle( 0, 0, 255, 10);//Blue breathing
}

void colorSet(uint32_t c) {
  for (uint16_t i = 0; i < strip.numPixels(); i++) {
    strip.setPixelColor(i, c);
  }
  strip.show();
}

void rainbowCycle( int r, int g, int b, uint8_t wait) {
  for (int val = 0; val < 255; val++)
  {
    colorSet(strip.Color(map(val, val_min, val_max, 0, r), map(val, val_min, val_max, 0, g), map(val, val_min, val_max, 0, b)));
    delay(wait);
  }
  for (int val = 255; val >= 0; val--)
  {
    colorSet(strip.Color(map(val, val_min, val_max, 0, r), map(val, val_min, val_max, 0, g), map(val, val_min, val_max, 0, b)));
    delay(wait);
  }
}
Program Debugging
Specifications
Additional Specs: File:Ws2812.pdf
Applications
|


