Difference between revisions of "Smart Scale"
(→Outline) |
|||
| (One intermediate revision by the same user not shown) | |||
| Line 3: | Line 3: | ||
| | | | ||
==Outline== | ==Outline== | ||
| − | * | + | *Project: Microduino Smart Electronic Scale |
| − | * | + | *Objective: Display the weight and broadcast it. |
| − | * | + | *Difficulty: Medium |
| − | *Time- | + | *Time-consuming: 2 hours |
| − | * | + | *Maker: |
*Introduction: | *Introduction: | ||
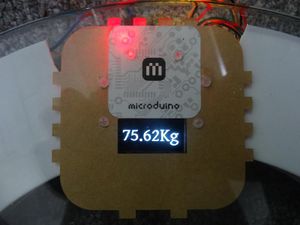
It can weigh our weight, and display it on the OLED screen, and it can also broadcasts it through the horn. | It can weigh our weight, and display it on the OLED screen, and it can also broadcasts it through the horn. | ||
| Line 40: | Line 40: | ||
|Name|| Number||Function | |Name|| Number||Function | ||
|- | |- | ||
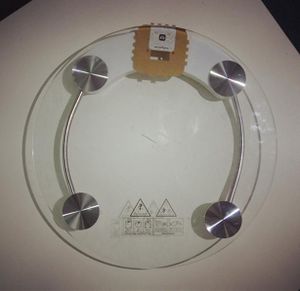
| − | |Pressure sensor(with | + | |Pressure sensor(with a base and a horn)|| 1||To measure the weight |
|- | |- | ||
|USB cable|| 1||Program download and power supply | |USB cable|| 1||Program download and power supply | ||
| Line 53: | Line 53: | ||
*Weighing sensor | *Weighing sensor | ||
| − | Resistance strain type weighing sensor is based on such a principle: The elastic deformation happens to the elastomer under the action of the external force to make the resistance strain | + | Resistance strain type weighing sensor is based on such a principle: The elastic deformation happens to the elastomer under the action of the external force to make the resistance strain gauge(transition element)on its surface deforms with it. After the deformation, its resistance will change (increase or decrease), and the change of the resistance will be converted to electrical signal which can be identified by the chip through the corresponding measurement circuit. |
| − | In order to measure the change of the resistance of the weighing | + | In order to measure the change of the resistance of the weighing sensor's strain gauge, the usual method is adopting strain gauge to make up a bridge circuit (wheatstone bridge)to measure. When the measured gravity acts on the strain gauge, the wheatstone bridge adhered on the elastomer will produce unbalanced output, and this output signal is positively proportional to the measured gravity. |
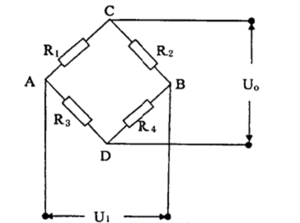
In the wheatstone bridge, R1, R2, R3 and R4 are strain resistances, Ui is excitation voltage, and Uoisoutput voltage. According to the analysis, the output expression of Uo is: | In the wheatstone bridge, R1, R2, R3 and R4 are strain resistances, Ui is excitation voltage, and Uoisoutput voltage. According to the analysis, the output expression of Uo is: | ||
So finally, we can indirectly measure the resistance change of the strain gauge through measuring the output voltage of Uo, namely the strain gauge bearing weight. | So finally, we can indirectly measure the resistance change of the strain gauge through measuring the output voltage of Uo, namely the strain gauge bearing weight. | ||
| Line 66: | Line 66: | ||
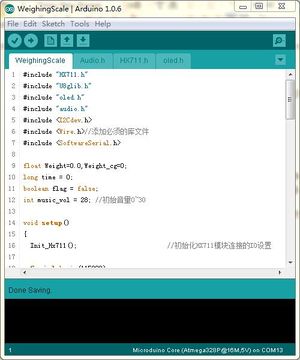
Open Arduino IDE programming software, and click 【File】->【Open】. | Open Arduino IDE programming software, and click 【File】->【Open】. | ||
[[File:Dl1.jpg||300px|center|thumb]] | [[File:Dl1.jpg||300px|center|thumb]] | ||
| − | Browse to the project program address, and click | + | Browse to the project program address, and click "WeighingScale.ino" to open it. |
[[File:Dl2.jpg||300px|center|thumb]] | [[File:Dl2.jpg||300px|center|thumb]] | ||
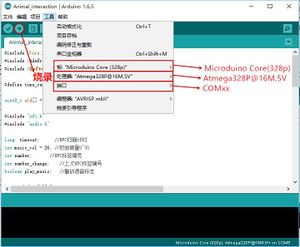
Click 【Tool】, choose board card(Microduino-Core) in the board options, choose processor (Atmega328p@16M,5V)in the processor options, chose right port number in the port options, and then program directly. | Click 【Tool】, choose board card(Microduino-Core) in the board options, choose processor (Atmega328p@16M,5V)in the processor options, chose right port number in the port options, and then program directly. | ||
| Line 72: | Line 72: | ||
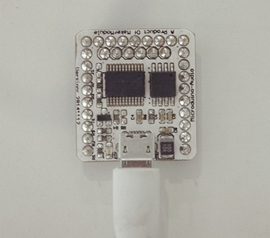
Use USB cable to connect Microduino-Audio to the computer. | Use USB cable to connect Microduino-Audio to the computer. | ||
[[File:Dl4.jpg||300px|center|thumb]] | [[File:Dl4.jpg||300px|center|thumb]] | ||
| − | If succeed, the computer will display a CD driver named Microduino Audio, and then you should perform the following | + | If succeed, the computer will display a CD driver named Microduino Audio, and then you should perform the following steps: |
[[File:Dl5.jpg||300px|center|thumb]] | [[File:Dl5.jpg||300px|center|thumb]] | ||
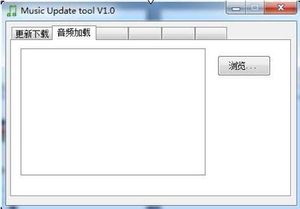
| − | After opening the CD driver, it will display the Music Update tool. Choose | + | After opening the CD driver, it will display the Music Update tool. Choose "audio load"; |
[[File:Dl6.jpg||300px|center|thumb]] | [[File:Dl6.jpg||300px|center|thumb]] | ||
| − | Click | + | Click "browse", and choose all audio files in the "weight" folders to add audio files to the software. |
[[File:Dl7.jpg||300px|center|thumb]] | [[File:Dl7.jpg||300px|center|thumb]] | ||
| − | Choose | + | Choose "update" in the "download and update" options. After updating, the audio files have been written into flash. |
[[File:Dl8.jpg||300px|center|thumb]] | [[File:Dl8.jpg||300px|center|thumb]] | ||
| − | *Set | + | *Set up: |
Fix Microduino-Duo-H2 and Microduino-OLED on the board of the shell with screws. | Fix Microduino-Duo-H2 and Microduino-OLED on the board of the shell with screws. | ||
[[File:Weightbuild1.jpg||300px|center|thumb]] | [[File:Weightbuild1.jpg||300px|center|thumb]] | ||
| Line 93: | Line 93: | ||
[[File:Weightbuild3.jpg||300px|center|thumb]] | [[File:Weightbuild3.jpg||300px|center|thumb]] | ||
[[File:Weightbuild4.jpg||300px|center|thumb]] | [[File:Weightbuild4.jpg||300px|center|thumb]] | ||
| − | Turn on the power switch of BM module, and confirm that the module power led is light. If the battery | + | Turn on the power switch of BM module, and confirm that the module power led is light. If the battery can't normally supply power, you can use USB to supply power to activate it. |
| − | After starting, you can see | + | After starting, you can see "weight housekeeper" displayed on the screen. |
[[File:Weightbuild5.jpg||300px|center|thumb]] | [[File:Weightbuild5.jpg||300px|center|thumb]] | ||
[[File:Weightbuild6.jpg||300px|center|thumb]] | [[File:Weightbuild6.jpg||300px|center|thumb]] | ||
| − | You can stand on the scale to measure your weight. When the data is stable, the horn will broadcast | + | You can stand on the scale to measure your weight. When the data is stable, the horn will broadcast that "Your weight is XX kg". |
[[File:Weightbuild7.jpg||300px|center|thumb]] | [[File:Weightbuild7.jpg||300px|center|thumb]] | ||
==Program Description== | ==Program Description== | ||
| Line 132: | Line 132: | ||
int decade = num / 10; //Tens | int decade = num / 10; //Tens | ||
int unit = num % 10; //Ones | int unit = num % 10; //Ones | ||
| − | audio_choose(11); //Broadcast | + | audio_choose(11); //Broadcast "your weight". |
delay(1600); | delay(1600); | ||
audio_choose(decade + 1); //Broadcast the tens. | audio_choose(decade + 1); //Broadcast the tens. | ||
| Line 143: | Line 143: | ||
delay(400); | delay(400); | ||
} | } | ||
| − | audio_choose(12); //Broadcast | + | audio_choose(12); //Broadcast "kg". |
} | } | ||
| Line 172: | Line 172: | ||
else //The weight is less than 25kg. | else //The weight is less than 25kg. | ||
{ | { | ||
| − | Weight_cg = 0; // | + | Weight_cg = 0; //Do'’t judge whether the weight is stable. |
flag = false; //Reset the broadcasting flag position. | flag = false; //Reset the broadcasting flag position. | ||
} | } | ||
| Line 238: | Line 238: | ||
//----------------------------- | //----------------------------- | ||
| − | void audio_pause() //Audio | + | void audio_pause() //Audio suspends. |
{ | { | ||
AUDIO_PORT.write(sn_pause, 4); | AUDIO_PORT.write(sn_pause, 4); | ||
| Line 359: | Line 359: | ||
u8g.print("Kg"); | u8g.print("Kg"); | ||
} | } | ||
| − | else //When weight is less than 25kg, display the | + | else //When weight is less than 25kg, display the "weight housekeeper" interface. |
{ | { | ||
u8g.drawXBMP( 0, 16, 32, 32, u8g_logo_bits1); | u8g.drawXBMP( 0, 16, 32, 32, u8g_logo_bits1); | ||
Latest revision as of 08:58, 13 September 2016
ContentsOutline
It can weigh our weight, and display it on the OLED screen, and it can also broadcasts it through the horn. Bill of Materials
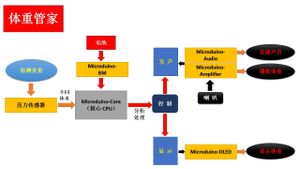
Principle of the ExperimentMircoduino-Weight module and the pressure sensor at the base make up a wheatstone bridge, which is able to measure the weight on the base. Then the Core collects the weight data and real-time displays it on the OLED screen to make the user can see the change of the weight data. Then, when the measured data of the scale is stable, the core CPU takes the current weight data as the final measured weight, and controls the Audio module to broadcast it.
Resistance strain type weighing sensor is based on such a principle: The elastic deformation happens to the elastomer under the action of the external force to make the resistance strain gauge(transition element)on its surface deforms with it. After the deformation, its resistance will change (increase or decrease), and the change of the resistance will be converted to electrical signal which can be identified by the chip through the corresponding measurement circuit. In order to measure the change of the resistance of the weighing sensor's strain gauge, the usual method is adopting strain gauge to make up a bridge circuit (wheatstone bridge)to measure. When the measured gravity acts on the strain gauge, the wheatstone bridge adhered on the elastomer will produce unbalanced output, and this output signal is positively proportional to the measured gravity. In the wheatstone bridge, R1, R2, R3 and R4 are strain resistances, Ui is excitation voltage, and Uoisoutput voltage. According to the analysis, the output expression of Uo is: So finally, we can indirectly measure the resistance change of the strain gauge through measuring the output voltage of Uo, namely the strain gauge bearing weight. DocumentDebugging
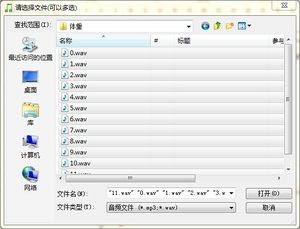
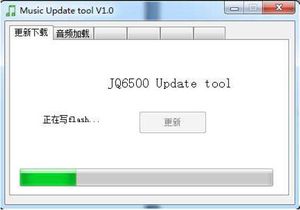
Stack Microduino-Core and Microduino-USBTTL(no order up and down), and connect them,with the computer with USB cable. Open Arduino IDE programming software, and click 【File】->【Open】. Browse to the project program address, and click "WeighingScale.ino" to open it. Click 【Tool】, choose board card(Microduino-Core) in the board options, choose processor (Atmega328p@16M,5V)in the processor options, chose right port number in the port options, and then program directly. Use USB cable to connect Microduino-Audio to the computer. If succeed, the computer will display a CD driver named Microduino Audio, and then you should perform the following steps: After opening the CD driver, it will display the Music Update tool. Choose "audio load"; Click "browse", and choose all audio files in the "weight" folders to add audio files to the software. Choose "update" in the "download and update" options. After updating, the audio files have been written into flash.
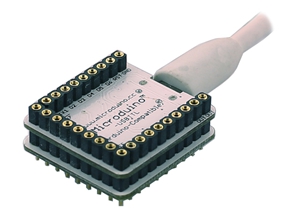
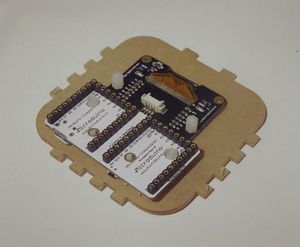
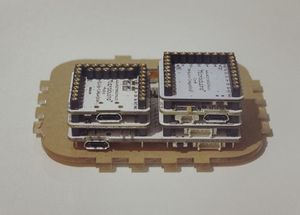
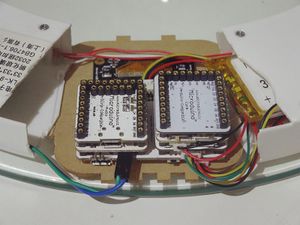
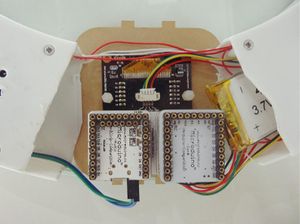
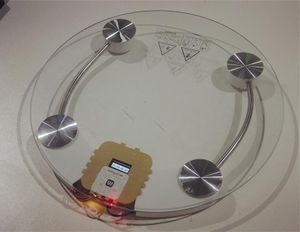
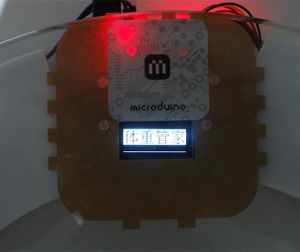
Fix Microduino-Duo-H2 and Microduino-OLED on the board of the shell with screws. Stack the used equipment on Microduino-Duo-H2. *Microduino-Core *Microduino-Audio *Microduino-Amplifier *Microduino-BM *Microduino-Weight Connect Microduino-OLED to the OLED interface of Microduino-Duo-H2, the pressure sensor to Microduino-Weight, the battery to Microduino-BM, and the horn to Micrdouino-Amplifier. Turn on the power switch of BM module, and confirm that the module power led is light. If the battery can't normally supply power, you can use USB to supply power to activate it. After starting, you can see "weight housekeeper" displayed on the screen. You can stand on the scale to measure your weight. When the data is stable, the horn will broadcast that "Your weight is XX kg". Program Description
#include "HX711.h"        //Weighing sensor library
#include "U8glib.h"
#include "oled.h"        //OLED displaying interface
#include "audio.h"        //Audio frequency control
#include <I2Cdev.h>
#include <Wire.h>        //Add required files
#include <SoftwareSerial.h>

float Weight = 0.0, Weight_cg = 0;
long time = 0;            //The measuring time
boolean flag = false;    //Bradcast speech marks
int music_vol = 28;     //The initial volume is 0~30.

void setup()
{
    Init_Hx711();                //Initialize the setting of IO which the HX711 module is connected to.

    Serial.begin(115200);
    audio_init(DEVICE_Flash, MODE_One_END, music_vol);
//Initialize the Audio module.
    delay(500);
    Get_Maopi();            //TO obtain gross weight
    Wire.begin();
}

//Broadcast
void broadcast(int num)
{
    int decade = num / 10; //Tens
    int unit = num % 10;    //Ones
    audio_choose(11);        //Broadcast "your weight".
    delay(1600);
    audio_choose(decade + 1);    //Broadcast the tens.
    delay(400);
    audio_choose(1);        //
    delay(400);
    if(unit)
    {
        audio_choose(unit + 1);    //Broadcast the ones.
        delay(400);
    }
    audio_choose(12);        //Broadcast "kg".
}

void loop()
{
    Weight = Get_Weight() / 1000;        //Measure the weight.
    u8g.firstPage();
    do
    {
        drawWeight(Weight);                //Display the weight.
    }
    while( u8g.nextPage() );

    if(Weight > 25)                //When the weight is bigger than 25 kg, the broadcasting function is effective.
    {
        if(Weight > Weight_cg)        //The weight is not stable.
        {
            Weight_cg = Weight;
            time = millis() + 2000;   //Update the measuring time.
        }
        else if(millis() > time && flag == false)
//When the measured weight not increases in 2S, the value is stable.
        {
            broadcast((int)Weight);        //Broadcast the weight.
            flag = true;                    //The broadcasting flag position.
        }
    }
    else                //The weight is less than 25kg.
    {
        Weight_cg = 0;            //Do'’t judge whether the weight is stable.
        flag = false;            //Reset the broadcasting flag position.
    }
    delay(200);
}
#include "arduino.h"
#include <SoftwareSerial.h>

SoftwareSerial mySerial(2, 3); // RX, TX
//#define AUDIO_PORT Serial1    //Core+
#define AUDIO_PORT mySerial  //Core

byte sn_reset[4] =                //Reset instruction
{
    0x7E, 0x02, 0x0C, 0xEF
};

byte sn_choose[6] =                //Choose repertoire instruction
{
    0x7E, 0x04, 0x03, 0x00, 0x01, 0xEF
};

byte sn_vol[5] =                    //Adjusting volume instruction
{
    0x7E, 0x03, 0x06, 0x18, 0xEF
};

byte sn_device[5] =                //Equipment setup instruction
{
    0x7E, 0x03, 0x09, 0x01, 0xEF
};

byte sn_pause[4] =                //Pausing instruction
{
    0x7E, 0x02, 0x0E, 0xEF
};

byte sn_play[4] =                //Broadcasting instruction
{
    0x7E, 0x02, 0x0D, 0xEF
};

byte sn_mode[5] =                //Setting broadcasting mode instruction
{
    0x7E, 0x03, 0x11, 0x00, 0xEF
};

byte sn_down[4] =                //Selecting the next instruction
{
    0x7E, 0x02, 0x01, 0xEF
};

byte sn_up[4] =                    //Selecting the last instruction
{
    0x7E, 0x02, 0x02, 0xEF
};

byte sn_eq[5] =                    //Setting broadcasting style instruction
{
    0x7E, 0x03, 0x07, 0x01, 0xEF
};

//-----------------------------
void audio_pause()                //Audio suspends.
{
    AUDIO_PORT.write(sn_pause, 4);
    delay(50);
}

void audio_play()                //Audio plays.
{
    AUDIO_PORT.write(sn_play, 4);
    delay(50);
}

//play eq    (Normal/Pop/Rock/Jazz/Classic/Base)  0-5
void audio_eq(byte _audio_eq)            //Set the broadcasting style.
{
    sn_mode[3] = _audio_eq;
    AUDIO_PORT.write(sn_eq, 5);
    delay(100);
}

#define MODE_loopAll 0
#define MODE_loopOne 1
#define MODE_One_STOP 2
#define MODE_One_END  4
//play mode    (ALL/FOL/ONE/RAM/ONE_STOP)  0-4
void audio_mode(byte _audio_mode)        //Set the broadcasting mode.
{
    sn_mode[3] = _audio_mode;
    AUDIO_PORT.write(sn_mode, 5);
    delay(100);
}

#define DEVICE_Flash  5
#define DEVICE_TF  1
//device select    (U/TF/AUX/SLEEP/FLASH)  0-4
void audio_device(byte _audio_device)        //Set the storage way.
{
    sn_device[3] = _audio_device;
    AUDIO_PORT.write(sn_device, 5);
    delay(1500);
}

void audio_down()                //Broadcast the next one.
{
    AUDIO_PORT.write(sn_down, 4);
    delay(500);
}

void audio_up()                    //Broadcast the last one.
{
    AUDIO_PORT.write(sn_up, 4);
    delay(500);
}

void audio_vol(byte _audio_vol)        //Set the volume.
{
    sn_vol[3] = _audio_vol;
    AUDIO_PORT.write(sn_vol, 5);
    delay(50);
}

void audio_choose(byte _audio_choose)    //Choose the song.
{
    sn_choose[4] = _audio_choose;
    AUDIO_PORT.write(sn_choose, 6);
    delay(100);
}

void audio_reset()                    //Reset.
{
    AUDIO_PORT.write(sn_reset, 4);
    delay(500);
}
//初始化
void audio_init(int _audio_init_device, int _audio_init_mode, int _audio_init_vol)
{
    AUDIO_PORT.begin(9600);
    delay(500);
    audio_reset();
    audio_device(_audio_init_device);
    audio_mode(_audio_init_mode);
    audio_vol(_audio_init_vol);
    audio_pause();
}
#include "U8glib.h"

U8GLIB_SSD1306_128X64 u8g(U8G_I2C_OPT_NONE);

static unsigned char u8g_logo_bits1[] U8G_PROGMEM =
{
    0xFF, 0xFF, 0xFF, 0xFF, 0xFF, 0xFF, 0xFF, 0xFF, 0xFF, 0xFF, 0xFF,    0xFF, 0xFF, 0xF8, 0xC7, 0xFF, 0xFF, 0xFC, 0xE7, 0xFF, 0xFF, 0xFC,    0xE7, 0xFF, 0x7F, 0xFE, 0xE7, 0xFF, 0x7F, 0xFE, 0xE7, 0xFF, 0x3F,    0xFF, 0xE7, 0xE7, 0x3F, 0x03, 0x00, 0xC0, 0xBF, 0xFF, 0xC1, 0xFF,    0x1F, 0xFE, 0xC1, 0xFF, 0x1F, 0xFF, 0xA4, 0xFF, 0x2F, 0xFF, 0xA4,    0xFF, 0x27, 0x7F, 0xA6, 0xFF, 0x37, 0x7F, 0x66, 0xFF, 0x3B, 0x3F,    0x67, 0xFF, 0x3D, 0x3F, 0xE7, 0xFE, 0x3F, 0x9F, 0xE7, 0xFC, 0x3F,    0xDF, 0xE7, 0xF9, 0x3F, 0xEF, 0xE7, 0xF1, 0x3F, 0xE7, 0xE7, 0xE3,    0x3F, 0xF3, 0xE7, 0xC2, 0x3F, 0x1B, 0x00, 0xE0, 0x3F, 0xFD, 0xE7,    0xFF, 0x3F, 0xFF, 0xE7, 0xFF, 0x3F, 0xFF, 0xE7, 0xFF, 0x3F, 0xFF,    0xE7, 0xFF, 0x3F, 0xFF, 0xE7, 0xFF, 0x3F, 0xFF, 0xE7, 0xFF, 0xBF,    0xFF, 0xFF, 0xFF, 0xFF, 0xFF, 0xFF, 0xFF, //"体",0
};

static unsigned char u8g_logo_bits2[] U8G_PROGMEM =
{
    0xFF, 0xFF, 0xFF, 0xFF, 0xFF, 0xFF, 0xFF, 0xFF, 0xFF, 0xFF, 0x3F,    0xFF, 0xFF, 0xFF, 0x07, 0xFE, 0xFF, 0x07, 0xE0, 0xFF, 0x3F, 0x78,    0xFE, 0xFF, 0xFF, 0x7F, 0xFE, 0xFF, 0xFF, 0x7F, 0xFE, 0xF3, 0x07,    0x00, 0x00, 0xE0, 0xFF, 0x7F, 0xFE, 0xFF, 0xFF, 0x7F, 0x7E, 0xFF,    0x7F, 0x00, 0x00, 0xFC, 0x7F, 0x7E, 0x7E, 0xFE, 0x7F, 0x7E, 0x7E,    0xFE, 0x7F, 0x7E, 0x7E, 0xFE, 0x7F, 0x00, 0x00, 0xFE, 0x7F, 0x7E,    0x7E, 0xFE, 0x7F, 0x7E, 0x7E, 0xFE, 0x7F, 0x7E, 0x7E, 0xFE, 0x7F,    0x00, 0x00, 0xFE, 0x7F, 0x7E, 0x7E, 0xFE, 0xFF, 0x7F, 0xFE, 0xFF,    0xFF, 0x7F, 0xFE, 0xFF, 0xFF, 0x7F, 0xFE, 0xFC, 0x1F, 0x00, 0x00,    0xF8, 0xFF, 0x7F, 0xFE, 0xFF, 0xFF, 0x7F, 0xFE, 0xFF, 0xFF, 0x7F,    0xFE, 0xE7, 0x03, 0x00, 0x00, 0xC0, 0xFF, 0xFF, 0xFF, 0xFF, 0xFF,    0xFF, 0xFF, 0xFF, 0xFF, 0xFF, 0xFF, 0xFF, //"重",1
};

static unsigned char u8g_logo_bits3[] U8G_PROGMEM =
{
    0xFF, 0xFF, 0xFF, 0xFF, 0xFF, 0xFF, 0xFF, 0xFF, 0x7F, 0xFF, 0xFF,     0xFF, 0x7F, 0xFE, 0xE7, 0xFF, 0x3F, 0xFE, 0xE7, 0xFF, 0x3F, 0xBF,    0xF3, 0xF7, 0x1F, 0x00, 0x03, 0xE0, 0xDF, 0xFD, 0xBD, 0xFF, 0xCF,    0xF9, 0x3E, 0xFF, 0xE7, 0x3B, 0x7F, 0xFE, 0xFB, 0x7B, 0x7E, 0xFF,    0xEF, 0x7F, 0xFE, 0xE7, 0x0F, 0x00, 0x00, 0xC0, 0xEF, 0xFF, 0xFF,    0xE7, 0xE7, 0xFF, 0xBF, 0xF3, 0xE3, 0x00, 0x00, 0xFB, 0xFF, 0xFC,    0x9F, 0xFF, 0xFF, 0xFC, 0x9F, 0xFF, 0xFF, 0xFC, 0x9F, 0xFF, 0xFF,    0x00, 0x80, 0xFF, 0xFF, 0xFC, 0x9F, 0xFF, 0xFF, 0xFC, 0xFF, 0xFF,    0xFF, 0xFC, 0x7F, 0xFF, 0xFF, 0x00, 0x00, 0xFE, 0xFF, 0xFC, 0x3F,    0xFF, 0xFF, 0xFC, 0x3F, 0xFF, 0xFF, 0xFC, 0x3F, 0xFF, 0xFF, 0xFC,    0x3F, 0xFF, 0xFF, 0x00, 0x00, 0xFF, 0xFF, 0xFC, 0x3F, 0xFF, 0xFF,    0xFC, 0xFF, 0xFF, 0xFF, 0xFF, 0xFF, 0xFF, //"管",2
};

static unsigned char u8g_logo_bits4[] U8G_PROGMEM =
{
    0xFF, 0xFF, 0xFF, 0xFF, 0xFF, 0xFF, 0xFF, 0xFF, 0xFF, 0x9F, 0xFF,    0xFF, 0xFF, 0x3F, 0xFE, 0xFF, 0xFF, 0x7F, 0xFE, 0xFF, 0xDF, 0xFF,    0xFE, 0xF7, 0x1F, 0x00, 0x00, 0xE0, 0xDF, 0xFF, 0xFF, 0xE3, 0xCF,    0xFF, 0xFF, 0xFB, 0xE7, 0xFF, 0x3F, 0xFD, 0x7F, 0x00, 0x00, 0xFE,    0xFF, 0x9F, 0xFF, 0xFF, 0xFF, 0xCF, 0xFF, 0xFF, 0xFF, 0xA7, 0x7F,    0xFE, 0xFF, 0x33, 0x3F, 0xFC, 0xFF, 0x7C, 0x9E, 0xFF, 0x3F, 0x3F,    0xE6, 0xFF, 0xCF, 0x9F, 0xE8, 0xFF, 0xF7, 0xCF, 0xDD, 0xFF, 0xFF,    0xF3, 0xD8, 0xFF, 0xFF, 0x79, 0x98, 0xFF, 0x7F, 0x3E, 0xB8, 0xFF,    0x9F, 0x1F, 0x3B, 0xFF, 0xE7, 0xCF, 0x7B, 0xFE, 0xFF, 0xE7, 0xFB,    0xF8, 0xFF, 0xF9, 0xFB, 0xE1, 0xFF, 0xFC, 0xF9, 0xE3, 0x1F, 0xFF,    0xF9, 0xF7, 0xE7, 0x0F, 0xF8, 0xFF, 0xFB, 0x3F, 0xFC, 0xFF, 0xFF,    0x7F, 0xFE, 0xFF, 0xFF, 0xFF, 0xFF, 0xFF, //"家",3
};

void drawWeight(float num)
{
    if(num > 25)            //When weight is bigger than 25 kg, display it.
    {
        u8g.setFont(u8g_font_gdr25);
        u8g.setPrintPos(0, 50);
        u8g.print(num, 2);
        u8g.setPrintPos(85, 50);
        u8g.print("Kg");
    }
    else                    //When weight is less than 25kg, display the "weight housekeeper" interface.
    {
        u8g.drawXBMP( 0, 16, 32, 32, u8g_logo_bits1);
        u8g.drawXBMP( 32, 16, 32, 32, u8g_logo_bits2);
        u8g.drawXBMP( 64, 16, 32, 32, u8g_logo_bits3);
        u8g.drawXBMP( 96, 16, 32, 32, u8g_logo_bits4);
        u8g.drawLine(0, 62, 128, 62);
    }
}
#include <Arduino.h>

#define HX711_SCK 4
#define HX711_DT 5
#define GapValue 24.3

long Weight_Maopi = 0, Weight_Shiwu = 0;
//****************************************************
//Initialize HX711.
//****************************************************
void Init_Hx711()
{
    pinMode(HX711_SCK, OUTPUT);
    pinMode(HX711_DT, INPUT);
}
//****************************************************
//Read HX711 .
//****************************************************
unsigned long HX711_Read(void)    //Add 128 .
{
    unsigned long count;
    unsigned char i;

    digitalWrite(HX711_DT, HIGH);
    delayMicroseconds(1);
    digitalWrite(HX711_SCK, LOW);
    delayMicroseconds(1);

    count = 0;
    while(digitalRead(HX711_DT));
    for(i = 0; i < 24; i++)
    {
        digitalWrite(HX711_SCK, HIGH);
        delayMicroseconds(1);
        count = count << 1;
        digitalWrite(HX711_SCK, LOW);
        delayMicroseconds(1);
        if(digitalRead(HX711_DT))
            count++;
    }
    digitalWrite(HX711_SCK, HIGH);
    count ^= 0x800000;
    delayMicroseconds(1);
    digitalWrite(HX711_SCK, LOW);
    delayMicroseconds(1);

    return(count);
}

//****************************************************
//Obtain gross weight.
//****************************************************
void Get_Maopi()
{
    Weight_Maopi = HX711_Read();
}
//****************************************************
//Weigh.
//****************************************************
float Get_Weight()
{
    Weight_Shiwu = HX711_Read() - Weight_Maopi;                //Obtain the AD sampling value of the object.
    if(Weight_Shiwu < 0)
    {
        return 0;
    }
    else
    {
        return Weight_Shiwu / GapValue;
    }
}
Video |
