Difference between revisions of "Itty Bitty Buggy: Example Outline (mDesigner)"
From Microduino Wiki
| (7 intermediate revisions by the same user not shown) | |||
| Line 1: | Line 1: | ||
Examples will be presented in the following format for ease of assembly: | Examples will be presented in the following format for ease of assembly: | ||
| + | <hr><hr> | ||
| + | {| class="wikitable" style="background-color:#FEF9E7;" | ||
| + | |'''Note:''' this example is performed in '''online mode'''.<br> | ||
| + | If you have overwritten the firmware when using "offline mode", [[Itty_Bitty_Buggy:_Getting_Started_(mDesigner)#Connecting_to_Itty_Bitty_Buggy_to_mDesigner_.28Online_mode.29|'''please follow the instructions to reset back to "online mode"'''.]] | ||
| + | |} | ||
| + | {| | ||
| + | |style="vertical-align:top;"| | ||
| + | {| class="wikitable" | ||
| + | |+Blocks Used | ||
| + | !Block Category | ||
| + | !Blocks | ||
| + | |- | ||
| + | |bgcolor=FEC254|Events | ||
| + | |[[File:MDesigner_When_Click_Green_Flag_block_new.png|x50px]] [[File:Info_icon.png|24px|link=block_reference]] | ||
| + | |- | ||
| + | |Buggy [[File:IBB_Buggy_icon.png|x30px]] | ||
| + | |[[File:IBB_mDesigner_ColorLED_Set_Color_NoLabels.png|x50px|link=Buggy_Base_(use_with_mDesigner)#ColorLED_-_Set_Color]] [[File:Info_icon.png|24px|link=Buggy_Base_(use_with_mDesigner)#ColorLED_-_Set_Color]] | ||
| + | |} | ||
| + | |style="vertical-align:top;"| | ||
| + | {| class="wikitable" | ||
| + | |+Example | ||
| + | |- | ||
| + | |style="padding:50px;"| | ||
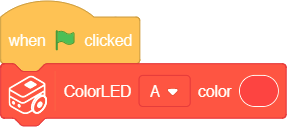
| + | [[File:IBB_mDesigner_ColorLED_Example1.png]] | ||
| + | |} | ||
| + | |||
| + | |} | ||
| + | |||
| + | '''Description:''' When activated, ColorLED "A" on Buggy Base will turn red. | ||
| + | <hr><hr> | ||
*The top usually has a note regarding whether this particular example is to be used in '''online''' or '''offline''' mode. | *The top usually has a note regarding whether this particular example is to be used in '''online''' or '''offline''' mode. | ||
| Line 10: | Line 40: | ||
*The right hand side will contain the '''Example'''. | *The right hand side will contain the '''Example'''. | ||
| − | **This is the completely assembled '''Example'''. It is your job to assemble the example. Pre-assembled saved project files are not provided in order to teach the user the importance of assembling the blocks correctly. | + | **This is the completely assembled '''Example'''. It is your job to assemble the example. Pre-assembled saved project files are not provided in order to teach the user the importance of assembling the blocks together correctly. |
| + | |||
| + | *The bottom has a '''Description''' of what the example does. | ||
| + | |||
| + | |||
| + | '''Please make note of this format when following the tutorials.''' | ||
Latest revision as of 00:44, 3 November 2018
Examples will be presented in the following format for ease of assembly:
| Note: this example is performed in online mode. If you have overwritten the firmware when using "offline mode", please follow the instructions to reset back to "online mode". |
|
|
Description: When activated, ColorLED "A" on Buggy Base will turn red.
- The top usually has a note regarding whether this particular example is to be used in online or offline mode.
- The left hand side will contain Block Category and Block.
- A Block will have a Block Category. This indicates where that specific Block can be found at.
- The right hand side will contain the Example.
- This is the completely assembled Example. It is your job to assemble the example. Pre-assembled saved project files are not provided in order to teach the user the importance of assembling the blocks together correctly.
- The bottom has a Description of what the example does.
Please make note of this format when following the tutorials.


