Difference between revisions of "Microduino-Module CoreSTM32"
From Microduino Wiki
(update link) |
|||
| (29 intermediate revisions by 5 users not shown) | |||
| Line 4: | Line 4: | ||
| | | | ||
[[file:Microduino- CoreSTM32 -rect.jpg|400px|thumb|right|Microduino- CoreSTM32]] | [[file:Microduino- CoreSTM32 -rect.jpg|400px|thumb|right|Microduino- CoreSTM32]] | ||
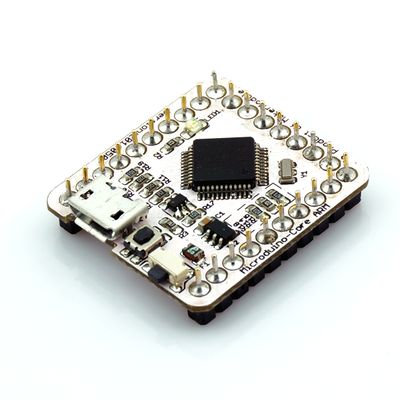
| − | + | Microduino-CoreSTM32 is one of the core modules of Microduino, adopting ARM development board of STM32F103CBT6 chip. '''[[Microduino-CoreSTM32]]''' is a open-source software, compatible with [http://leaflabs.com/docs/hardware/maple-mini.html Maple Mini], and it can be used together with Microduino extension modules and other electronic components, modules, and sensors to make many funny interactive works. | |
| − | |||
==Features== | ==Features== | ||
| − | * Small, | + | * Small, cheap, stackable, and open; |
| − | * Open source hardware | + | * Open source hardware circuit design and programming development environment similar to Arduino. |
| − | + | * Microduino-CoreSTM32 can be downloaded with [http://static.leaflabs.com/pub/leaflabs/maple-bootloader/maple_mini_boot.bin bootloader] through Microduino-USBTTL; | |
| − | + | *With an uniform Microduino interface standard and rich peripheral modules, it can be easily connected with other Microduino modules and sensors. | |
| − | + | *2.54mm-spacing female connector interface,which makes it easy to integrate to the pegboard. | |
| − | * Microduino-CoreSTM32 can | ||
| − | |||
| − | |||
|- | |- | ||
| | | | ||
| − | == | + | ==Specification== |
| − | * Microcontroller: STM32F103CBT6 | + | ===Electrical Specification=== |
| − | * | + | *Microcontroller: STM32F103CBT6 |
| − | * | + | *Frequency: 72MHz |
| − | * Core | + | *Operation voltage: 5V |
| − | * Flash: 128KB | + | *Core voltage: 3.3V |
| − | * SRAM: | + | *Flash: 128KB |
| − | + | *SRAM: 20KB | |
| − | |||
| − | |||
| − | |||
| − | |||
| − | |||
| − | |||
| − | |||
| − | |||
| − | |||
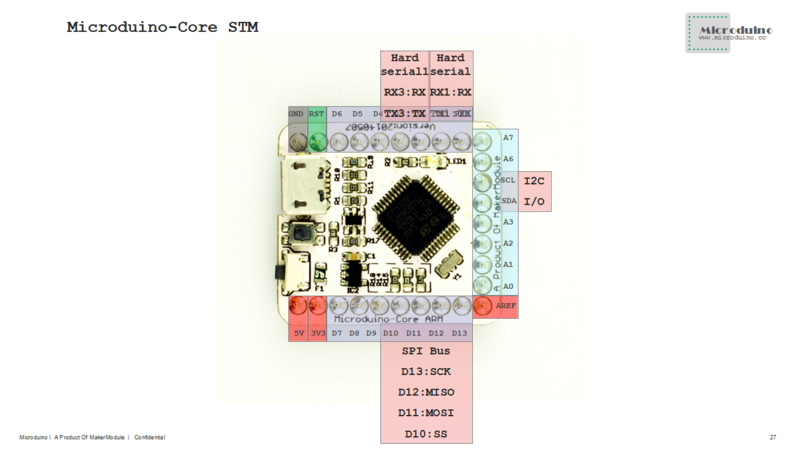
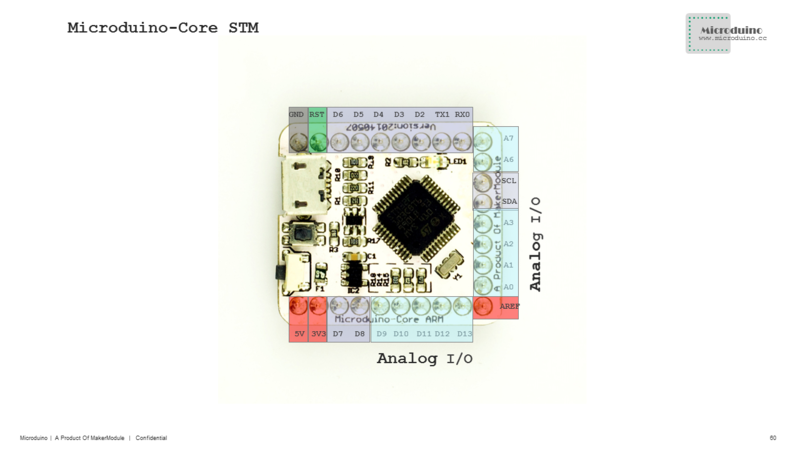
| − | + | ===Pin Specification === | |
| − | * | + | *Digital I/O pin: |
| − | * | + | 0,1,2,3,4,5,6,7,8,9,10,11,12,13,14(A0),15(A1),16(A2),17(A3),18(SDA),19(SCL),20(A6),21(A7) |
| − | * | + | *Analog input pin: |
| − | * | + | A0(ADC12_IN0), A1(ADC12_IN1), A2(ADC12_IN2), A3(ADC12_IN3), 10(ADC12_IN4), 13(ADC12_IN5), 12(ADC12_IN6), 11(ADC12_IN7), A6(ADC12_IN8), A7(ADC12_IN9) |
| − | * | + | *Serial port: |
| − | * | + | **Serial RX0 and TX1, used for receiving(RX) and sending(TX) TTL serial data. |
| + | **Serial1 D2(RX3)and D3(TX3), used for receiving(RX) and sending(TX) TTL serial data. | ||
| + | *Hardware PWM: 0, 1, 4, 11, 12, 14(A0), 15(A1), 16(A2), 17(A3), 18(SDA), 19(SCL), 20(A6), 21(A7) | ||
| + | *SPI: D10(SPI1_NSS), D11(SPI1_MOSI), D12(SPI1_MISO), D13(SPI1_SCK); | ||
| + | *IIC: 18(SDA), 19(SCL); | ||
| + | *Each I/O port has interruption function. | ||
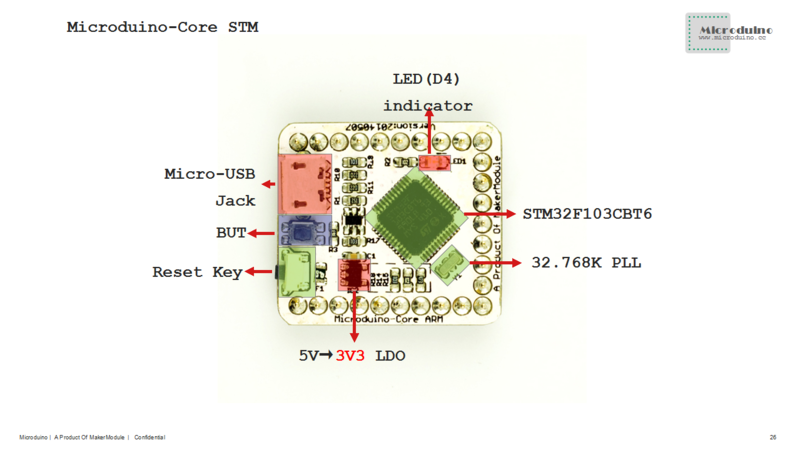
| + | :[[file:Microduino-Core STM-PinoutBig.png|800px|thumb|center|Microduino-Core STM-Pinout]] | ||
| + | :[[file:Microduino-Core STM-Pinout1Big.png|800px|thumb|center|Microduino-Core STM-Pinout]] | ||
| + | :[[file:Microduino-Core STM-Pinout2Big.png|800px|thumb|center|Microduino-Core STM-Pinout]] | ||
==Documents== | ==Documents== | ||
| − | Microduino- CoreSTM32 | + | *Main components used in Microduino- CoreSTM32 |
** MCU: '''[[media: STM32F103CBT6.pdf| STM32F103CBT6]]''' | ** MCU: '''[[media: STM32F103CBT6.pdf| STM32F103CBT6]]''' | ||
| + | **Schematic diagram: [[media:Microduino-CoreSTM32.zip| Microduino-CoreSTM32]]''' | ||
==Development== | ==Development== | ||
| − | ===Set up the Microduino-CoreSTM32 development environment=== | + | ===Set up the Microduino-CoreSTM32 development environment(1)=== |
| − | * Use the Maple IDE development environment: Microduino use the similar | + | * Use the Maple IDE development environment: Microduino use the similar development environment with the Arduino IDE, so you can use the Maple IDE, Flash or Processing and so on. Combining with other Microduino modules, you can make many interesting interactive works.. |
| − | |||
*Configure the Maple IDE, please refer to '''[[Microduino-CoreSTM32 Maple Drive Install]]''' | *Configure the Maple IDE, please refer to '''[[Microduino-CoreSTM32 Maple Drive Install]]''' | ||
| + | *TO download programs to Microduino-CoreSTM32, just use the USB interface of Microduino-CoreSTM32, without [[Microduino-USBTTL]], which is only used when programming bootLoader. There is bootloader, by default, so you don't have to program it. | ||
===Program for Microduino-CoreSTM32=== | ===Program for Microduino-CoreSTM32=== | ||
*Make sure installed the Microduino-CoreSTM32 derive | *Make sure installed the Microduino-CoreSTM32 derive | ||
| − | *Prepared hardware:Microduino- | + | *Prepared hardware:Microduino-CoreSTM32, USB cable |
*Prepared software:Maple IDE | *Prepared software:Maple IDE | ||
| − | '''[[ | + | '''[[The beginning of Micoduino-CoreSTM32]]''' |
| + | ===Set Microduino-CoreSTM32 Development Environment(2)=== | ||
| + | *Use Keil uVision development environment: To develop Microduino-CoreSTM3, software keil can also be used. This environment can not only use C language, but also assembly language to program. And it has accessible integration environment, and powerful software simulation debugging tolls. Keil provides a complete development plan, including C compiler, microassembler, exoskeleton, library manager, and a powerful simulation debugger, which are combined together by an integration development environment(μVision. | ||
| + | *To configure Keil uVision development environment, please refer to '''[[Configuration of Microduino-CoreSTM32 Keil development environment]]''' | ||
| + | *To download programs to Microduino-CoreSTM32, you can directly use the USB interface of Microduino-CoreSTM32. And to execute online breakpoint debugging, another module Microduino-CoreSTMDEBUGE is needed, namely stlink.And you can stack the two modules and connect them through the USB interface of Microduino-CoreSTMDEBUGE to the computer to download programs. | ||
| + | |||
| + | ===Program Microduino-CoreSTM32(2)=== | ||
| + | |||
| + | *Please make sure that you have installed STLINK driver. | ||
| + | *Required hardware: Microduino-CoreSTM32, Microduino-CoreSTMDEBUGE, and a USB cable. | ||
| + | *Requires software: Keil uVision5 | ||
| + | '''[[STM32 Keil development environment experiment]]''' | ||
===Burn the Microduino- CoreSTM32 BootLoader=== | ===Burn the Microduino- CoreSTM32 BootLoader=== | ||
| − | *If you got a Microduino-CoreSTM32 board without the bootloader, you have to use the Microduino-CoreUSB to burn the bootloader firstly, please refers to '''[[ | + | *If you got a Microduino-CoreSTM32 board without the bootloader, you have to use the Microduino-CoreUSB to burn the bootloader firstly, please refers to '''[[Use the Microduino-USBTTL to burn bootloader for Microduino- CoreSTM32]]'''. |
==Applicaion== | ==Applicaion== | ||
| − | [[Microduino | + | [[Microduino CoreSTM32 Tutorial]] |
==History== | ==History== | ||
Latest revision as of 03:50, 4 August 2017
| Language: | English • 中文 |
|---|
|
Microduino-CoreSTM32 is one of the core modules of Microduino, adopting ARM development board of STM32F103CBT6 chip. Microduino-CoreSTM32 is a open-source software, compatible with Maple Mini, and it can be used together with Microduino extension modules and other electronic components, modules, and sensors to make many funny interactive works. Contents[hide]Features
|
SpecificationElectrical Specification
Pin Specification
0,1,2,3,4,5,6,7,8,9,10,11,12,13,14(A0),15(A1),16(A2),17(A3),18(SDA),19(SCL),20(A6),21(A7)
A0(ADC12_IN0), A1(ADC12_IN1), A2(ADC12_IN2), A3(ADC12_IN3), 10(ADC12_IN4), 13(ADC12_IN5), 12(ADC12_IN6), 11(ADC12_IN7), A6(ADC12_IN8), A7(ADC12_IN9)
Documents
DevelopmentSet up the Microduino-CoreSTM32 development environment(1)
Program for Microduino-CoreSTM32
The beginning of Micoduino-CoreSTM32 Set Microduino-CoreSTM32 Development Environment(2)
Program Microduino-CoreSTM32(2)
STM32 Keil development environment experiment Burn the Microduino- CoreSTM32 BootLoader
ApplicaionHistoryPicture |


