Difference between revisions of "Temperature & Humidity Sensor"
From Microduino Wiki
(Created page with "{| style="width: 800px;" |- | ==Objective== How to use Microduino light intensity sensor. ==Equipment== *'''Microduino-CoreUSB''' *'''Microduino-Light Intensity Sens...") |
|||
| (10 intermediate revisions by 3 users not shown) | |||
| Line 2: | Line 2: | ||
|- | |- | ||
| | | | ||
| − | == | + | ==Outline== |
| − | + | This mCookie sensor uses an AM2321 chip and the standard mCookie connector to give you the ability to quickly add high precision temperature measuring and humidity sensing to any Microduino project. The sensor has an on-board microprocessor delivering rapid response, high noise tolerance and excellent data quality. | |
| − | + | ==Specification== | |
| − | + | *Electrical Specifications | |
| − | == | + | **Operation Voltage: 2.6~5V; |
| − | * | + | **Output: Data over I2C bus protocol |
| − | * | + | *Technical Specifications |
| − | * | + | **Resolution: |
| − | + | ***0.1 Degrees Celsius (°C) | |
| − | + | ***0.1 percent (%) Relative Humidity | |
| + | *Dimensions | ||
| + | **Dimensions of the Sensor: 8mm*11mm | ||
| + | **Dimensions of the Board: 20mm*10mm | ||
| + | ** Connector Interface: 4 Pin, 1.27mm-pitch | ||
| + | *Communication Protocol | ||
| + | **Interface: I2C | ||
| + | **Pins: SDA (data), SCL (clock), VCC (power) and GND (ground) | ||
| + | ==Development== | ||
| + | ===Equipment=== | ||
| + | {|class="wikitable" | ||
| + | |- | ||
| + | |Module||Number||Function | ||
| + | |- | ||
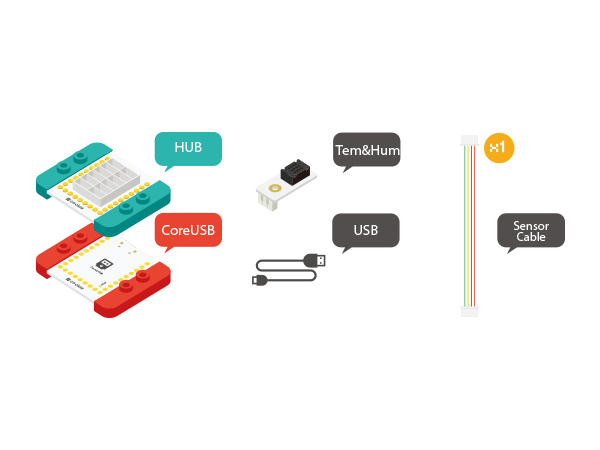
| + | |[[mCookie-CoreUSB]]||1||Core board | ||
| + | |- | ||
| + | |[[mCookie-Hub]]||1||Sensor pin board | ||
| + | |- | ||
| + | |[[Microduino-Temp&Hum]]||1||Sound detection sensor | ||
| + | |} | ||
*Other Hardware Equipment | *Other Hardware Equipment | ||
| − | **USB cable | + | **One USB cable |
| − | + | [[File:Temp-Hum.jpg|600px|center]] | |
| − | + | ===Preparation=== | |
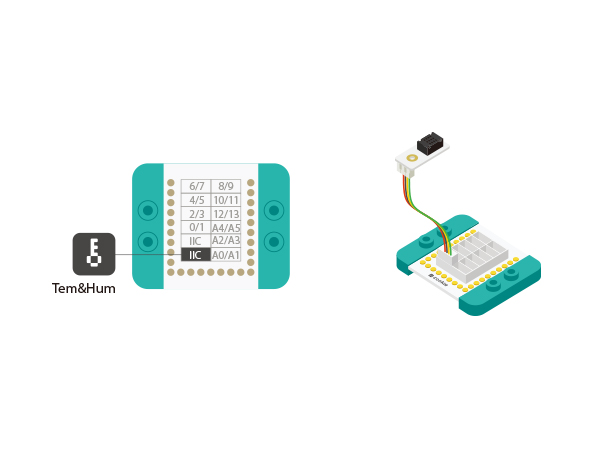
| − | == | + | *Setup 1: Connect Microduino-Temp&Hum to the IIC port of the Hub. |
| − | + | [[file:mCookie-Temp&Hum-sensor.JPG|600px|center]] | |
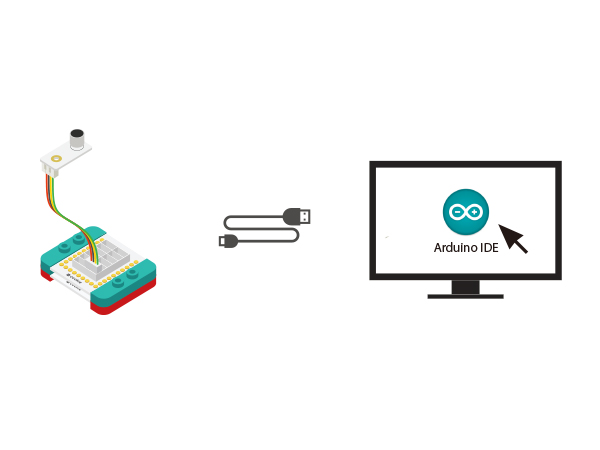
| − | + | *Setup 2: Stack the CoreUSB, Hub and Sound together and then connect them to the computer with a USB cable. | |
| − | + | [[file:mCookie-Sound-pc.JPG|600px|center]] | |
| − | |||
| − | |||
| − | [[ | ||
| − | |||
| − | |||
| − | |||
| − | |||
| − | |||
| − | [[ | ||
| − | |||
| − | + | ===Experiment: Detect Temp&Hum Values === | |
| − | + | *Open the Arduino IDE and copy the following code into IDE, or select from the examples built into the IDE: | |
| − | + | File->Examples->_07_Sensor_Temp_Hum_AM2321->'read_simple' | |
| + | <source lang="cpp"> | ||
| + | #include <Wire.h> | ||
| + | #include <AM2321.h> | ||
| + | void setup() { | ||
| + | Serial.begin(9600); | ||
| + | } | ||
| − | + | void loop() { | |
| − | + | readByAM2321(); | |
| − | + | delay(500); | |
| + | } | ||
| + | void readByAM2321() | ||
| + | { | ||
| + | AM2321 am2321; | ||
| + | am2321.read(); | ||
| − | + | Serial.print("("); | |
| + | Serial.print(am2321.temperature/10.0); | ||
| + | Serial.print(", "); | ||
| + | Serial.print(am2321.humidity/10.0); | ||
| + | Serial.println(')'); | ||
| + | } | ||
| + | </source> | ||
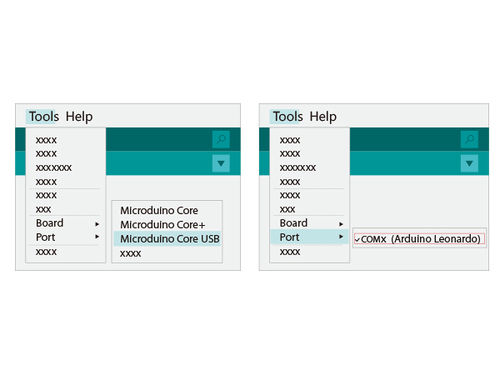
| + | *Select the right board from Tools→Serial Port in Arduino IDE and download the program. | ||
| + | [[file:uploadhum.JPG|500px|center]] | ||
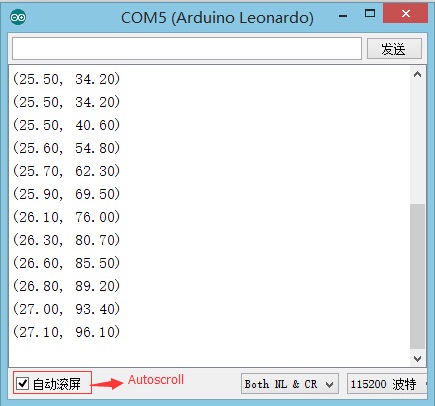
| + | *Open the serial monitor after download; The value displayed reflects the current temperature and humidity. | ||
| + | [[file:mCookie-Temp-Hum-reshum.JPG|500px|center]] | ||
| − | + | ===Program Debugging === | |
| + | *The program uses AM2321 temperature and humidity collection library and defines "#include <Wire.h>" and "#include <AM2321.h>" as driving files. | ||
| + | *The program uses two important libraries to communicate with the sensor. For any project/software that uses this sensor, the following libraries must be included: | ||
| + | **For the AM2321 sensor: "#include <AM2321.h>" | ||
| + | **For I2C Communication: "#include <Wire.h>" | ||
| + | *“am2321.temperature/10.0”represents the calculated temperature value and " am2321.humidity/10.0" represents the calculated humidity value. | ||
| + | ==Application== | ||
| + | The Microduino Temperature and Humidity sensor can be used in a range of applications including HVAC systems, dehumidifiers, home automation, data recording or in a weather station. | ||
==Video== | ==Video== | ||
|} | |} | ||
Latest revision as of 06:40, 30 September 2016
ContentsOutlineThis mCookie sensor uses an AM2321 chip and the standard mCookie connector to give you the ability to quickly add high precision temperature measuring and humidity sensing to any Microduino project. The sensor has an on-board microprocessor delivering rapid response, high noise tolerance and excellent data quality. Specification
DevelopmentEquipment
Preparation
Experiment: Detect Temp&Hum Values
File->Examples->_07_Sensor_Temp_Hum_AM2321->'read_simple' #include <Wire.h>
#include <AM2321.h>
void setup() {
Serial.begin(9600);
}
void loop() {
readByAM2321();
delay(500);
}
void readByAM2321()
{
AM2321 am2321;
am2321.read();
Serial.print("(");
Serial.print(am2321.temperature/10.0);
Serial.print(", ");
Serial.print(am2321.humidity/10.0);
Serial.println(')');
}
Program Debugging
ApplicationThe Microduino Temperature and Humidity sensor can be used in a range of applications including HVAC systems, dehumidifiers, home automation, data recording or in a weather station. Video |
