Difference between revisions of "Open Source Electric Drive Cube Robot"
From Microduino Wiki
(→Installation) |
(→Installation) |
||
| Line 102: | Line 102: | ||
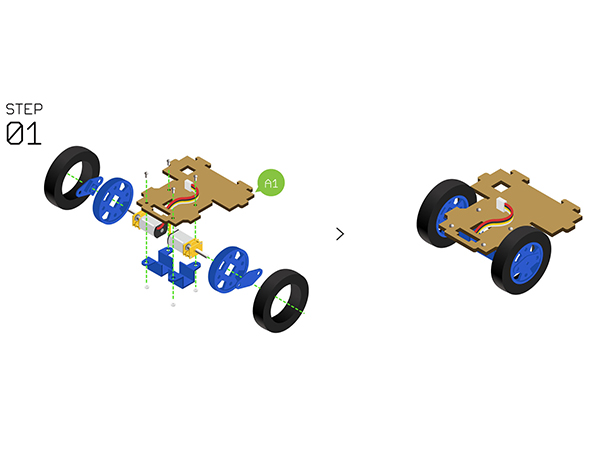
**Adopt '''Motor fixation base''' to fixate the two '''N20 gear motors ''' on the '''Structure-A1'''. | **Adopt '''Motor fixation base''' to fixate the two '''N20 gear motors ''' on the '''Structure-A1'''. | ||
**Assemble the '''Wheels''', '''tyres''' and '''Couplings''', then install them with the fixated '''N20 gear motor'''. | **Assemble the '''Wheels''', '''tyres''' and '''Couplings''', then install them with the fixated '''N20 gear motor'''. | ||
| + | |- | ||
| + | | | ||
[[File:Cubestep1.jpg||600px|left]] | [[File:Cubestep1.jpg||600px|left]] | ||
| − | + | | | |
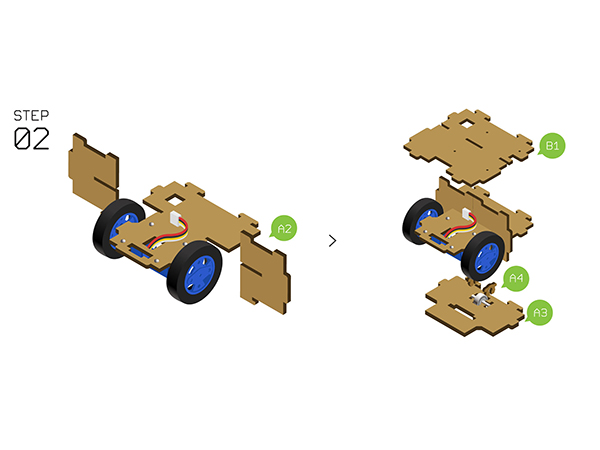
*'''Step2''': | *'''Step2''': | ||
| Line 109: | Line 111: | ||
*Use two '''Structure-A4''' to fixate the bottom of '''Auxiliary wheel''' on the '''Structure-A3'''. | *Use two '''Structure-A4''' to fixate the bottom of '''Auxiliary wheel''' on the '''Structure-A3'''. | ||
*Prepare '''Structure-A3''' and '''Structure-B1''' from up to down as the picture shows below. | *Prepare '''Structure-A3''' and '''Structure-B1''' from up to down as the picture shows below. | ||
| + | |- | ||
| + | | | ||
[[File:Cubestep2.jpg||600px|left]] | [[File:Cubestep2.jpg||600px|left]] | ||
| − | + | | | |
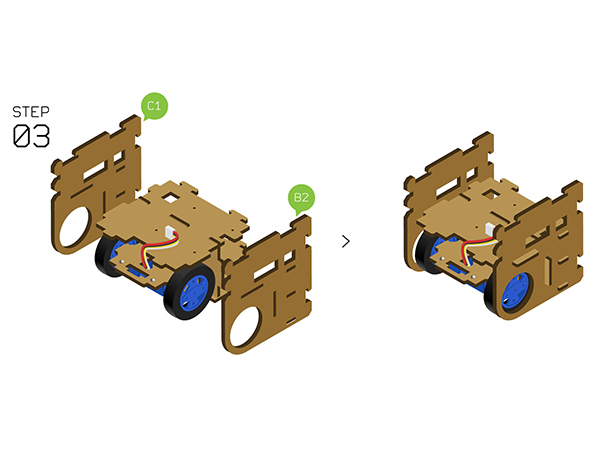
*'''Step3''': | *'''Step3''': | ||
*Fixate the'''Structure-B2''' and '''Structure-C1''' on the two sides. | *Fixate the'''Structure-B2''' and '''Structure-C1''' on the two sides. | ||
| + | |- | ||
| + | | | ||
[[File:Cubestep3.jpg||600px|left]] | [[File:Cubestep3.jpg||600px|left]] | ||
| − | + | | | |
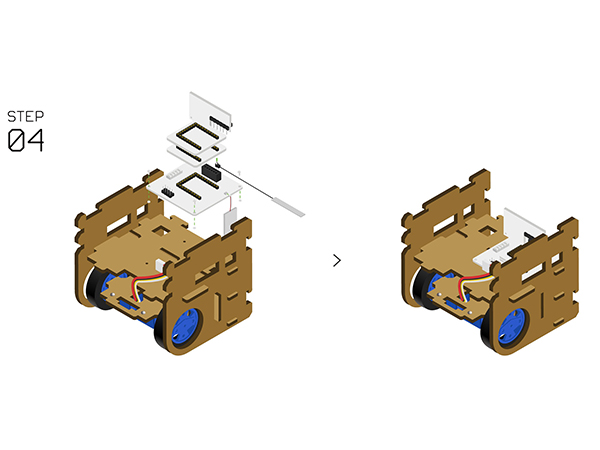
*'''Step4''': | *'''Step4''': | ||
| Line 126: | Line 132: | ||
*Connect two '''N20 gear motors''' to the A.A/A.B motor interfaces on the base of '''[[Microduino-Robot]]'''. | *Connect two '''N20 gear motors''' to the A.A/A.B motor interfaces on the base of '''[[Microduino-Robot]]'''. | ||
*Fixate '''[[Microduino-Robot]]''' on'''Structure-B1''' with screws. | *Fixate '''[[Microduino-Robot]]''' on'''Structure-B1''' with screws. | ||
| + | |- | ||
| + | | | ||
[[File:Cubestep4.jpg||600px|left]] | [[File:Cubestep4.jpg||600px|left]] | ||
| − | + | | | |
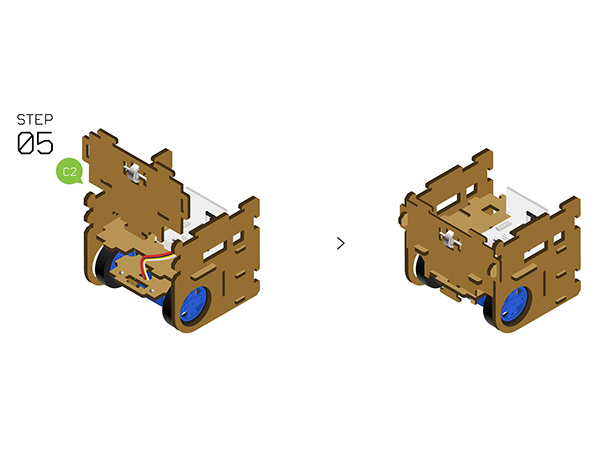
*'''Step5''': | *'''Step5''': | ||
*Fixate '''Auxiliary wheels''' on '''Structure-C2''' with two '''Structure-C3'''. | *Fixate '''Auxiliary wheels''' on '''Structure-C2''' with two '''Structure-C3'''. | ||
*Insert the '''Structure-C2''' to the front side. | *Insert the '''Structure-C2''' to the front side. | ||
| + | |- | ||
| + | | | ||
[[File:Cubestep5.jpg||600px|left]] | [[File:Cubestep5.jpg||600px|left]] | ||
| − | + | | | |
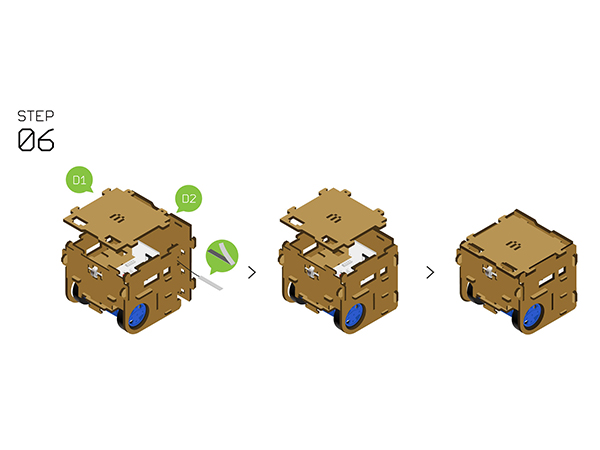
*'''Step6''': | *'''Step6''': | ||
*Insert'''Structure-D2''' to the back side and stick the antenna. | *Insert'''Structure-D2''' to the back side and stick the antenna. | ||
*Put the '''Structure-D1''' on the top and by here, congratulations! You just completed the installation. | *Put the '''Structure-D1''' on the top and by here, congratulations! You just completed the installation. | ||
| + | |- | ||
| + | | | ||
[[File:Cubestep6.jpg||600px|left]] | [[File:Cubestep6.jpg||600px|left]] | ||
| + | | | ||
| + | |} | ||
==Instructions of the Remote Control == | ==Instructions of the Remote Control == | ||
Revision as of 03:14, 8 June 2016
ContentsOutline
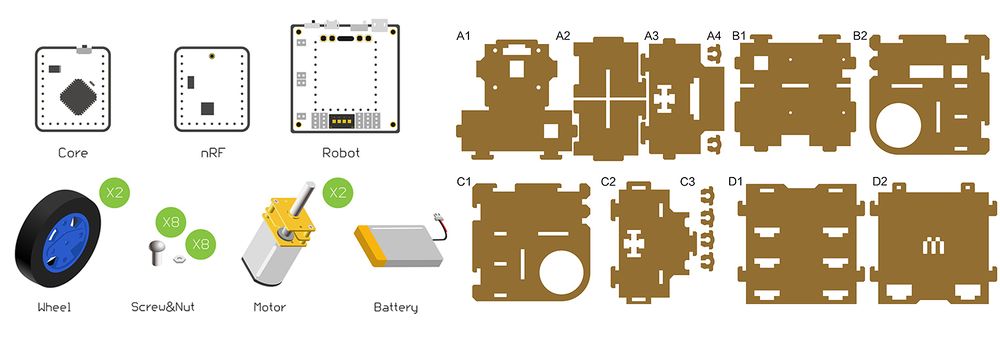
Bill of MaterialBill of Modules(Joypad mode)
Bill of Module(Bluetooth mode)
Other Material
Principle of the Experiment
Program Download
Programming
Installation
| ||||||||||||||||||||||||||||||||||||||||||||||||||||||||||||
| ||||||||||||||||||||||||||||||||||||||||||||||||||||||||||||
| ||||||||||||||||||||||||||||||||||||||||||||||||||||||||||||
| ||||||||||||||||||||||||||||||||||||||||||||||||||||||||||||
| ||||||||||||||||||||||||||||||||||||||||||||||||||||||||||||
| ||||||||||||||||||||||||||||||||||||||||||||||||||||||||||||
Instructions of the Remote Control
- If stacking the nRF module and start, the system will enter the Joypad control mode by default, otherwise, it'll enter the Bluetooth mode.
Guide for Joypad Control
- For the installation, you can refer to the following page: [1]
- Joypad Communication Mode Configuration *
- For the mode configuration, you can refer to the following page: Communication Protocol Configuration
- When we use Microduino-nRF24 as the communication module, for the Joypad, it can choose nRF mode correspondingly.
- Instruction of Joypad Battery Use *
- For the battery use, you can refer to: Power-on via Battery
Guide for Bluetooth Control
- Bluetooth control APP download: File:MTank.rar
Code Description
- Find the configuration file in " user_def.h ".
- The following codes can configure the channel under nRF mode, which needs to keep consistent with Joypad controller.
- For the Joypad's nRF mode channel configuraton, you can refer to: Channel Configuration of nRF Mode
#define NRF_CHANNEL 70 //nRF channel- The following codes can configure the throttle and the corresponding steering channel.
- For the corresponding channel, you can refer to: Channel/Operation Description
#define CHANNEL_THROTTLE  2 //Throttle channel
#define CHANNEL_STEERING 1 //Steering channel- The following codes can revise the speed ratio of the two wheels.
- The range is between -1 and 1.
- Set as -1, the maximum speed ratio, clockwise.
- Set as 1, the maximum speed ratio, anti-clockwise.
- If the car cannot go straightly, you should reduce the speed ratio of the lower wheel.
#define motor_fixL 1  //Speed correction (-1 to 1)
#define motor_fixR 1  // Speed correction (-1 to 1)
FAQ
- Q:How to choose Joypad mode or Bluetooth mode for this CUBE robot?
- A:You don't have to select manually but stack nRF24 module when power-on. The system will enter the Joypad mode by default, or it'll enter Bluetooth mode.
- Q:What type of battery does the CUBE robot support?
- A:It supports 3.7V 1S lithium battery.
- Q:How to connect the motors?
- A:You can connect the two motors to the A.A/A.B interfaces respectively.
- Q:Does my phone support Bluetooth control?
- A:It is supportable for phones of Android 4.3 or higher.
|}
