Difference between revisions of "Lesson 1--Microduino "LED and a Breadboard""
(Created page with "{| style="width: 800px;" |- | ==Objective== Using Microduino to control a LED. Actually you can learn to how to use the Micrduino's I/O port. This is a basic skill you should ...") |
|||
| Line 38: | Line 38: | ||
==Program== | ==Program== | ||
| − | * | + | *Using delay() function: |
<source lang="cpp"> | <source lang="cpp"> | ||
| − | int led = 13;// | + | int led = 13;// Define the PIN |
void setup() { | void setup() { | ||
| − | pinMode(led, OUTPUT); // | + | pinMode(led, OUTPUT); // Define the I/O port 13 as output |
} | } | ||
void loop() { | void loop() { | ||
| − | digitalWrite(led, HIGH); // | + | digitalWrite(led, HIGH); //I/O port 13 output High. If the connection is high lighted,the LED will light, otherwise extinguished |
| − | delay(1000); // | + | delay(1000); // delay 1s |
| − | digitalWrite(led, LOW); // | + | digitalWrite(led, LOW); //I/O port 13 output Low.If the connection is high lighted,the LED off, otherwise light. |
| − | delay(1000); // | + | delay(1000); // delay 1s |
} | } | ||
</source> | </source> | ||
| − | * | + | *Using function milles():Return the number of milliseconds from start running Microduino program to now. |
<source lang="cpp"> | <source lang="cpp"> | ||
int ledPin=13; | int ledPin=13; | ||
| Line 78: | Line 78: | ||
</source> | </source> | ||
| − | + | Using function millis () is better than the delay () function, less resource and fewer delays on the system. | |
| + | |||
| + | ==Download program method== | ||
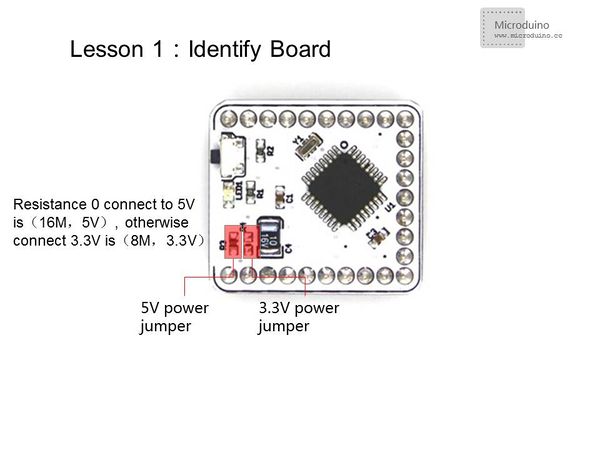
| + | *Choose the board type in "tools", the "Microduino-Core(ATmega328P@16M,5V)" is used in this experiment. There are two types of 328 board, so you need identify which type board you are using. You can check the 0 resistor's connection method to identify. | ||
| − | |||
| − | |||
[[File:板卡判断.jpg|600px|center|thumb]] | [[File:板卡判断.jpg|600px|center|thumb]] | ||
| − | * | + | *Choose COM port.Matched serial port is different for everyone's computer, so you just need choose your own. The COM port is in "properties"->"device manager" in your computer, you also can double-click "Advanced" to change the COM port by port settings. |
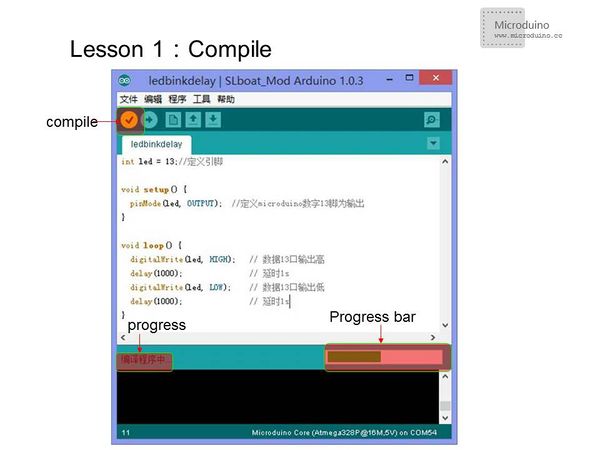
| − | * | + | *Compile downloads |
[[File:编译图.jpg|600px|center|thumb]] | [[File:编译图.jpg|600px|center|thumb]] | ||
[[File:下载界面.jpg|600px|center|thumb]] | [[File:下载界面.jpg|600px|center|thumb]] | ||
| − | == | + | ==Result== |
| − | + | After the download, you can see LED flashes once every 1s. | |
| − | == | + | ==Video== |
|} | |} | ||
Revision as of 05:53, 8 February 2014
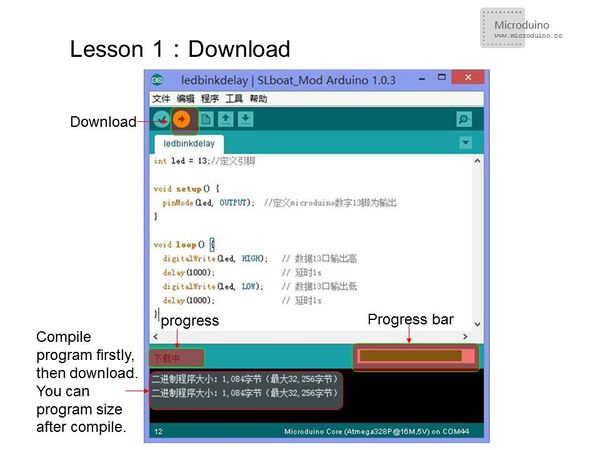
ContentsObjectiveUsing Microduino to control a LED. Actually you can learn to how to use the Micrduino's I/O port. This is a basic skill you should master and for further study. EquipmentMicroduino-Core is a 8-bit microcontroller development board based on Atmel ATmega328P, ATmega168PA series, and is an open source, compatible with Arduino UNO controller module. Detailed information, please refer to http://wiki.microduino.net/index.php?title=Microduino-Core Download program module, connect with Microduino-Core or Microduino-Core+ directly and communicate with PC. It uses MicUSB as the download port. And it has the same size with a dollar coin. Download line with most smart phones usb data cable is the same, convenient and practical Detailed information, please refer to http://wiki.microduino.net/index.php?title=Microduino-FT232R
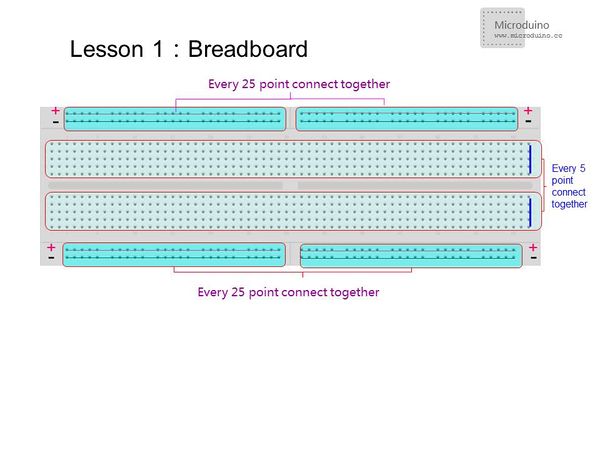
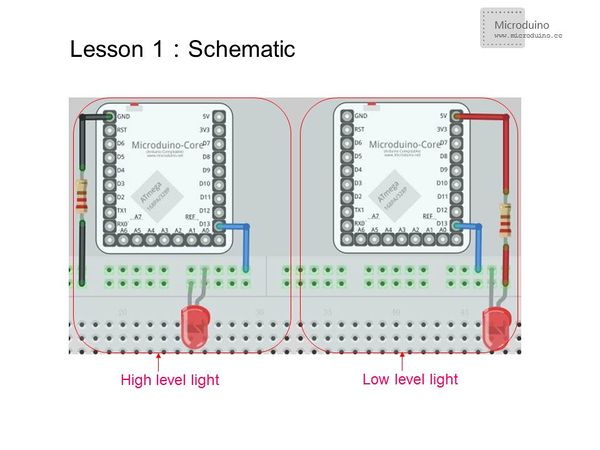
BreadboardIn the vertical direction,5 points connected together and 25 points connected together in a horizontal direction. Some bread has 50 points connected together, so make sure connection format before you use it, in order to avoid generating erroneous results. The next two rows of points 50 have more usage, one row as GDN, the other row as VCC. Please refer to the following picture. Resistor and LEDLimiting resistor is used to prevent LED burned. Usually red and green LED voltage is 1.8 ~ 2.4V, blue and white is 2.8 ~ 4.2V, 3mmLED rated current is 1 ~ 10mA, 5mmLED rated current is 5 ~ 25mA, and 10mmLED rated current is 25 ~ 100mA. According to R = U / I to the calculated resistance. Usually hundreds of ohm should be ok. Experimental schematicThere are two connection methods, one is that led cathode connects to GND, anode connects to Microduino digital I/O port 13, which is the high light led. The other method ist that led cathode connected Microduino digital I/O port 13, anode connects to VCC, so that low-level light led.
Program
int led = 13;// Define the PIN
void setup() {
  pinMode(led, OUTPUT);  // Define the I/O port 13 as output
}
void loop() {
digitalWrite(led, HIGH); //I/O port 13 output High. If the connection is high lighted,the LED will light, otherwise extinguished
delay(1000);               // delay 1s
digitalWrite(led, LOW); //I/O port 13 output Low.If the connection is high lighted,the LED off, otherwise light.
delay(1000);               // delay 1s
}
int ledPin=13;
#define TIME 1000
long time1=0,time2=0;
void setup()
{
  pinMode(ledPin,OUTPUT);
}
void loop()
{
if(millis()<time2+TIME)
{
digitalWrite(ledPin,HIGH);
time1=millis();
}
else
{
digitalWrite(ledPin,LOW);
if(millis()>time1+TIME)
time2=millis();
}
}
Using function millis () is better than the delay () function, less resource and fewer delays on the system. Download program method
ResultAfter the download, you can see LED flashes once every 1s. Video |
