Difference between revisions of "OLED (use with mDesigner)"
From Microduino Wiki
(→Method 2: Connecting with Wire) |
|||
| Line 7: | Line 7: | ||
==Method 2: Connecting with Wire== | ==Method 2: Connecting with Wire== | ||
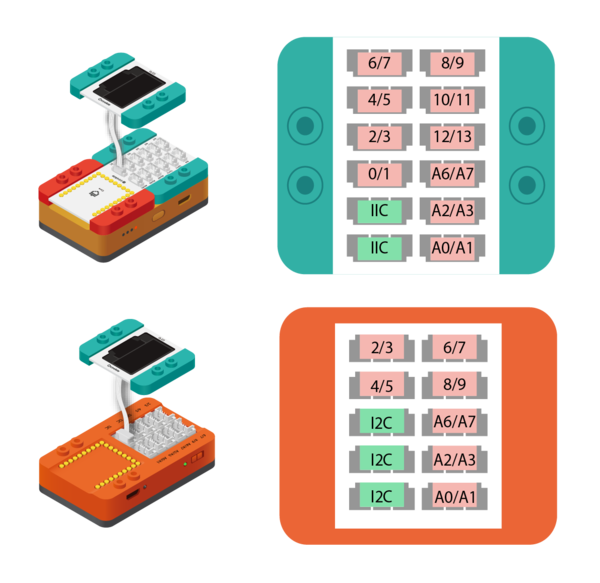
| − | Connecting the OLED screen to a sensor hub with a wire allows for the OLED to be positioned in different locations. | + | Connecting the OLED screen to a sensor hub with a wire allows for the OLED to be positioned in different locations.<br>The following pins on the '''Hub''' or '''mCenter+'s Hub''' support this module: |
| − | The following pins on the '''Hub''' or '''mCenter+'s Hub''' support this module: | ||
<div style="width: 80%;"> | <div style="width: 80%;"> | ||
<div style="float: left;">[[File:OLED_Connectivity_Wired.png|thumb|600px]]</div> | <div style="float: left;">[[File:OLED_Connectivity_Wired.png|thumb|600px]]</div> | ||
Revision as of 19:36, 12 July 2018
The organic light-emitting diode (OLED) module is a display module capable of displaying information, shapes, images, etc on its 0.96-inch 128x64 (pixel) screen. Support for this trinket is found in mDesigner.
Connectivity
The OLED module can be connected to a project in two ways. Either stacking or connecting to a sensor hub using a wire.
Method 1: Stacking
Stack directly onto an mBattery or mCenter+.
Method 2: Connecting with Wire
Connecting the OLED screen to a sensor hub with a wire allows for the OLED to be positioned in different locations.
The following pins on the Hub or mCenter+'s Hub support this module:
