Difference between revisions of "Microduino Light indicator-Digital tube(TSL2561)"
(Created page with "{{Language | Microduino 光照指示器-数码管(TSL2561)}} {| style="width: 800px;" |- | ==Objective== This tutorial will teach you to use the TSL2561 sensor and use digital...") |
|||
| Line 80: | Line 80: | ||
==Debug== | ==Debug== | ||
| − | Step | + | Step 1: Download TSL2561 library, and uncompress it to libraries folder of Arduino IDE, then restart IDE. |
http://learn.adafruit.com/tsl2561/use | http://learn.adafruit.com/tsl2561/use | ||
| − | Step | + | Step 2: Copy the code to IDE and compile it. |
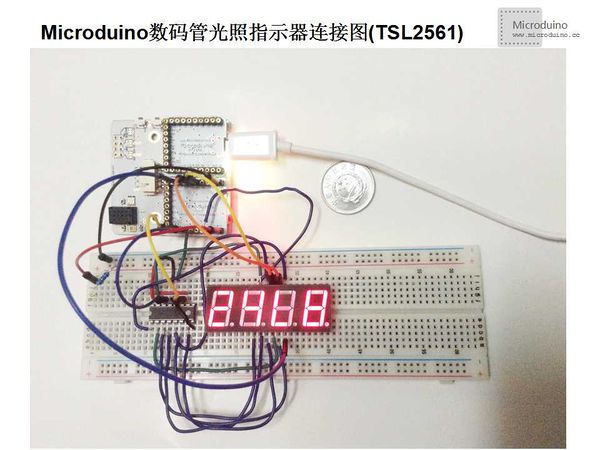
Step 3: Set up circuit, as follows: | Step 3: Set up circuit, as follows: | ||
| Line 89: | Line 89: | ||
[[File:Microduino数码管关照指示器连接图(TSL2561).jpg|600px|center|thumb]] | [[File:Microduino数码管关照指示器连接图(TSL2561).jpg|600px|center|thumb]] | ||
| − | Step | + | Step 4: Run program. |
| − | Step | + | Step 5: Observe digital tube, cover the light sensor with the hand and then let it see the light again, look at the digital tube change. |
==Result== | ==Result== | ||
Latest revision as of 10:12, 28 September 2016
| Language: | English • 中文 |
|---|
Contents[hide]ObjectiveThis tutorial will teach you to use the TSL2561 sensor and use digital tube to dispaly the result. Equipment
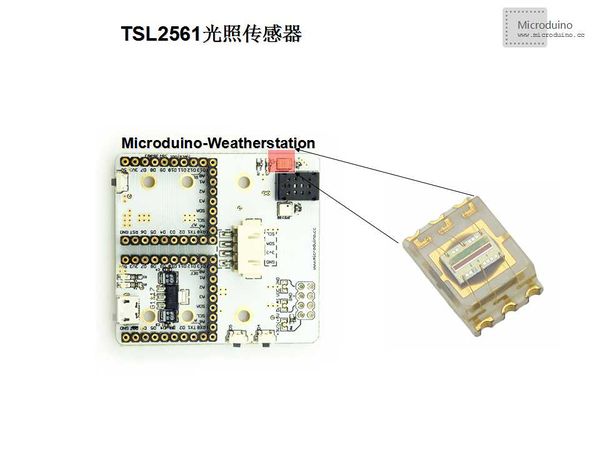
TSL2561 light sensor: Product overview TSL2561 is a light-digital converter which converts light into digital signal output, contains I2C interface or SMBus interface. Each device connected to a photosensitive diode tube and infrared photosensitive diode on a single CMOS integrated circuit. The integrated circuit has 20bit dynamic range optimal light response ability. Features:
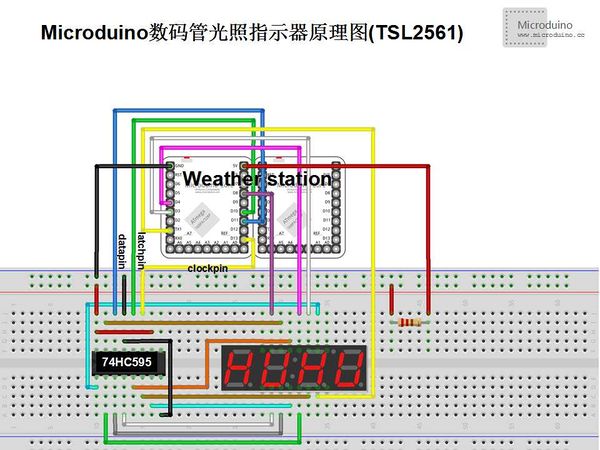
SchematicPin table
Programhttps://github.com/Microduino/Microduino_Tutorials/tree/master/Microduino_Sensor/TSL2561Segments DebugStep 1: Download TSL2561 library, and uncompress it to libraries folder of Arduino IDE, then restart IDE. http://learn.adafruit.com/tsl2561/use Step 2: Copy the code to IDE and compile it. Step 3: Set up circuit, as follows: Step 4: Run program. Step 5: Observe digital tube, cover the light sensor with the hand and then let it see the light again, look at the digital tube change. ResultCover the TSL2561 sensor with the hand, the digital tube's value will decrease, put the hand away, the value will increase.
Video |


