Difference between revisions of "Microduino Hall sensor to measure DC motor RPM"
(Created page with "{{Language | Microduino 霍尔传感器测量直流电机RPM}} {| style="width: 800px;" |- | ==Objective== This lesson will teach you use the hall sensor to measure the RPM(Re...") |
|||
| Line 31: | Line 31: | ||
https://github.com/Microduino/Microduino_Tutorials/tree/master/Microduino_Sensor/HallSensorSpeedMeasurement | https://github.com/Microduino/Microduino_Tutorials/tree/master/Microduino_Sensor/HallSensorSpeedMeasurement | ||
| − | Function | + | Function description: |
attachInterrupt(0, rpm, RISING); //Bind the interrupt to pin 0 which corresponding to port D2 in microduino. When interrupt happened, invoke function rpm(), the trigger condition is that voltage changed from low to high. | attachInterrupt(0, rpm, RISING); //Bind the interrupt to pin 0 which corresponding to port D2 in microduino. When interrupt happened, invoke function rpm(), the trigger condition is that voltage changed from low to high. | ||
| Line 40: | Line 40: | ||
==Debug== | ==Debug== | ||
| − | Step | + | Step 1: Copy the code to IDE and compile it. |
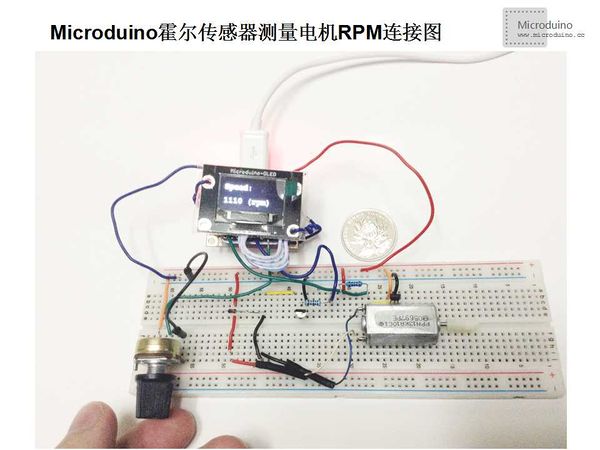
| − | Step | + | Step 2: Set up circuit, as follows: |
[[File:Microduino霍尔传感器测量电机RPM连接图.jpg|600px|center|thumb]] | [[File:Microduino霍尔传感器测量电机RPM连接图.jpg|600px|center|thumb]] | ||
| − | + | Note: | |
| − | + | Step 1: During setting up circuit, we will use Microduino-Cube-S1 board. This extension board was designed for OLED, only need plug in the Microduino-Core and Microduino-FT232R to slot and then connect the OLED to corresponding slot on Microduino-Cube-S1. | |
| − | + | Step 2: As far as possible close hall sensor to DB motor, and easy to detect magnetic field changes. | |
| − | Step | + | Step 3: Run program. |
| − | Step | + | Step 4: Rotate the potentiometer, observe the value on OLED. |
==Result== | ==Result== | ||
Revision as of 06:42, 12 September 2016
| Language: | English • 中文 |
|---|
ObjectiveThis lesson will teach you use the hall sensor to measure the RPM(Revolution(s) Per Minute) of DC motor, and display the value on OLED. Equipment
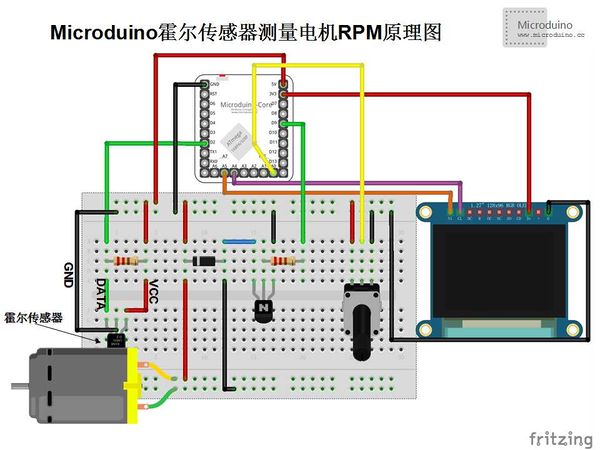
Schematic
ProgramFunction description: attachInterrupt(0, rpm, RISING); //Bind the interrupt to pin 0 which corresponding to port D2 in microduino. When interrupt happened, invoke function rpm(), the trigger condition is that voltage changed from low to high. sei(); //Enable the interrupt cli(); //Disable the interrupt DebugStep 1: Copy the code to IDE and compile it. Step 2: Set up circuit, as follows: Note: Step 1: During setting up circuit, we will use Microduino-Cube-S1 board. This extension board was designed for OLED, only need plug in the Microduino-Core and Microduino-FT232R to slot and then connect the OLED to corresponding slot on Microduino-Cube-S1. Step 2: As far as possible close hall sensor to DB motor, and easy to detect magnetic field changes. Step 3: Run program. Step 4: Rotate the potentiometer, observe the value on OLED. ResultRotate the potentiometer, motor will rotate. Hall sensor will induct motor's magnetic field changes regularly, to determine the frequency in one second and calculate the RPM, and then displayed on the OLED. Videohttp://v.youku.com/v_show/id_XNjkyNzk0MTQw.html
|

