Difference between revisions of "Microduino BLE Android-202KIT"
From Microduino Wiki
(Created page with "{{Language|Microduino_BLE_Android-202KIT}} {| style="width: 800px;" |- | ==Outline== Project:Microduino BT communicates with Android device Objective:Android mobile send ...") |
|||
| Line 4: | Line 4: | ||
| | | | ||
==Outline== | ==Outline== | ||
| − | + | Project: Microduino-BT communicates with Android devices. | |
| − | + | Objective: Android phones can send character strings to Microduino-Core and Microduino-BT via phone App, and display character data via the serial monitor. | |
| − | + | Difficulty: Primary | |
| − | Time- | + | Time-consuming: 30mins |
| − | + | Maker: Microduino Studio-YLB | |
|- | |- | ||
| | | | ||
| − | ==Bill of Materials== | + | ==Bill of Materials == |
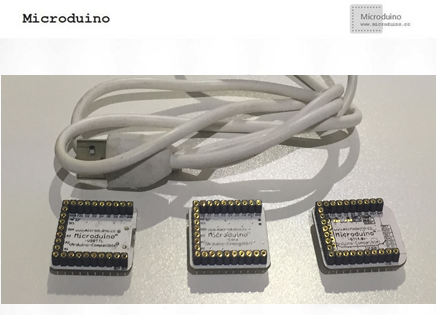
| − | *Microduino | + | *Microduino Equipment |
{|class="wikitable" | {|class="wikitable" | ||
|- | |- | ||
| − | |Module||Number||Function | + | |Module||Number||Function |
|- | |- | ||
| − | |Microduino-Core||1|| | + | |[[Microduino-Core]]||1||Core board |
|- | |- | ||
| − | |Microduino- | + | |[[Microduino-USBTTL]] ||1||Program download |
|- | |- | ||
| − | |Microduino-BT||1|| | + | |[[Microduino-BT]]||1||Bluetooth communication |
| − | |||
| − | |||
| − | |||
| − | |||
|} | |} | ||
|- | |- | ||
| | | | ||
| − | [[File:Android- | + | [[File:Android-202KIT2-module.png|600px|center|thumb|202KIT图片]] |
|- | |- | ||
| | | | ||
| − | *Software | + | *Software Equipment |
| − | Arduino | + | Arduino IDE(Version 1.0 and higher) |
| − | |||
| − | *Other | + | *Other Equipment |
| − | **Android | + | **Android devices(Version 4.3 and higher) , which supports Bluetooth 4.0. _ |
| − | ** | + | **Micro USB cable |
==Document== | ==Document== | ||
| − | + | Test program and App download:[[File:BT—APP.zip]] | |
| − | + | ||
|- | |- | ||
| | | | ||
| − | == | + | |
| + | ==Debugging== | ||
|- | |- | ||
| | | | ||
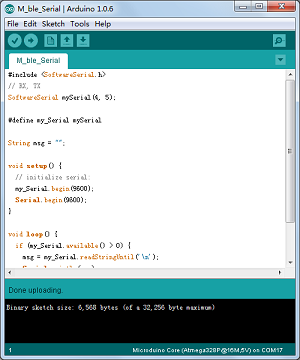
| − | Step | + | Step 1: Stack Microduino-Core and Microduino-USBTTL together, connect them to a computer with a USB cable, start Arduino IDE, open test program M_ble_Serial.ino, select Microduino Core (Atmega328P@16M,5V) from (tools)-> (Board) and choose the corresponding serial port from(tools)-> (Serial) . After that, please click the button "√" on the top left of IDE, compile the program, and then click "√" to burn the program into the board; |
|- | |- | ||
| | | | ||
| − | [[File:ble- | + | [[File:ble-Download2.png|600px|center|thumb|Download]] |
| − | + | ||
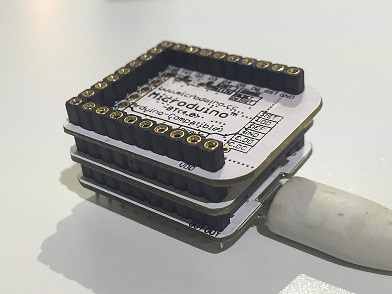
| − | + | Step 2: Stack all modules after the download, connect them to the computer with a USB cable and install after power-off. | |
| − | |||
|- | |- | ||
| | | | ||
| − | [[File:202KIT-android- | + | [[File:202KIT-android-system1.jpg|600px|center|thumb|202KIT-OK]] |
| − | Step | + | |
| + | Step 3: Start to set IOS device, get the Bluetooth function activated, install and open ".apk " file, then open the serial monitor in the IDE side of the computer. | ||
| + | |||
| + | Step 4: Click the SCAN button on the top right of the App and you'll see peripheral Bluetooth devices as follows: | ||
| + | [[File:202KIT-android-system3.jpg|600px|center|thumb|App—蓝牙搜索]] | ||
| + | Click the correpsonding Bluetooth number and enter the following interface: | ||
| + | [[File:202KIT-android-system4.jpg|600px|center|thumb|App—蓝牙通信]] | ||
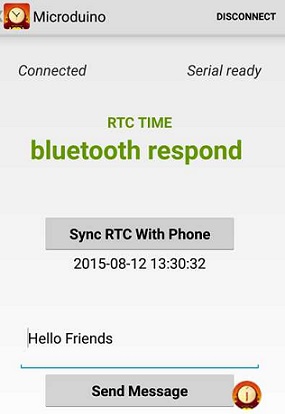
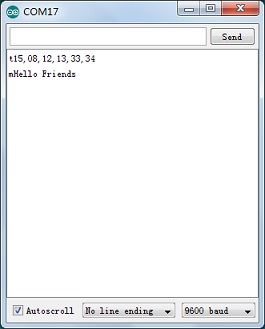
| + | Wait for 203 seconds until you see "ready" on the screen, meaning the phone has established connection with the Bluetooth; By clicking the button " Sync RTC With Phone " in the middle of the screen and watch the change of the serial monitor as well as "RTC TIME" on the top of the button. | ||
| + | [[File:202KIT-android-system6.jpg|600px|center|thumb|App—手机App]] | ||
| + | [[File:202KIT-android-system5.jpg|600px|center|thumb|App—串口监视器]] | ||
| − | + | You can see RTC content change on the phone and receive the corresponding data on the serial monitor side, which means the bidirectional communication function of Bluetooth. | |
| − | |||
| − | |||
| − | |||
| − | |||
| − | |||
| − | |||
| − | |||
| − | |||
| − | |||
| − | |||
| − | |||
| − | |||
| − | |||
| − | |||
| − | |||
| − | + | ==Analysis of Test Code== | |
| − | + | <source lang="cpp"> | |
| + | #include <SoftwareSerial.h> | ||
| + | // RX, TX ; Use default Bluetooth communication serial 4 and 5. | ||
| + | SoftwareSerial mySerial(4, 5); | ||
| + | #define my_Serial mySerial | ||
| + | String msg = ""; | ||
| + | void setup() | ||
| + | { | ||
| + | // Initialize the baud rate of the serial communication. | ||
| + | my_Serial.begin(9600); | ||
| + | Serial.begin(9600); | ||
| + | } | ||
| + | void loop() | ||
| + | { | ||
| + | //Every time it receives signal, it'll give feedback once to the other communication side. | ||
| + | if (my_Serial.available() > 0) //If there is serial data input | ||
| + | { | ||
| + | msg = my_Serial.readStringUntil('\n'); //Acquire all content before a line break. | ||
| + | Serial.println(msg); //Display character strings on "msg" in the serial monitor. | ||
| + | my_Serial.println("bluetooth respond"); //Send data to the other side of the Bluetooth communication. | ||
| + | } | ||
| + | } | ||
| + | </source> | ||
==Result== | ==Result== | ||
| − | Microduino | + | By Microduino-BT, Microduino core can communicate with an Android phone. |
| − | == | + | ==Caution== |
| − | * | + | *Serial baud rate must be 9,600 or the receiving character will cause messy codes. |
| − | *If | + | *If keeping the default jumper wire(RX0,TX1), please unplug Microduino-BT 4.0 while downloading the program, and then power off and install after the download. |
| − | *If | + | *If adopting jumper wire changing method, then you can change the serial connection of Microduino-BT and Microduino-Core from TX-RX-, RX-TX1 to: |
| − | **TX-D2, RX- | + | **TX-D2, RX-D3(Serial1 for Core+) |
| − | **TX-D9, RX- | + | **TX-D9, RX-D10(You can use SoftwareSeria library to handle it.) |
| − | |||
| − | |||
| − | |||
| − | |||
Latest revision as of 07:13, 16 November 2015
| Language: | English • 中文 |
|---|
ContentsOutlineProject: Microduino-BT communicates with Android devices. Objective: Android phones can send character strings to Microduino-Core and Microduino-BT via phone App, and display character data via the serial monitor. Difficulty: Primary Time-consuming: 30mins Maker: Microduino Studio-YLB | ||||||||||||
Bill of Materials
| ||||||||||||
Arduino IDE(Version 1.0 and higher)
DocumentTest program and App download:File:BT—APP.zip | ||||||||||||
Debugging | ||||||||||||
Step 1: Stack Microduino-Core and Microduino-USBTTL together, connect them to a computer with a USB cable, start Arduino IDE, open test program M_ble_Serial.ino, select Microduino Core (Atmega328P@16M,5V) from (tools)-> (Board) and choose the corresponding serial port from(tools)-> (Serial) . After that, please click the button "√" on the top left of IDE, compile the program, and then click "√" to burn the program into the board; | ||||||||||||
Step 2: Stack all modules after the download, connect them to the computer with a USB cable and install after power-off. | ||||||||||||
Step 3: Start to set IOS device, get the Bluetooth function activated, install and open ".apk " file, then open the serial monitor in the IDE side of the computer. Step 4: Click the SCAN button on the top right of the App and you'll see peripheral Bluetooth devices as follows: Click the correpsonding Bluetooth number and enter the following interface: Wait for 203 seconds until you see "ready" on the screen, meaning the phone has established connection with the Bluetooth; By clicking the button " Sync RTC With Phone " in the middle of the screen and watch the change of the serial monitor as well as "RTC TIME" on the top of the button. You can see RTC content change on the phone and receive the corresponding data on the serial monitor side, which means the bidirectional communication function of Bluetooth. Analysis of Test Code#include <SoftwareSerial.h>
// RX, TX ; Use default Bluetooth communication serial 4 and 5.
SoftwareSerial mySerial(4, 5);
#define my_Serial mySerial
String msg = "";
void setup()
{
// Initialize the baud rate of the serial communication.
my_Serial.begin(9600);
Serial.begin(9600);
}
void loop()
{
//Every time it receives signal, it'll give feedback once to the other communication side.
if (my_Serial.available() > 0) //If there is serial data input
{
msg = my_Serial.readStringUntil('\n'); //Acquire all content before a line break.
Serial.println(msg); //Display character strings on "msg" in the serial monitor.
my_Serial.println("bluetooth respond"); //Send data to the other side of the Bluetooth communication.
}
}ResultBy Microduino-BT, Microduino core can communicate with an Android phone. Caution
|
