|
Outline
Let us make a fire indicating light, which will flash unceasingly to warn people to leave at once when a fire appear.
Suitable kits: mCookie102, mCookie202, mCookie302, IBC
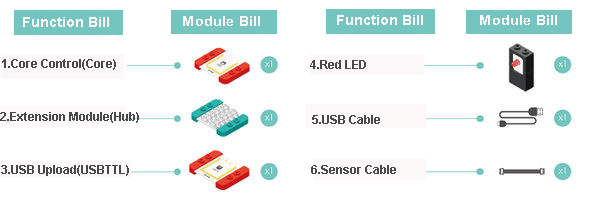
Module Bill
Module
Other Equipment
- USB cable*1
- Sensor cable*1
- Sensor shell*1
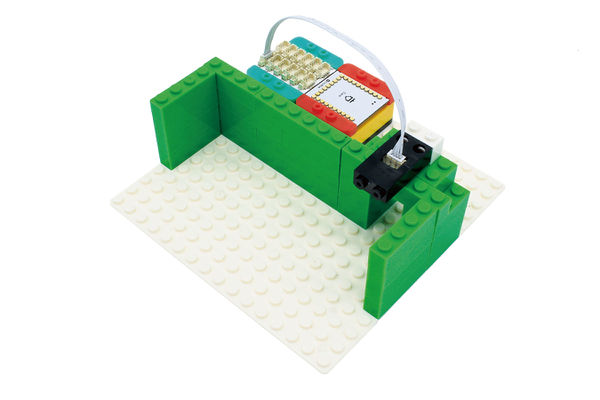
- Lego or other fixation structure
Module Setup
- Assemble modules and sensors:
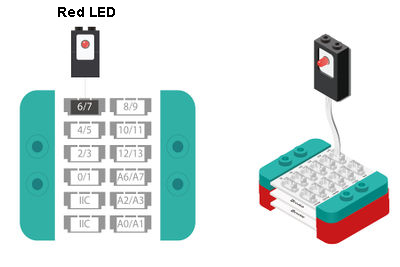
- Stick the red core module, USB upload module and green extension module together;
- Connect the red LED to pin 6/7 of the extension module;
- Insert one end of the USB cable into USB upload module, and connect the other to the computer;
Programming
Look at the New Program Block
"Analog Write" Program Block
"Analog write" program block is in the "Microduino>Core" tab.
"Analog write" program block instruction
"Analog write" program block can divide the energy into 256 levels: the lowest is 0, which control the LED to off; the highest is 255, which controls the LED to on, and is the brightest. 0~255中的其它数值会让灯呈现不同亮度。
Hub的数字输出管脚
"模拟输出"管脚号是传感器与扩展模块连接的接口号,扩展模块有2个模拟信号接口:6/7,10/11。
"数字输出"和“模拟输出”程序块的区别
- 数字输出
- 就好像电灯的开关,只有开和关两种状态,关的时候灯不亮,开的时候灯最亮。
- 模拟输出
- 就好像电灯的调光旋钮,可以使灯的亮度在完全不亮和最亮之间自由变化,在程序中是从0~255级过渡,0为不亮,255为最亮。
“延时”程序块
“延时”程序块位于“控制”选项卡中。
“延时”程序块说明
“延时”程序块可以让程序原地踏步一定时间后在执行下一步程序。在执行这个程序块的时候不能做其他事情,直到时间结束为止。
编程思路
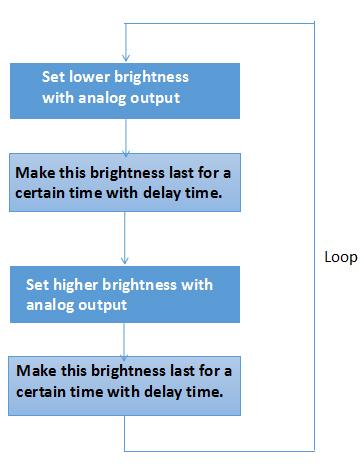
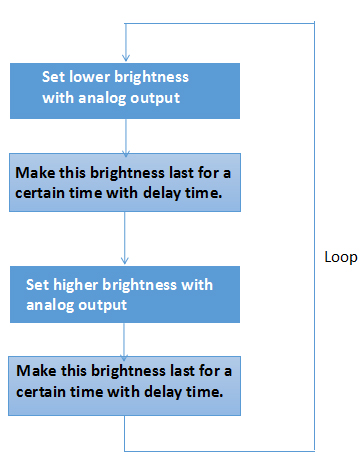
如果想实现单色LED灯闪烁的效果,就要用“模拟输出”程序块控制单色LED灯的亮度,用“延时”程序块控制间隔时间。通过不同的亮度和间隔时间模拟灯光闪。
开始编程
1.LED灯以较暗的亮度点亮1秒
将“模拟输出”的管脚号改为6,赋值为120;延时时间设为1000毫秒,即1秒。
2.LED灯以较亮饿的亮度点亮1秒
将“模拟输出”的管脚号改为6,赋值为240;延时时间设为1000毫秒,即1秒。
3.两步骤程序块连接在一起,选择好核心和端口下载程序。
测试结果:
上传成功后,观察到LED灯忽暗忽亮的闪烁起来,我们的火警指示灯就大功告成啦!
用乐高搭建一个紧急出口,将我们的火警指示灯安装好,向小伙伴们介绍安全逃生的知识。
我们还能怎么玩
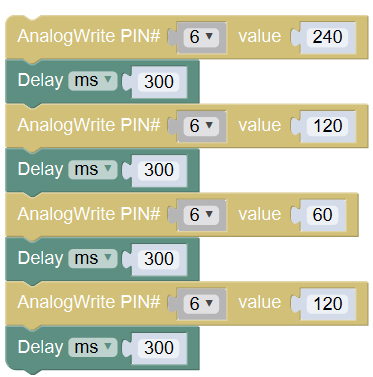
Q:可不可以设置三种亮度的火警灯,同时让灯光闪烁得更快一些呢?这样更容易引起人的注意。
A:这很简单,只需要在0-255之间设置3个亮度,同时每个亮度持续时间更短一些就可以了。
Q&A
- Hub的模拟输出管脚只有6/7,10/11口吗?
- 如果使用Core作为核心,那就只能用6,7,使用输出模拟信号(0-255)的设备必须连接到Hub的6/7,10/11接口之一,因为模拟信号其实是后台程序用数字信号模拟出来的,所以也只能用双数接口,在Mixly中模拟输出管脚只能选择6、10。
核心PWM支持端口
- Core PWM支持,共6个:
- Core+ PWM支持,共8个:
|
