Introduction to Mixly
This guide provides an introduction to Mixly. A drag and drop programming software (IDE) for Microduino and Arduino boards. Mixly was developed by the Mixly Team @ Bejing Normal University.
For official documentation and Github for the Mixly project see the See More & References.
Contents
Setup
Please follow the setup guide for Mixly before proceeding the rest of this guide.
Interface Layout
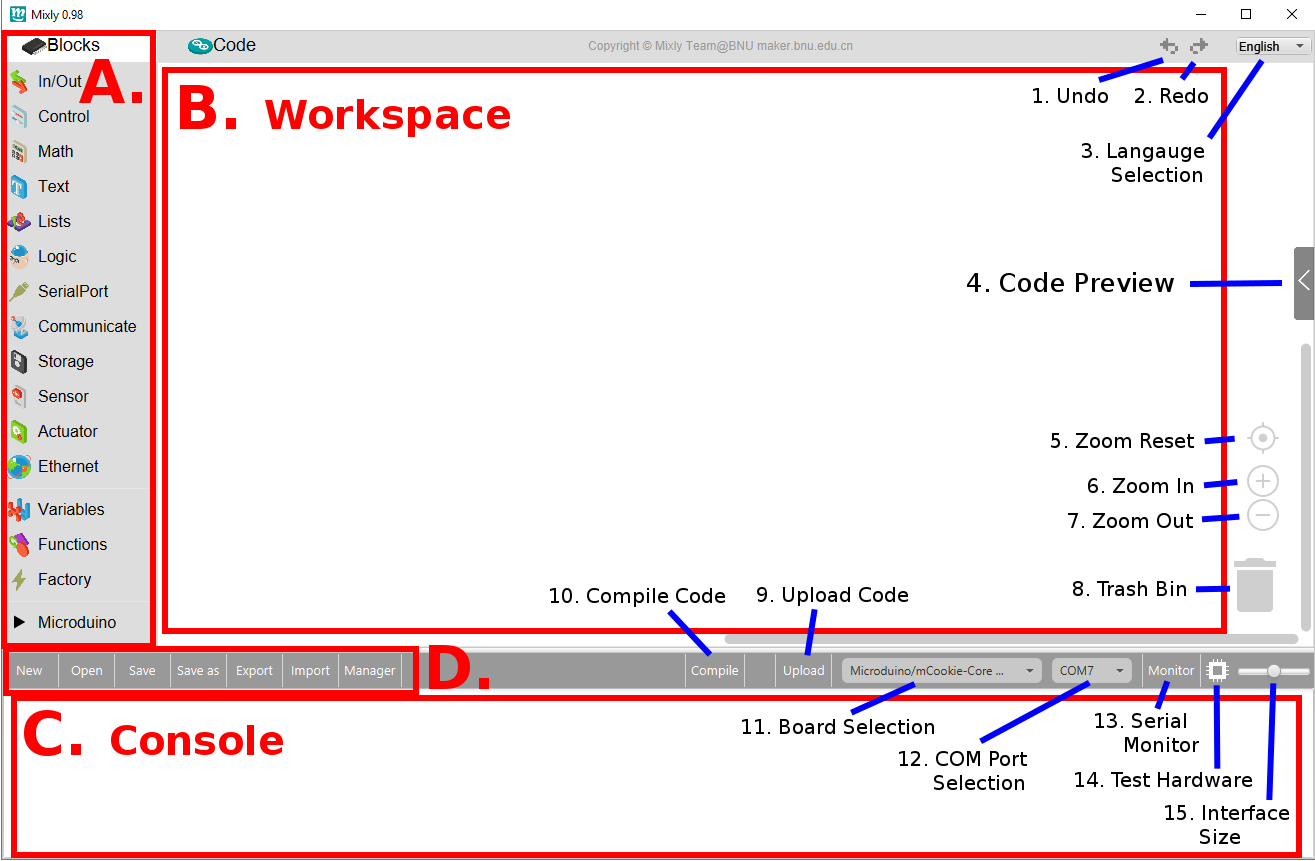
- Open Mixly by opening the mixly.jar.
- Section A. - Blocks. See Blocks
- Section B. - Workspace.
- Section C. - Console.
- Section D. - File Options.
- New - Creates a new Workspace. Will replace the current one. Save before hand or data will be lost!
- Open - Open a saved Workspace.
- Save - Save the current Workspace.
- Save as - Save the current Workspace as a new file.
- Export -
- Import -
- Manager - Manage libraries for Mixly.
- 1. Undo - Reverts the last change.
- 2. Redo - Reverts the last undo.
- 3. Language Selection - Select the language of Mixly. Select-able languages are English, Spanish & Chinese
- 4. Code Preview - Opens a panel which shows the generated code from the Workspace blocks.
- 5. Zoom Reset - Resets the zoom to the default level.
- 6. Zoom In - Zoom in on the Workspace.
- 7. Zoom Out - Zoom out on the Workspace.
- 8. Trash Bin - Drag to the trash bin to delete blocks from the Workspace.
- 9. Upload Code - Compiles and uploads the code generated from the Workspace.
- 10. Compile Code - Compiles the code generated from the Workspace, but DOESN'T upload the code. Used to test if the code compiles without uploading it to a Core module afterwards.
- 11. Board Selection - Select the type of Core module/Arduino from this drop down menu that will be programmed.
- 12. COM Port Selection - Select the COM Port that the Core module/Arduino is connected to.
- 13. Serial Monitor - Opens the serial monitor that is used to send and receive data from the Core module/Arduino.
- 14. Test Hardware - Uploads a program to the attached board and tests to see if it is functional.
- 15. Interface Size - Scales the size of the interface of Mixly.
Blocks
Blocks are the pieces used to create code in Mixly. The blocks connects to each other if compatible. Incompatible blocks will not fit together. A program in Mixly is the collection of several blocks configured to perform a duty.
There are various types of blocks sorted into different categories. These include:
| Category | Description |
|---|---|
| In / Out | Blocks that controls the analog / digital pins on the Core module (or Arduino) boards. Such as digital write / read, analog write / read and interrupts. |
| Control | Blocks that determine the way the program executes. Such as if / else statements, delays, and loops. |
| Math | Blocks that provide mathematical functions such as arithmetic, trigonometric functions, etc. |
| Text | Blocks that provides text, text comparison, and text manipulation. |
| Lists | Blocks that creates lists and list accessing. |
| Logic | Blocks that are used for logically comparison. Such as equals, or/and and true/false. |
| SerialPort | Blocks to configure, use, and read / write to the Serial Port. |
| Communicate | Blocks for other forms of communication such as IR, I2C, SPI, etc. |
| Storage | Blocks for storage of data on a SD card (SD module needed) or on board EEPROM. |
| Sensor | Blocks for reading from an ultrasonic range finder, DHT11, DS18B20 or GPS. (Respective modules required.) |
| Actuator | Blocks for servos, buzzers (tone), LCD, and stepper motors. (Respective modules required.) |
| Ethernet | Blocks for Ethernet (network) communication. |
| Variables | Blocks for declaring and accessing variables. |
| Functions | Blocks for creating functions. Functions or subroutines are a block of code that serves a specific purpose and is seperated from the main code for ease of understanding, re-usability and organization. |
| Factory | Blocks that are closely similar to C/C++ code. These blocks are defined because there is no other way to express them in other categories. |
Microduino Blocks
There are additional block categories related specifically to Microduino. These block categories can be accessed by clicking on the Microduino tab on the side.
There are various types of blocks sorted into different categories. These include:
| Category | Description |
|---|---|
| Core | Blocks for Core modules that provided some misc. functions such as while loops, for loops, analog write / read. |
| Extended | Blocks for Extension modules that provide controls for motors ([[Motor Shield]), stepper motor (Stepper Shield), dot matrix (Dot Matrix), and OLED (OLED module). |
| Function | Blocks for Function modules that provide control for Audio play back (Audio module), Real Time Clock (RTC module), GPS (GPS module), Motion (Motion module), and SD storage (SD module). |
| Communication | Blocks for Communication modules that provide control for the Bluetooth module, WiFi module, IR transmitter & receiver, and I2C bus master. |
| Executor | Blocks for control of ColorLED, Buzzer, and Servo. |
| Sensor | Blocks for use with Button, Joystick, Temperature, Temperature & Humidity, and Potentiometer. |
| VariableExpansion | Blocks for creating special variables for use with the nRF (nRF module). In additional, blocks for creating Melodies. |
Workspace
Workspace is the area where Blocks are dragged to to create the behavior and functionality of your program.
See More & References
Official Mixly Github: https://github.com/xbed/Mixly_Arduino
Official Mixly Quick Start Guide: https://github.com/xbed/Mixly_Arduino/blob/master/Mixly%20Quick%20Start%20Guide.pdf


