Overview
Make a barbecue machine of which the spinning time can be set with Joystick, and can be displayed on OLED. Press the Joystick to start barbecuing.
Suitable kits: mCookie202 and mCookie302
Module List
Modules
Other Equipment
- USB cable*1
- Sensor cable*4
- Sensor shell
- Building blocks or other fixation structures
Modules Setup
Setup
- Assemble modules and sensors together:
- Connect Servo Connector to pin 6/7 of Hub;
- Connect the Servo to pin 1 (the upper 3 pins) of Servo Connector;
- Connect ColorLED to pin 8/9 of Hub;
- Connect Joystick to pin A0/A1 of Hub;
- Plug one end of USB cable into the battery base and connect the other end to the computer;
Programming
Required Program Blocks
Programming Thought
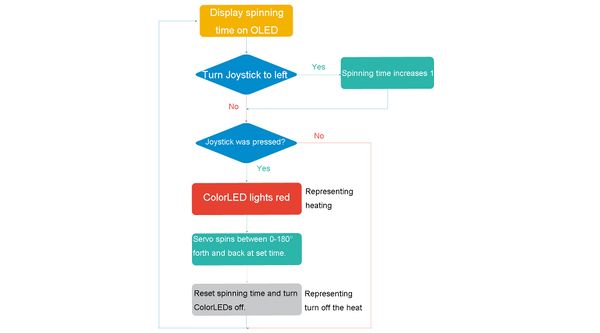
Display turning time on OLED, turn Joystick to right to increase turning time. Press the Joystick, and the two red LED will light up (representing electric heating barbecue), the servo will spin forth and back according to the set time between 0-180 degrees.
Start to Program
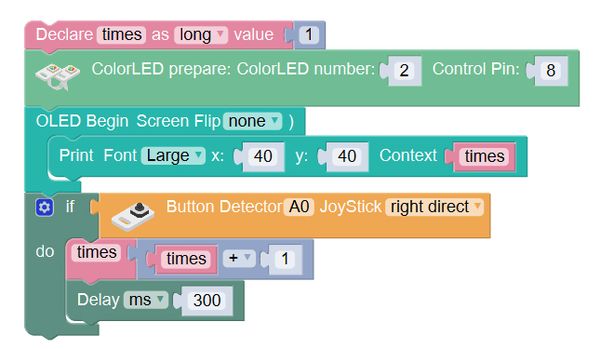
1. Display turning time which is set through Joystick on OLED
Declare variable times to record turning time, and the initial value is 1.
ColorLED prepare, there are 2 colorLEDs totally. And the control pin is 8.
Display and print times (turning time) out.
If the Joystick is turned right, times adds 1, delay 300ms.
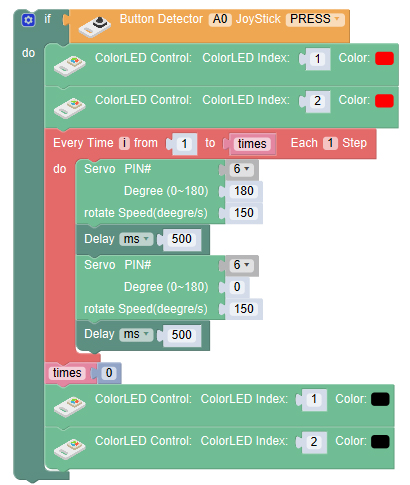
2. Start to barbecue
If the Joystick is pressed, the two red LEDs will light up (representing electric heat barbecue), execute the internal program “times” times repeatedly through every time program block, the servo spins from 180 degrees to 0 degree to simulate the rotation of kebabs.
Reset times at the end of the barbecue. Turn ColorLEDs off (stop barbecuing).
Test the result
After upload the program, on OLED will 1 be displayed, saying default time is 1, you can adjust it through turn the Joystick to right and display the time on OLED. Press the Joystick and the ColorLED will light red, the servo will spin specified times forth and back. After ending, the ColorLEDs will turn off, and the time is 0.
Fix two ends of the kebab with two building blocks with holes in the center, and fix one on servo and the other on building block axis.
Q: You can see only the spinning time at setting stage and can’t see the rest time during the process of barbecuing. How to modify the program?
A: Rest time=Set time-executed time. When barbecuing, every time it is executed, display the rest time.
Keep other code unchanged, and use OLED to display the rest times in every time program block.
Technical Specification
Relative Cases
FAQ
|


