MDesigner: Live mode
The primary methods of using Microduino modules with mDesigner is with Live and Arduino mode. Each mode as it own pros and cons. Determining the right mode is up to the user per use case. Although, it is recommended to start with "Live" mode for testing then switching to "Arduino" mode later.
Live mode is regular Scratch, but with added blocks which are designed to interact with Microduino modules. This means the user has access to the stage and actor blocks. Projects (hardware) need to be connected to the computer running mDesigner. mDesigner communicates with the project (hardware), namely the Core module, in "real time" over the USB connection by sending commands for the Core module to perform. This means that "Live" mode requires a constant connection with the computer running mDesigner.
Arduino mode acts as a "visual" drag and drop coding editor. The script (code) is converted to "Arduino" code and then compile and uploaded to the attached Core module. This means that code can run even when detached from the computer. The stage and actor are disabled in this mode since the code runs independent of mDesigner.
| Capability | Live Mode | Arduino Mode |
|---|---|---|
| Drag & Drop programming | Yes | Yes |
| Supports Microduino modules | Yes | Yes |
| Stage and actor enabled | Yes | No |
| Real time code testing | Yes | No |
| Code compiled and uploaded | No | Yes |
| Can run WITHOUT being connect to computer | No | Yes |
Contents
Live Mode
Live mode is the default mode when using mDesigner. It allows the user to use mDesigner as if it was Scratch, but with the ability to use Microduino modules. The user must upload a special firmware on the Core / Core+ module first in order to use this mode. A firmware is code that runs on the core module itself. This special firmware is designed to accept commands from mDesigner directly and performs the requested commands.
Communication Overview
The communication between mDesigner running on a computer and the project (hardware) is outlined below.
 
| ||
| Computer: Computer running mDesigner sends commands or receives data with mBattery/mCenter+ over USB. |
mBattery/mCenter+: mBattery/mCenter+ acts as a communication bridge with the Computer (running mDesigner) and the Core/Core+ module. |
Core/Core+:
|
Connected to Computer Requirement
In this mode, to control the modules, the user will need to have their project (hardware) connected to the computer sending commands in real time.
| Note: If the project (hardware) is disconnected from the computer running mDesigner, then the project (hardware) will stop receiving commands and thus does nothing. |
 
| ||
| Computer: Computer running mDesigner cannot send commands or receive data with mBattery/mCenter+ over USB since it is disconnected. |
Core/Core+: The Core/Core+ module is no longer receiving commands and does nothing. | |
Preparation
A firmware is a program that runs on core modules such as the Core and Core+. Live mode requires a special firmware to be uploaded prior to use.
| Note: The special firmware only needs to be programmed once unless it is overwritten. Using Arduino mode and uploading a program will overwrite the special firmware, thus a re-programming of the special firmware will be necessary in order to use Live mode again. |
Hardware Preparation
- Ensure drivers are properly installed by following the mDesigner getting started guides.
- Connect to the computer with a USB cable with either a:
- mBattery with a stacked Core / Core+ module.
- mCenter+
- Ensure that mBattery / mCenter+ is powered on.


Upload the Firmware
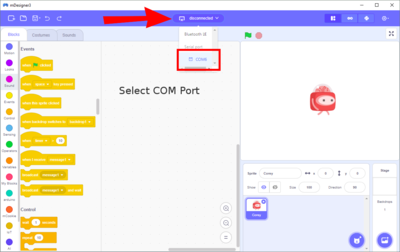
- Open mDesigner.
:
- Select the port mBattery / mCenter+ is connect to.
:
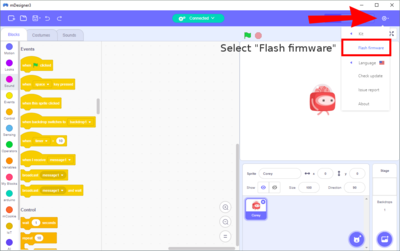
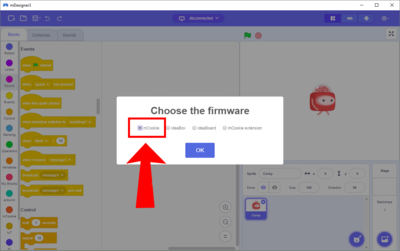
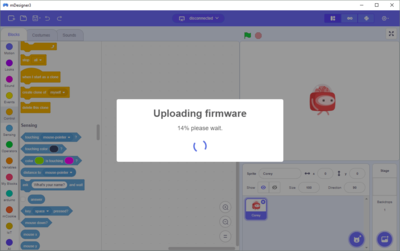
- Under Settings (gear icon) select Flash firmware and select mCookie. Uploading will start.
:
- Once complete, select the port mBattery / mCenter+ is connected to again to begin using mDesigner with Microduino modules.
: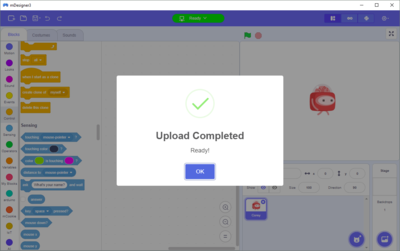


| Note: Ensure the top says Ready when using Live mode. This means that the hardware and mDesigner are ready. The COM port must be re-selected again if restarting mDesigner again or when re-connecting the mBattery / mCenter+. |

Usage
Once your script is assembled and ready. To start your script simply click on the Block set to activate it. If your Block set has a When Green Flag Clicked block on top of it, then the Block set can be activated by the green flag on the top right of mDesigner.
To stop all currently running Block, click on the Stop Sign on the top right of mDesigner.
Arduino Mode
Arduino is a special mode which can be enabled. It acts as a drag and drop editor for programming. The Stage and Actor is disabled and many Block Categories cannot be used.
The main advantage of using Arduino Mode is that code is geennerated, compile, and uploaded. This means that the user can disconnect the project (hardware) from a computer and it can still work. Whereas, during Live Mode the user needs to have the project (hardware) connected in order to receive commands from mDesigner.
Arduino Mode can be accessed by click on the Arduino Mode button.
Usage
Once your script (code) is assembled and ready. Click on the "upload" on the top right of the mDesigner window [image]. mDesigner will now attempt to compile the script. If not successful, mDesigner will inform of an error. If successful, the compile script will be uploaded onto the core module.