Infrared Light Control
From Microduino Wiki
| Language: | English • 中文 |
|---|
Contents[hide]ObjectiveTo control the color and brightness of RGB LEDs via an infrared remote controller. PrincipleTo receive the infrared signal of the remote controller by using infrared receiving sensor and to control the LED luminous color and brightness by judging the different infrared encoding. Equipment
Preparation
Debugging
#include <IRremote.h>
#include <Adafruit_NeoPixel.h>

#define PIN 6
#define RECV_PIN 10

//Encoder defining for the key of the remote controller
#define INCREASE 0XFF02FD    //Increase"+"
#define DECREASE 0xFF9867   //Decrease"-"
#define NUM_0 0xFF6897      //Number 0
#define NUM_1 0xFF30CF      // Number1
#define NUM_2 0xFF18E7      // Number 2
#define NUM_3 0xFF7A85      // Number 3
#define NUM_4 0xFF10EF      / Number 4
#define NUM_5 0xFF38C7      // Number 5
#define NUM_6 0xFF5AA5      // Number 6
#define NUM_7 0xFF42BD      // Number 7
#define NUM_8 0xFF4AB5      // Number 8
#define NUM_9 0xFF52AD      // Number 9

Adafruit_NeoPixel strip = Adafruit_NeoPixel(6, PIN, NEO_GRB + NEO_KHZ800);

IRrecv irrecv(RECV_PIN);
decode_results results;

#define val_max 255
#define val_min 0

int pos = 8, color = 100;

uint32_t color_n[9] =
{
  strip.Color(255, 0, 0),
  strip.Color(248, 141, 30),
  strip.Color(255, 255, 0),
  strip.Color(0, 255, 0),
  strip.Color(0, 127, 255),
  strip.Color(0, 0, 255),
  strip.Color(139, 0, 255),
  strip.Color(255, 255, 255),
  strip.Color(0, 0, 0)
};
uint32_t color_m[9][3] =
{
  {0, 255, 255},
  {255, 0, 0},
  {248, 141, 30},
  {255, 255, 0},
  {0, 255, 0},
  {0, 127, 255},
  {0, 0, 255},
  {139, 0, 255},
  {255, 255, 255}
};

void setup() {
  // put your setup code here, to run once:
  strip.begin();
  strip.show(); // Initialize all pixels to 'off'
  irrecv.enableIRIn(); // Start the receiver
  for (int i = 0; i < 9; i++)
  {
    colorSetall(color_n[i]);
    delay(300);
  }
}

void loop() {
  // put your main code here, to run repeatedly:
  if (irrecv.decode(&results))
  {
    Serial.println(results.value, HEX);
    switch (results.value)
    {
      case INCREASE:
        color += 50;
        if (color > 250)
          color = 250;
        break;
      case DECREASE:
        color -= 50;
        if (color < 0)
          color = 0;
        break;
      case NUM_1:
        color = 100;
        pos = 0;
        break;
      case NUM_2:
        pos = 1;
        color = 100;
        break;
      case NUM_3:
        pos = 2;
        color = 100;
        break;
      case NUM_4:
        pos = 3;
        color = 100;
        break;
      case NUM_5:
        pos = 4;
        color = 100;
        break;
      case NUM_6:
        pos = 5;
        color = 100;
        break;
      case NUM_7:
        pos = 6;
        color = 100;
        break;
      case NUM_8:
        pos = 7;
        color = 100;
        break;
      case NUM_9:
        pos = 8;
        color = 100;
        break;
      default:
        break;
    }
    irrecv.resume(); // Receive the next value
    colorSetall(strip.Color(map(color, val_min, val_max, 0, color_m[pos][0]),
                            map(color, val_min, val_max, 0, color_m[pos][1]),
                            map(color, val_min, val_max, 0, color_m[pos][2])));
  }
}

void colorSetall(uint32_t c) {
  for (uint16_t i = 0; i < strip.numPixels(); i++) {
    strip.setPixelColor(i, c);
  }
  strip.show();
}
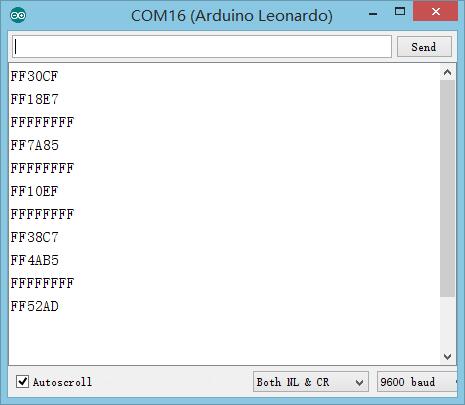
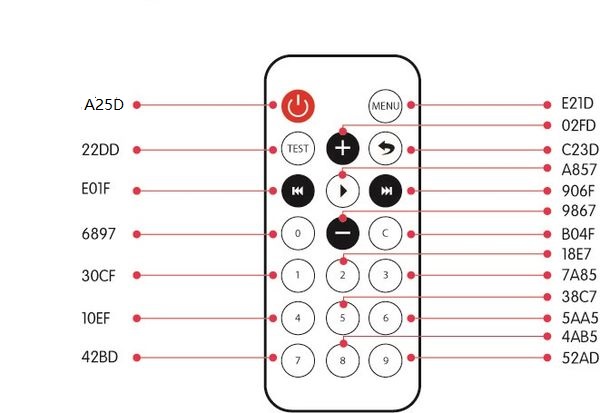
Software Debugging
#define PIN 6           //LED control pin
#define RECV_PIN 10     //IR Receiver pin
// Define the encoder of the remote controller.
#define INCREASE 0xFFA857   ///Increase"+"
#define DECREASE 0xFFE01F   // Decrease"-"
#define NUM_0 0xFF6897      // Number 0
#define NUM_1 0xFF30CF      // Number 1
#define NUM_2 0xFF18E7      // Number 2
#define NUM_3 0xFF7A85      // Number 3
#define NUM_4 0xFF10EF      // Number 4
#define NUM_5 0xFF38C7      // Number 5
#define NUM_6 0xFF5AA5      // Number 6
#define NUM_7 0xFF42BD      // Number 7
#define NUM_8 0xFF4AB5      // Number 8
#define NUM_9 0xFF52AD      // Number 9
    colorSetall(strip.Color(map(color, val_min, val_max, 0, color_m[pos][0]),
                            map(color, val_min, val_max, 0, color_m[pos][1]),
map(color, val_min, val_max, 0, color_m[pos][2])));ResultPress different keys on the infrared remote controller, you can change the color and brightness of the LED. Result |


