Lesson 20--Microduino "Use Interrupt"
| Language: | English • 中文 |
|---|
Contents[hide]ObjectiveUnderstand the interruption, and through the button to learn the usage of the interrupt. InterruptThe basic principle of interruptionCPU is processing one event and interrupted by external another event, after when performing the external things, continue to do previous event. For example: the teacher in class, and a student enter the classroom suddenly interrupted the teacher, the teacher allow him into the classroom, and go on teaching, this is the interrupt. Interrupt conceptInterrupt that menas the CPU in the normal operation of the program, due to internal/external events or by program pre-arranged event which cause the CPU stop running applications, and transfer to another service for internal/external events or service for a pre-arranged event program. After finished that service, return to execute the temporarily interrupted program. Due to the occurrence of an event, the CPU suspended execution of a program, and then turn to process incoming event's program. After complete this program, then CPU recover the suspended program. This process is called the interrupt. Interrupt classification
Interrupt benefits
EquipmentMicroduino-Core Microduino-FT232R
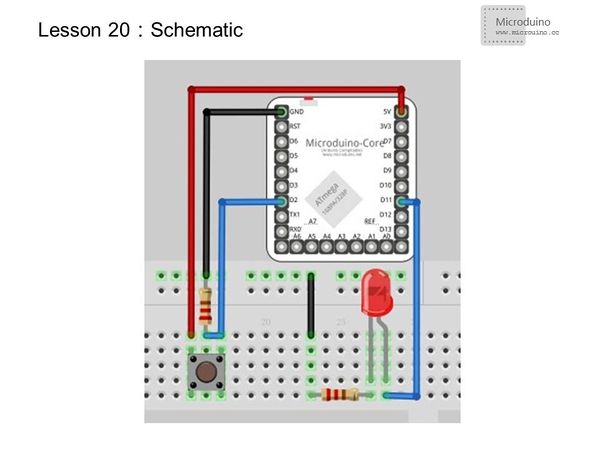
Experimental schematic
Program
int button= 2;          // Define the input pin
int pin = 13;
volatile int state = LOW;

void setup()
{
  //Set the input pin as input state and output pin as output state
  pinMode(button,INPUT);
  pinMode(pin,OUTPUT);
}

void loop()
{
  state = digitalRead(button);      //Read the button's state

  digitalWrite(ledOut, state);    //Set the state value to LED

  //Simulate a long time process or a complex task
  for (int i = 0; i < 100; i++)
  {
    delay(10);
  }
}
int pin = 13;
volatile int state = LOW;

void setup()
{
  pinMode(pin, OUTPUT);
  attachInterrupt(0, blink, RISING);
}

void loop()
{
  digitalWrite(pin, state);//Set the state value to LED
  //Simulate a long time process or a complex task
  for (int i = 0; i < 100; i++)
  {
    delay(10);
  }
}

void blink()
{
  state = !state;
}ResultIf don't use the interrupt, push down the button, wait for a moment LED state will changed, otherwise use the interrupt LED state changes immediately. Interrupt grammar
Redistribute the interruptInterrupt setting can be changed by function attachInterrupt() at any time. If use function attachInterrupt() to redistribute,previously assigned interrupt will be removed from the corresponding pin. Disable\enable interruptmicroduino can ignore all interrupt. If you don't want to handle the interrupt in special code segment, you can use the noInterrupts() to disable interrupt. After this code segment, you can use interrupts() to enable the interrupt. Delete the interruptYou also can delete the interrupt by detachInterrupt(interrupt_number) in terminical. NoteWhen the interrupt function occurs, delya () and millis () values will not continue to change.When an interrupt occurs, the serial port receives the data may be lost.You should declare a variable to store variable when not interrupted. |
