Rhythm Master

From Microduino Wiki
Jump to: navigation, search

Overview

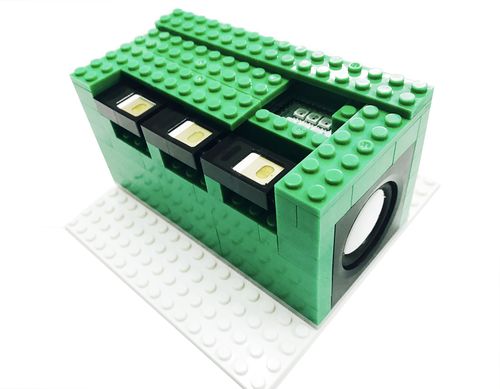
It is an electronic DIY music box, which has three modes to be chosen. Mode 0 is the default traditional mode, each touch button corresponding to a LED and a rhythm. In mode 1, you can touch the corresponding touch button according to the color of the light to control the beat of the music. In mode 2, the music will be played automatically, with the change of the color of light.

Rhythm master.jpg

Principle

You can select a mode through the 3 buttons, and each of the 3 touch buttons corresponds to a certain music rhythm, you can press the button according to the prompt of light color to set the number which is allowed of mistake. At the end of a piece of music, if the number of mistake you make is less than the set one, the music box will play a piece of completed piano music automatically.

Equipment

Module Quantity Function
mCookie-Core+ 1 Core board
mCookie-Hub 1 Sensor adapter
mCookie-mBattery 1 Program download and powersupply
mCookie-AudioPro 1 Play music
Sensor-LED Matrix 1 Emit light
Sensor-Touch 3 Serve as keys

Others

  • Horn*2
  • Sensor cable*3
  • Horn cable*2
  • USB cable*1
  • Building blocks or other fixation structures

Preparation

Step1: Connect Core+ and mBattery to your computer with the USB cable, and then open Arduino IDE1.6.9.
Step2: Download the sample program: File:Music piano.rar
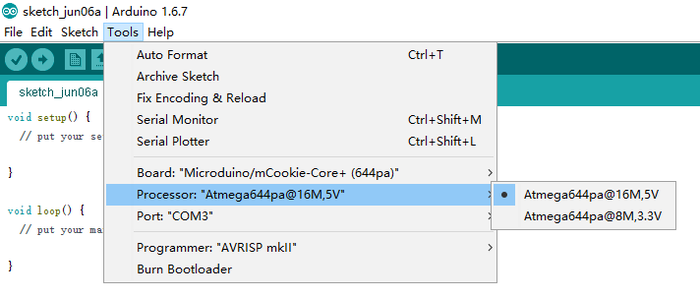
Step3: Open the program, and select the board and COM to download the program.
302 music.png

Software Debugging

You can modify the connection of the touch buttons and playing method.

User defined

  1. define maxMissNum 10 //The maximum allowed mistake number
  2. define maxWaitTime 3000 //The maximum allowed waiting time
  3. define PIN_KEYA 6 //Pin of touch button A
  4. define PIN_KEYB 8 // Pin of touch button B
  5. define PIN_KEYC 12 // Pin of touch button C

User defined

You can change the color of light const uint16_t colorArray[10][3] = {

 {0,   0,   0   },        //colorLED OFF 
 {255, 0,   0   },        //Red      
 {255, 255, 0   },        //Yellow
 {0,   255, 0   },        //Green
 {234, 139, 23  },        //Orange
 {0,   255, 255 },        //Lime
 {0,   0,   255 },        //Blue
 {255, 0,   255 },        //Purple
 {155, 100, 0   },        //Warm
 {100, 130, 100 }        //Cold

};

Hardware Setup

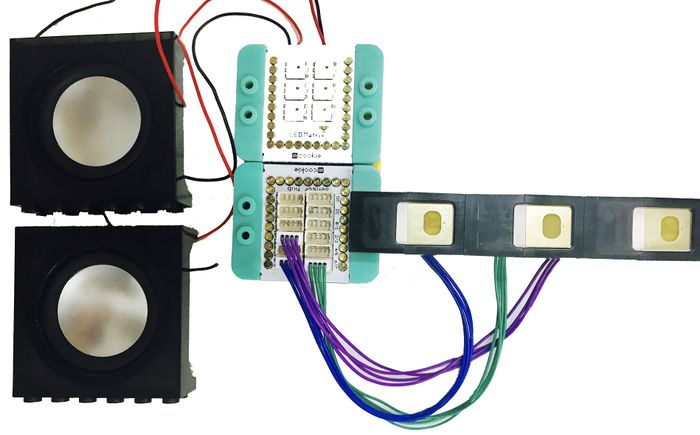
Step1: Connect the three touch buttons to pin 6, 8 and 12 of Hub respectively.
Music connection.jpg
Step2: Connect the two horns to AudioPro.
Step3: Stack AudioPro, Hub, Core+ and Led Matrix together.

How to Play

The touch buttons connected to pin 6, 8 and 12 of Hub stand for A, B and C respectively. When the device is powered, you can select a mode with the touch buttons.

  • A corresponds to mode 0;
  • B corresponds to mode 1;
  • C corresponds to mode 2.

Mode 0: touch button A, B and C, and the LED Matrix will light corresponding color, corresponding rhythm will sound.
Mode 1: According to the light color of LED Matrix, press the corresponding button to play a whole piece of music. When the LED Matrix lights red, you are supposed to press A; when it lights yellow, you are supposed to press B; when it lights green, you are supposed to press C. If you make a mistake, the mistake number will add 1, until it is larger than the set mistake number, then the game will end, and red, yellow and green will light up at the same time. At this time, you should press the three buttons simultaneously to unlock the game, and play the game again. At the end of the music, if the mistake number is less than the set one, it will play a whole piece of music along with light.
Mode 2: It can play rhythm automatically, and you can switch the music with A, B and C.


Expansion

You can build a beautiful shape with building blocks or make a 3D-printed one.