|
|
| (18 intermediate revisions by 2 users not shown) |
| Line 3: |
Line 3: |
| | |- | | |- |
| | | | | | |
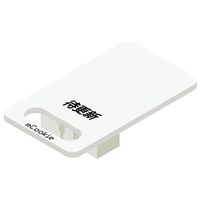
| − | [[File: Microduino-Dust.jpg|400px|thumb|center| Microduino-Dust]] | + | [[File: Microduino-Dust.jpg|200px|thumb|right| Sensor-Dust]] |
| | + | The product number of Sensor-Dust is: '''MSDT62''' |
| | | | |
| | Microduino-Dust is a PM2.5 sensor. | | Microduino-Dust is a PM2.5 sensor. |
| | + | |
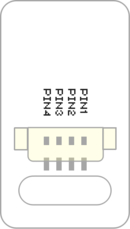
| | + | ==Sensor Pin Introduction== |
| | + | {{ST_Pinout |
| | + | |st_name=Dust Sensor |
| | + | |pin3=Analog Input |
| | + | }} |
| | | | |
| | ==Features== | | ==Features== |
| | *Adopt SHARP GP2Y1010AUOF air quality sensor; | | *Adopt SHARP GP2Y1010AUOF air quality sensor; |
| − | *Independent air duct and fast detection speed; | + | *Serial port communication. |
| | + | |
| | ==Specification== | | ==Specification== |
| − | *Operation voltage: 4.5V~5.5V | + | *Sensor voltage |
| − | *Detection sensibility: 0.5V/0.1mg/m3 | + | **3.3V~5V working voltage |
| − | *1.27mm-pitch 4PIN interface | + | |
| − | *Input: Fan control /5V digital signal & LED control/5V digital signal | + | *Sensor size |
| − | *Output 0~5V analog signal | + | **Board size: 23.5mm*13mm |
| − | * Pin Description for Fan Control: GND, VCC, fan signal input and NC(empty). Since the output signal is digital, it needs to use digital interface to detect (D0~D13). Microduino-Dust can be connected to the pins (3~10) of the Sensorhub with the corresponding pins (D0,D2,D4,D6,D8,D10,D12). | + | **1.27mm-spacing 4Pin connected with sensorhub |
| − | *Pin Description for Sensor Control: GND, VCC, detection signal output and LED control signal output. Since the output signal is simulated, it needs to use the analog interface to detect (A0~A7). The control signal is digital, it needs to be driven by the digital interface(D0~D13). | + | **The CAD drawing of the sensor: '''[[File:Sensor_CAD.zip]]''' |
| − | You can use Microduino-IO-Split to divide the two signals, by connecting the interface of Microduino-Dust with the IN interface of Microduino-IO-Split: The IO-Split's A-OUT interface can be connected to the pin (10, 11 or 12) of the Sensorhub with the corresponding pin (A6,A2 or A0); The IO-Split's B-OUT interface can be connected to the pin (3~10) of the Sensorhub with the corresponding pin (D0,D2,D4,D6,D8,D10,D12).
| + | |
| − | [[file:mCookie-sensorhub_rule.JPG|thumb|800px|center]]
| + | *Connection |
| − | [[File: Microduino-Dust_rule1.jpg|600px|thumb|center]]
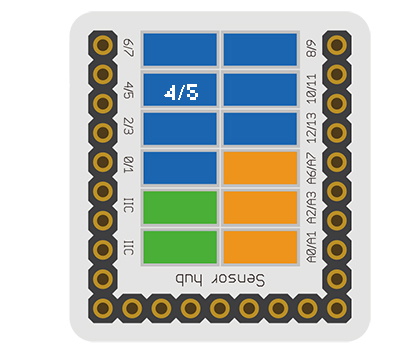
| + | **This sensor can be connected to the following interfaces: '''D4/D5''' |
| | | | |
| | ==Document== | | ==Document== |
| − | *Schematic: '''[[File: Microduino_Dust.Zip]]''' | + | *Schematic diagram: '''[[File: Sensor-Dust.Zip]]''' |
| | + | *Main sensor: '''[[File:Sensor-Dust_datasheet.pdf ]]''' |
| | | | |
| | ==Development== | | ==Development== |
| | | | |
| − | Microduino-Dust can be applied in outdoor air quality detection or indoor dust detection.
| + | ===Program Download=== |
| − | | + | *Download and unzip the program '''[[File:Sensor-Dust_Test.zip]]''' |
| − | ==Application== | |
| − | *All hardware needed: [[Microduino-CoreUSB]], [[Microduino-sensorhub]], [[Microduino-IO split]], a USB cable and several wires; | |
| − | ** Make sure you build Microduino IDE or refer to: [[Microduino Getting started]]
| |
| − | *Program
| |
| − | <source lang="cpp">
| |
| | | | |
| − | #define FAN_PIN 10 //Fan control pin
| + | ===Programming=== |
| − | #define LED_PIN 12 //Sensor LED control pin
| + | {{Upload |
| − | #define DUST_PIN A0 //Sensor detection
| + | |nameA=[[Microduino-Core]], [[Microduino-USBTTL]] |
| − | #define TIME1 280
| + | |nameB=[[Microduino-USBTTL]] |
| − | #define TIME2 40
| + | |boardName=Microduino/mCookie-Core(328p), Atmega328P@16M,5V |
| − | #define TIME3 9680
| + | |fileName=Sensor-Dust Test.ino |
| | + | }} |
| | | | |
| − | int dustVal = 0;
| + | ===Hardware Setup=== |
| − | float dustVoltage = 0;
| + | *Referring to the following diagram, connect the Sensor-Dust to digital interface D4/D5 of '''[[Microduino-Sensorhub]]'''. |
| − | float dustDensity = 0;
| + | <br> |
| | + | [[file:Microduino-sensorhub_Dust.JPG|thumb|400px|left]] |
| | + | <br style="clear: left"/> |
| | + | ===Result=== |
| | + | *After download, open the serial monitor. |
| | + | *The detected PM2.5 intensity will be printed out in cycle in the serial monitor. |
| | | | |
| − | void setup(){
| + | ==Application== |
| − | Serial.begin(9600);
| + | It can be used to detect the air quality and indoor dust and so on. |
| − | pinMode(FAN_PIN, OUTPUT);
| |
| − | pinMode(LED_PIN, OUTPUT);
| |
| − | digitalWrite(FAN_PIN, LOW);
| |
| − | }
| |
| − | | |
| − | void loop(){
| |
| − | digitalWrite(FAN_PIN, HIGH); //Open the fan before detecting
| |
| − | delay(3000);
| |
| − | digitalWrite(FAN_PIN, LOW); //Close the fan after 3s delay
| |
| − | digitalWrite(LED_PIN,LOW); //Turn on LED inside the sensor
| |
| − | delayMicroseconds(TIME1); //Wait for 280us
| |
| − | dustVal = analogRead(DUST_PIN); //Analog value sampling
| |
| − | delayMicroseconds(TIME2); // Wait for 40us
| |
| − | digitalWrite(LED_PIN,HIGH); //Turn off the LED
| |
| − | delayMicroseconds(TIME3);
| |
| − | dustVoltage = dustVal * (5.0/1024.0); //Convert the analog value to voltage value.
| |
| − | dustDensity = 0.17 * dustVoltage - 0.1; //Convert the voltage value to dust density (Output unit: mg / m³)
| |
| − | Serial.println(dustDensity);
| |
| − | delay(1000);
| |
| − | }
| |
| − | </source>
| |
| − | *Software:
| |
| − | *Stack all modules together and then connect the Dust sensor's fan control interface with the D10 pin of the Sensorhub with a wire.
| |
| − | *Connect Microduino-Dust sensor's control detection interface to the IO splitter's IN interface with a wire. And then connect the IO splitter's A-OUT interface to Sensorhub A0, the IO splitter's *B-OUT interface to Sensorhub D12.
| |
| − | *Open Arduino IDE, copy the program to IDE and then choose the right board from Tools→Board and then compile.
| |
| − | *Select the right port from Tools→Serial Port in Arduino IDE after compiling, then download program.
| |
| − | *After the download, you can open the serial monitor. After the Dust sensor's fan works for three seconds, the serial console will display the current air dust density and the Dust sensor will have another detection after one second.
| |
| | | | |
| | ==Purchase== | | ==Purchase== |
| | | | |
| | ==History== | | ==History== |
| − |
| |
| − | ==Pictures==
| |
| − |
| |
| − | *Front
| |
| − | [[file: Microduino-Dust-F.JPG|thumb|600px|center|Microduino-Dust Front]]
| |
| − | *Back
| |
| − | [[file: Microduino-Dust -b.JPG|thumb|600px|center|Microduino-Dust Back]]
| |
| − | |}
| |


