Difference between revisions of "Sensor-Touch Button"
(→Basic Functionality) |
(→Programming) |
||
| (8 intermediate revisions by the same user not shown) | |||
| Line 1: | Line 1: | ||
{{Language|Sensor-Touch Button}} | {{Language|Sensor-Touch Button}} | ||
| − | {| style="width: | + | {| style="width: 80%;" |
|- | |- | ||
| | | | ||
| Line 39: | Line 39: | ||
===Basic Functionality=== | ===Basic Functionality=== | ||
| − | The Touch Button is a simple digital input sensor. It uses the TTP223 chip to detect capacitance when the switch is touched. It is an input module which produces a HIGH or LOW voltage depending if pressed or not. A Core module can read the voltage value and determine the state of the | + | The Touch Button is a simple digital input sensor. It uses the TTP223 chip to detect capacitance when the switch is touched. It is an input module which produces a HIGH or LOW voltage depending if pressed or not. A Core module can read the voltage value and determine the state of the Touch Button. |
{| class="wikitable" | {| class="wikitable" | ||
|+Touch Button State Table | |+Touch Button State Table | ||
| Line 56: | Line 56: | ||
<tab name="Arduino for Microduino" style="width:100%;"> | <tab name="Arduino for Microduino" style="width:100%;"> | ||
==Introduction== | ==Introduction== | ||
| − | The | + | The Touch Button is used as a simple input pin. Therefore, the '''pinMode''' and '''digitalRead''' functions will be used. |
==Key Functions== | ==Key Functions== | ||
*Required Libraries: None | *Required Libraries: None | ||
| Line 67: | Line 67: | ||
==Example== | ==Example== | ||
| − | This is a simple example which outputs the state of the | + | This is a simple example which outputs the state of the Touch Button to the serial port terminal. |
| + | |||
'''Note''': Important lines of code are highlighted. | '''Note''': Important lines of code are highlighted. | ||
| − | <syntaxhighlight lang="cpp" | + | <syntaxhighlight lang="cpp" highlight="1,2,10,11,17,18"> |
//Define the pin the sensor is connected to | //Define the pin the sensor is connected to | ||
| − | const int | + | const int TOUCH_BUTTON_PIN = 6; |
void setup(){ | void setup(){ | ||
| Line 81: | Line 82: | ||
//Configure the pin into input mode | //Configure the pin into input mode | ||
| − | pinMode( | + | pinMode(TOUCH_BUTTON_PIN, INPUT); |
} | } | ||
| Line 88: | Line 89: | ||
//Perform a digital read and store the value into pin_state variable | //Perform a digital read and store the value into pin_state variable | ||
| − | int pin_state = digitalRead( | + | int pin_state = digitalRead(TOUCH_BUTTON_PIN); |
//Check if the sensor's state is HIGH (not pressed) | //Check if the sensor's state is HIGH (not pressed) | ||
if(pin_state == HIGH){ | if(pin_state == HIGH){ | ||
| − | Serial.println(" | + | Serial.println("Touch Button is not pressed!"); |
} | } | ||
//Check if the sensor's state is LOW (pressed) | //Check if the sensor's state is LOW (pressed) | ||
else if(pin_state == LOW){ | else if(pin_state == LOW){ | ||
| − | Serial.println(" | + | Serial.println("Touch Button is pressed!"); |
} | } | ||
else{} | else{} | ||
| Line 104: | Line 105: | ||
} | } | ||
</syntaxhighlight> | </syntaxhighlight> | ||
| + | Copy and paste the code above to the Arduino IDE or | ||
| + | |||
| + | Download the above example: n/a | ||
| − | + | *Open the Serial Monitor (magnifier glass on top right) and set 9600 baud. This will display the serial output. | |
</tab> | </tab> | ||
Latest revision as of 19:25, 18 August 2017
| Language: | English • 中文 |
|---|
|
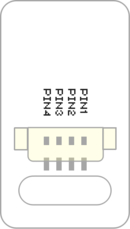
The product number of Sensor-Touch Button is: MSDS21 Sensor-Touch Button is capacitive touch button sensor module.
ContentsIntroduction of Sensor Pin
AboutSpecification
Documents
UsageBasic FunctionalityThe Touch Button is a simple digital input sensor. It uses the TTP223 chip to detect capacitance when the switch is touched. It is an input module which produces a HIGH or LOW voltage depending if pressed or not. A Core module can read the voltage value and determine the state of the Touch Button.
ProgrammingIntroductionThe Touch Button is used as a simple input pin. Therefore, the pinMode and digitalRead functions will be used. Key Functions
ExampleThis is a simple example which outputs the state of the Touch Button to the serial port terminal. Note: Important lines of code are highlighted. //Define the pin the sensor is connected to
const int TOUCH_BUTTON_PIN = 6;
void setup(){
// put your setup code here, to run once:
//Initial serial communication port at 9600 baud
Serial.begin(9600);
//Configure the pin into input mode
pinMode(TOUCH_BUTTON_PIN, INPUT);
}
void loop(){
// put your main code here, to run repeatedly:
//Perform a digital read and store the value into pin_state variable
int pin_state = digitalRead(TOUCH_BUTTON_PIN);
//Check if the sensor's state is HIGH (not pressed)
if(pin_state == HIGH){
Serial.println("Touch Button is not pressed!");
}
//Check if the sensor's state is LOW (pressed)
else if(pin_state == LOW){
Serial.println("Touch Button is pressed!");
}
else{}
//delay 100ms between loops
delay(100);
}Copy and paste the code above to the Arduino IDE or Download the above example: n/a
Program Download
Programming
Hardware Setup
Result
Application
ProjectHistoryGallery
|


