Difference between revisions of "Sensor-LED"
From Microduino Wiki
(→Introduction of the Sensor Pin) |
(→Programming) |
||
| (7 intermediate revisions by the same user not shown) | |||
| Line 1: | Line 1: | ||
{{Language|Microduino-LED }} | {{Language|Microduino-LED }} | ||
| − | {| style="width: | + | {| style="width: 80%;" |
| | | | ||
| | | | ||
| − | [[File: Microduino-LED-rect-v1.jpg|400px|thumb|right|mCookie- | + | [[File: Microduino-LED-rect-v1.jpg|400px|thumb|right|mCookie-SingleLED]] |
The product number of mCookie Sensor—LED: '''MSDL11''' | The product number of mCookie Sensor—LED: '''MSDL11''' | ||
| − | The LED controlled by GPIO directly has red, green, and yellow | + | The LED controlled by GPIO directly has three color types: red, green, and yellow. |
| Line 18: | Line 18: | ||
==Features== | ==Features== | ||
*With small size which is easy to install. | *With small size which is easy to install. | ||
| − | * | + | *Three different color variants: red, green, yellow. |
==Specification== | ==Specification== | ||
| Line 39: | Line 39: | ||
*Schematic diagram: '''[[File: Sensor-_LED.Zip.pdf]]''' | *Schematic diagram: '''[[File: Sensor-_LED.Zip.pdf]]''' | ||
| − | == | + | ==Usage== |
| + | |||
| + | ===Basic Functionality=== | ||
| + | The LED Trinket is a simple trinket which emits light when passed with a sufficient voltage. A Core module can supply voltage to the LED Trinket. | ||
| + | {| class="wikitable" | ||
| + | |+Crash Sensor State Table | ||
| + | |- | ||
| + | ! Pin State | ||
| + | ! LED State | ||
| + | |- | ||
| + | |HIGH | ||
| + | |Emits Light | ||
| + | |- | ||
| + | |LOW | ||
| + | |No Light | ||
| + | |} | ||
| + | |||
| + | ===Programming=== | ||
| + | <tab name="Arduino for Microduino" style="width:100%;"> | ||
| + | ==Introduction== | ||
| + | The LED Trinket is used as a simple output pin. Therefore, the '''pinMode''' and '''digitalWrite''' functions will be used. | ||
| + | ==Key Functions== | ||
| + | *Required Libraries: None | ||
| + | *Key Functions: | ||
| + | ** '''pinMode(pin_number, pin_mode)''' - sets the mode for the pin | ||
| + | ***'''pin_number''' - is the pin number that the trinket is connected to | ||
| + | ***'''pin_mode''' - is the mode to set the pin to. Either '''INPUT''' or '''OUTPUT''' | ||
| + | ** '''digitalWrite(pin_number)''' - Changes the state of the pin either to HIGH or LOW | ||
| + | ***'''pin_number''' - is the pin number that the trinket is connected to | ||
| + | |||
| + | ==Example== | ||
| + | This is a simple example which turns on and off the LED at 1 second intervals. | ||
| + | |||
| + | '''Note''': Important lines of code are highlighted. | ||
| + | |||
| + | <syntaxhighlight lang="cpp" highlight="1,2,10,11,17,18,23,24"> | ||
| + | //Define the pin the sensor is connected to | ||
| + | const int LED_PIN = 6; | ||
| + | |||
| + | void setup() { | ||
| + | // put your setup code here, to run once: | ||
| + | |||
| + | //Initial serial communication port at 9600 baud | ||
| + | Serial.begin(9600); | ||
| + | |||
| + | //Configure the pin into output mode | ||
| + | pinMode(LED_PIN, OUTPUT); | ||
| + | } | ||
| + | |||
| + | void loop() { | ||
| + | // put your main code here, to run repeatedly: | ||
| + | |||
| + | //Perform a digitalWrite with HIGH to turn on the LED | ||
| + | digitalWrite(LED_PIN, HIGH); | ||
| + | |||
| + | //Delay 1 second | ||
| + | delay(1000); | ||
| + | |||
| + | //Perform a digitalWrite with LOW to turn off the LED | ||
| + | digitalWrite(LED_PIN, LOW); | ||
| + | |||
| + | //Delay 1 second | ||
| + | delay(1000); | ||
| + | } | ||
| + | </syntaxhighlight> | ||
| + | Copy and paste the code above to the Arduino IDE or | ||
| + | |||
| + | Download the above example: n/a | ||
| + | </tab> | ||
| + | |||
===Program Download=== | ===Program Download=== | ||
*Download and unzip the program '''[[File:Sensor-LED.zip]]''' | *Download and unzip the program '''[[File:Sensor-LED.zip]]''' | ||
Latest revision as of 19:23, 18 August 2017
| Language: | English • 中文 |
|---|
|
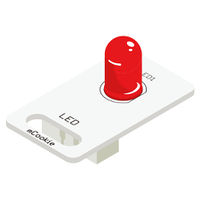
The product number of mCookie Sensor—LED: MSDL11 The LED controlled by GPIO directly has three color types: red, green, and yellow.
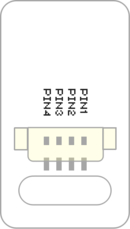
ContentsIntroduction of the Sensor Pin
Features
Specification
Document
UsageBasic FunctionalityThe LED Trinket is a simple trinket which emits light when passed with a sufficient voltage. A Core module can supply voltage to the LED Trinket.
ProgrammingIntroductionThe LED Trinket is used as a simple output pin. Therefore, the pinMode and digitalWrite functions will be used. Key Functions
ExampleThis is a simple example which turns on and off the LED at 1 second intervals. Note: Important lines of code are highlighted. //Define the pin the sensor is connected to
const int LED_PIN = 6;
void setup() {
// put your setup code here, to run once:
//Initial serial communication port at 9600 baud
Serial.begin(9600);
//Configure the pin into output mode
pinMode(LED_PIN, OUTPUT);
}
void loop() {
// put your main code here, to run repeatedly:
//Perform a digitalWrite with HIGH to turn on the LED
digitalWrite(LED_PIN, HIGH);
//Delay 1 second
delay(1000);
//Perform a digitalWrite with LOW to turn off the LED
digitalWrite(LED_PIN, LOW);
//Delay 1 second
delay(1000);
}Copy and paste the code above to the Arduino IDE or Download the above example: n/a Program Download
Programming
Hardware Setup
Result
Application
ProjectsPurchaseHistoryGallery
|


