Difference between revisions of "Birthday Lamp Project (X02)"
(→Program Description) |
|||
| (4 intermediate revisions by the same user not shown) | |||
| Line 93: | Line 93: | ||
=Program= | =Program= | ||
1. Connect [[mCookie-Core|mCookie Core]] to the PC with the USB Cable. Open the Microduino IDE. | 1. Connect [[mCookie-Core|mCookie Core]] to the PC with the USB Cable. Open the Microduino IDE. | ||
| − | 2. | + | |
| − | + | 2. Download the project file and unzip: '''<big>[[File:Birthday_Lamp_X02.zip]]</big>'''. | |
| + | *Using the Microduino IDE and go to '''File > Open...''' and navigate to the unzipped folder. Open the '''Birthday_Lamp_X02.ino''' file. | ||
| + | |||
3. Select the board, processor and port: | 3. Select the board, processor and port: | ||
*Go to '''Tools > Board''' and select '''Microduino/mCookie-Core (328p)''' | *Go to '''Tools > Board''' and select '''Microduino/mCookie-Core (328p)''' | ||
| Line 101: | Line 103: | ||
4. Upload the program by clicking on the '''right arrow icon''' on the top left of the window. Or under '''Sketch > Upload'''. | 4. Upload the program by clicking on the '''right arrow icon''' on the top left of the window. Or under '''Sketch > Upload'''. | ||
| + | '''NOTE''': If not using the default Core module included in the kits, please follow the '''[[Selecting_board,_processor,_and_port|selecting the board and processor guide]]'''. | ||
==Program Description== | ==Program Description== | ||
*Function | *Function | ||
| Line 108: | Line 111: | ||
*Define pin | *Define pin | ||
<source lang="cpp"> | <source lang="cpp"> | ||
| − | |||
| − | + | #define PIXEL_PIN A0 //Digital IO pin connected to the NeoPixels (LED Matrix) | |
| − | + | ||
| + | #define PIXEL_COUNT 6 //Number of NeoPixels in the LED Matrix | ||
| + | |||
| + | #define KEY_PIN 4 //Pin that the button (for play/pause) is connected to. | ||
| + | |||
| + | #define SPEAKER_PIN 6 //Pin that the buzzer is connected to. | ||
</source> | </source> | ||
*Check switch and see if it is pressed. | *Check switch and see if it is pressed. | ||
| − | **Use file " key_get( | + | **Use file " key_get(KEY_PIN, 0)" to detect if the key is pressed. " KEY_PIN" is the pin that connects with the key, which can be change by users. "0" means triggering once pressing the key. "1" means triggering after you press and loosen the key. |
**Each time the key is detected to be "pressed", the True and False values of " play_pause " will change once. Therefore, you can control the music and light according to the values of "play_pause". | **Each time the key is detected to be "pressed", the True and False values of " play_pause " will change once. Therefore, you can control the music and light according to the values of "play_pause". | ||
<source lang="cpp"> | <source lang="cpp"> | ||
void blink() | void blink() | ||
{ | { | ||
| − | if (key_get( | + | if (key_get(KEY_PIN, 0)) //Press the key |
{ | { | ||
delay(200); //Shockproof | delay(200); //Shockproof | ||
| Line 157: | Line 164: | ||
==Tweaking== | ==Tweaking== | ||
| + | |||
| + | '''DEBUG''' un-comment or comment to disable or enable debug mode. | ||
| + | |||
| + | '''PIXEL_PIN''' is the digital IO pin connected to the NeoPixels (LED Matrix). | ||
| + | |||
| + | '''PIXEL_COUNT''' is number of NeoPixels in the LED Matrix or ColorLED string. | ||
| + | |||
| + | '''KEY_PIN''' is the pin that the button (for play/pause) is connected to. | ||
| + | |||
| + | '''SPEAKER_PIN''' is the pin in that the buzzer is connected to. | ||
=Usage= | =Usage= | ||
Latest revision as of 20:48, 1 May 2017
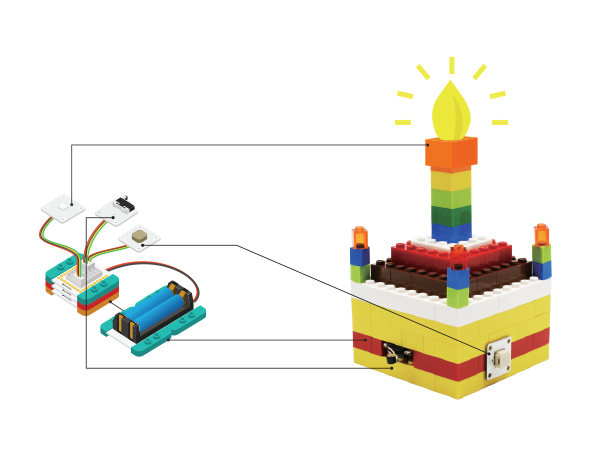
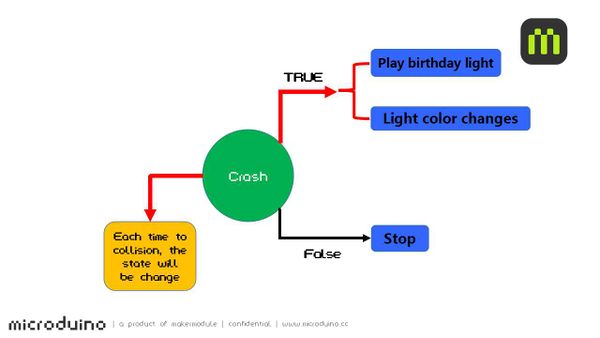
ContentsAboutPress the Crash switch and the Buzzer will play the Happy Birthday song. The LEDs will also flash. Double press the Crash switch to stop. This guide is written for the second generation mCookie kits. .SchematicThe Core module detects if the Crash switch is pressed. The variable holding the status of the Crash switch will change to True if the switch is pressed and False if the switch is not pressed. If True, the project will play the Happy Birthday music and light up. If False, no music will play and the lights will be off. Equipment
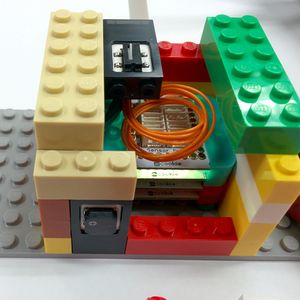
Hardware BuildupNOTE: When connecting sensor wires, push on the plastic connector and not on the wires. Pushing on the wire can damage them.
Program1. Connect mCookie Core to the PC with the USB Cable. Open the Microduino IDE. 2. Download the project file and unzip: File:Birthday Lamp X02.zip.
3. Select the board, processor and port:
4. Upload the program by clicking on the right arrow icon on the top left of the window. Or under Sketch > Upload. NOTE: If not using the default Core module included in the kits, please follow the selecting the board and processor guide. Program Description
#define PIXEL_PIN     A0    //Digital IO pin connected to the NeoPixels (LED Matrix)

#define PIXEL_COUNT   6     //Number of NeoPixels in the LED Matrix

#define KEY_PIN       4     //Pin that the button (for play/pause) is connected to.

#define SPEAKER_PIN   6     //Pin that the buzzer is connected to.
void blink()
{
  if (key_get(KEY_PIN, 0))  //Press the key
  {
    delay(200);  //Shockproof
    play_pause = !play_pause; // Status changes one time.
  }
}
add++;
if (add == 5)
add = 1;
if (add == 1)
colorSet(strip.Color(i * 10, 0, 0));
else if (add == 2)
colorSet(strip.Color(0, i * 10, 0));
else if (add == 3)
colorSet(strip.Color(0, 0, i * 10));
else if (add == 4)
colorSet(strip.Color(i * 10, i * 10, 0));
int notes[] = {
  NOTE_C4, NOTE_C4, NOTE_D4, NOTE_C4, NOTE_F4, NOTE_E4,
  NOTE_C4, NOTE_C4, NOTE_D4, NOTE_C4, NOTE_G4, NOTE_F4,
  NOTE_C4, NOTE_C4, NOTE_C5, NOTE_A4, NOTE_F4, NOTE_E4, NOTE_D4,
  NOTE_AS4, NOTE_AS4, NOTE_A4, NOTE_F4, NOTE_G4, NOTE_F4
};DebuggingTweakingDEBUG un-comment or comment to disable or enable debug mode. PIXEL_PIN is the digital IO pin connected to the NeoPixels (LED Matrix). PIXEL_COUNT is number of NeoPixels in the LED Matrix or ColorLED string. KEY_PIN is the pin that the button (for play/pause) is connected to. SPEAKER_PIN is the pin in that the buzzer is connected to. UsagePress crash switch, play birthday song and get lighted. The light will get brighter and brighter. Then press the switch once more, the music and light will be turned off.
|


