Outline
Make an automatic air conditioner, which can change refrigeration and heat automatically through detecting the temperature of the surroundings.
Suitable kits: mCookie302, IBC
Module Bill
Module
Other Equipment
- USB cable*1
- Sensor cable*3
- Sensor shell*1
- Lego or other fixation structure
Module Setup
Setup
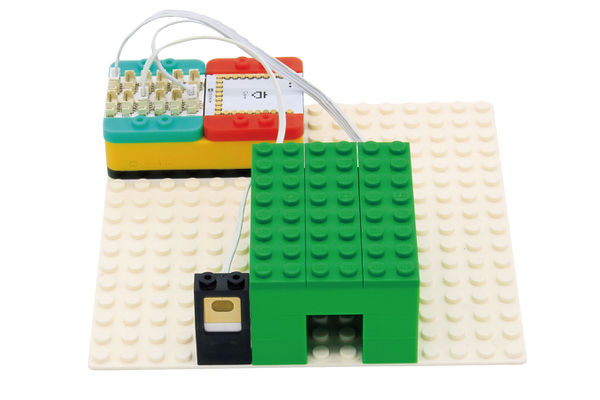
- Assemble the modules and sensors;
- Stick the red core module, battery base, and green extension module together;
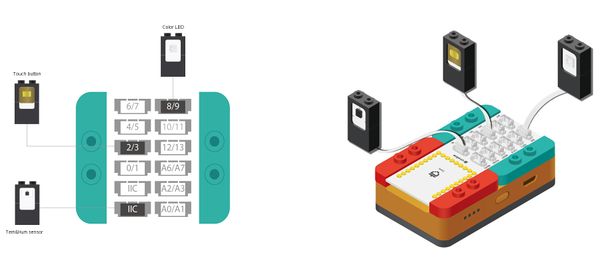
- Connect the color LED to pin 8/9 of Hub;
- Connect the tem&hum sensor to pin IIC of Hub;
- Connect the touch button to pin 2/3 of Hub;
- Plug one end of USB cable into the battery base, and connect the other to computer.
Programming
Required Program Block
Programming Thought
Set a temperature value, set the state of the switch with a touch button, detect the temperature with a tem&hum sensor, and judge the relationship between the real temperature and the setting one, so that it can control it to refrigerate or heat.
Start to Program
1. ColorLED prepare, and declare a variable
ColorLED prepare: connect one color LED to pin 8, and declare a variable named on to record the working state. Declare another variable named temp to record the setting temperature.
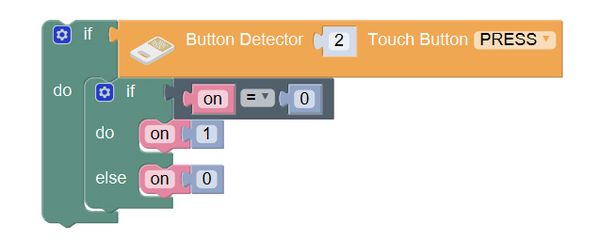
2. Pres the touch button 2 to change the state of the switch.
If the power button was pressed, the internal program will be executed. If on is 0 (now it is on the off state), assign 1 to it (power on). Otherwise, assign 0 to it (power off).
3. The air conditioner will switch heat and refrigeration state according to the temperature value on itself.
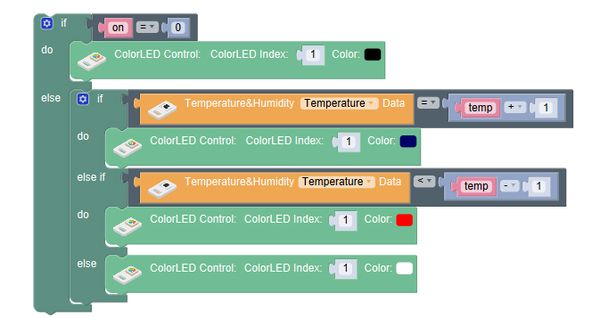
If on is equivalent to 0(power off), the color LED will go off. Otherwise, execute the working program. If the indoor temperature is higher that the setting one by above 1 degree (need to refrigerate), the color LED will light blue (representing refrigerating);
If the indoor temperature is lower than the setting one by above 1degree (need to heat), the color LED will light red (representing heat); otherwise, it will light white (representing standing by).
4. Press the touch button 2 to change the state of the switch.
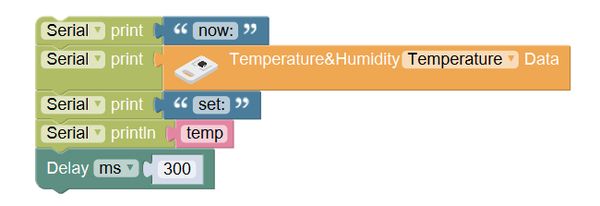
On the screen of computer display: now: indoor temperature set: setting temperature. Delay 300ms.
Test the result
You can get close to the temperature sensor and blow to it, to simulate the hot air, or fan toward it to simulate cold air, and observe whether the air conditioner will change its refrigeration or heat state. Because of different temperature in different seasons, you can adjust the setting temperature (25 in the program) appropriately so that the temperature can be observed more intuitively.
Q: If I want to adjust the setting temperature, I can only modify the program and download again. Is there a simple way?
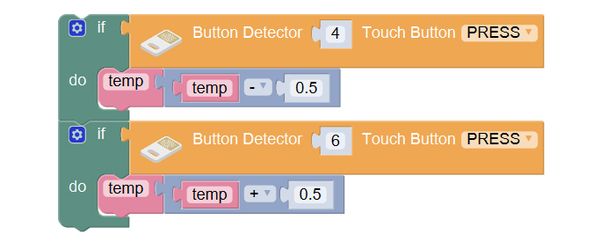
A: Two touch buttons can be added to change the setting temperature, one to increase the temperature, the other to reduce it.
- Adjust the value of setting temperature temp.
- If “subtract” button was pressed, the variable temp will subtract 0.5.
- If “addition” button was pressed, the variable temp will add 0.5.
Technical Specification
- The product number of tem&hum sensor: MSDT11
- For details about tem&hum sensor, please refer to Sensor-Tem&Hum-S2.
Related Cases
FAQ
- Q: What dose the baud rate mean on the serial monitor?
- A: Baud rate refers to transmission speed of the data between computer and the core module, which is 9600 by default. If it is not same with the setting one, messy code will appear in the transmitted code.
|
