Open Source Welcome Door Report

From Microduino Wiki
Jump to: navigation, search

Outline

  • Project: Microduino open source welcome door report
  • Objective: Use Microduino module to build welcome door human body detection system
  • Difficulty: Medium
  • Time-consumig: 2 hours
  • Maker: Peng
  • Introduction:
    • Welcome door human detection system detects whether there is someone near the 3 meter range through heat release sensor.
    • When someone is near, prompt through the color LED lights change color, and use speakers to broadcast a welcome speech.

Bill of Material

Bill of Module

Module Number Function
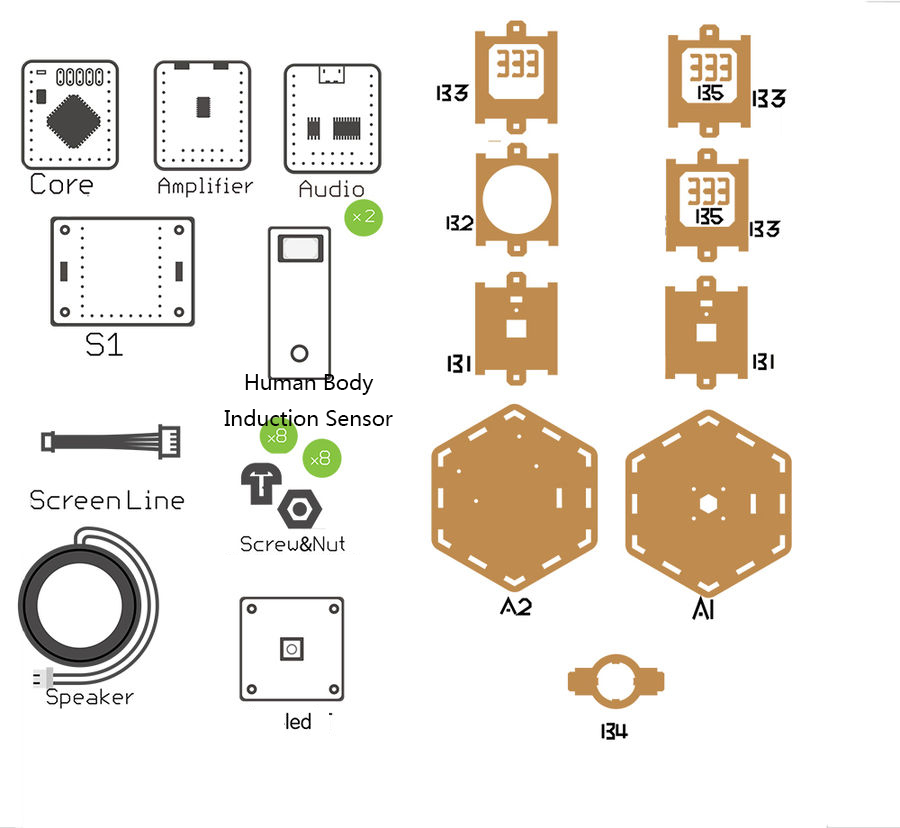
Microduino-Core 1 Core board
Microduino-USBTTL 1 Program Download
Microduino-Audio 1 Audio control
Microduino-Amplifier 1 Power amplification
Microduino-Sensorhub 1 Connect with the sensor
Microduino-Cube-S1 1 Extension
Microduino-PIR 2 Pyroelectric infrared sensor
Microduino-Color LED 1 Colorful LED lamps

Other Materials

Assembly unit Number Function
Micro-USB cable 1 Program download, and power supply
Horn 1 Sound
Nylon screws 10 Module fixation
Nylon nuts 5 Module fixation
Nylon studs 5 Module fixation
Open source welcome door shell suite 1 Shell
Welcomebom1.jpg

Principle of the Experiment

  • Welcome door human body detection system is mainly divided into detection and control two parts.
  • Detection part:
    • Use infrared pyroelectric sensor Microduino-PIR to detect the nearly infrared characteristic signal of the body.
    • The working principle of the sensor Microduino-PIR.
      • Human body certain wavelength about 10um, the infrared ray which can be detected by pyroelectric sensor and passive infrared sensor.
      • The infrared rays of human body gather on the infrared probe after the enhancement of Finel filter, and the temperature of the pyroelectric element in the probe will change and release electric charge outside. After the subsequent circuit's processing it can produce addressable electrical signals.
  • Control part: It's divided into sound and light control.
Doorwelcome1.jpg

Program Download

  • Please keep to download and update Microduino official latest IDE.
  • The code of the welcome door report Github:WelcomeBodyDetector

Programming

  • Overlay Microduino-Core and Microduino-USBTTL together.
    • Use the USB cable to connect Microduino-USBTTL and prepare to upload.
    • Note: Please upload programs before stacking all modules together.
  • Open Arduino IDE for Microduino environment (The reference to set up:AVR Core:Getting started
  • Click [Tool], and confirm board card(Microduino-Core)and processor(Atmega328P@16M,5V) selected rightly, and select the corresponding port(COMX).
  • Click [File]->[Open], browse to the project program address, and click "WelcomeBodyDetector.ino" to open the program.
  • After all these items are correct, click "→" button to download the program to the development board.

Assembly

Welcome11.jpg
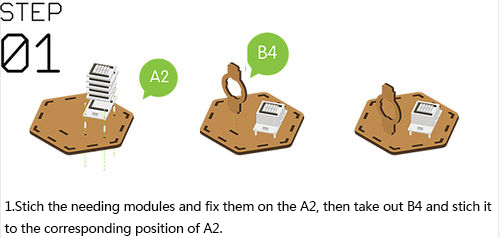
  • Step2:
    • As the following figure, insert structure B6 into the baseboard and fix the horn.
    • Use nylon screws and nylon nuts to fix the two sensors Microduino-PIR on the two structure B1 respectively.
    • Insert structure B1 into the baseboard.
    • Connect the horn to the interface of the module Microduino-Amplifier(no difference sequence).
Welcome21.jpg
  • Connect the two sensors Microduino-PIR to the interfaces D4/D5 and D6/D7which are marked in blue in the figure).
  • Connect Microduino-Color led to the A0/A1 interface (which is marked in red in the figure).
Welcome6.jpg
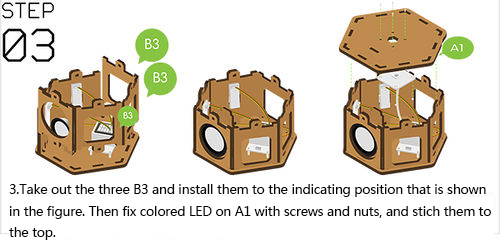
  • Step3:
    • As the following figure, insert the 3 structure B3 into the baseboard (structure A2).
    • As the following figure, use nylon screws and nylon studs to fix Microduino-Color led on the top cap(structure A1).
Welcome331.jpg
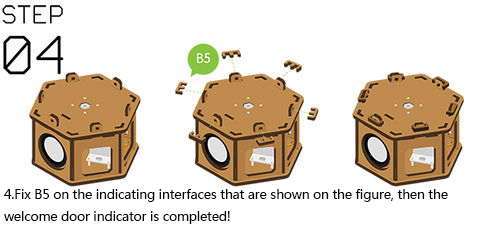
  • Step4:
    • Fix structure B5 on the indicating interfaces as the figure shows, and the welcom door detector is completed.
Welcome41.jpg

Operating Instruction

  • When Microduino-PIR sensor has detected the someone is near within the range, Microduino-Color LED module will change color, and Auido module will broadcast "welcome to come" or "good-bye".

The Instruction of the Code

  • The judgment of going out of into.
{ 
    //First passing D4, then passing D6 is entering. 
    if((digitalRead(body_pin) == 1) && (digitalRead(body_pin2) == 0)) 
    { 
        FLAG_1 = 1; 
        delay(200); 
    } 
    if((digitalRead(body_pin) == 1) && (digitalRead(body_pin2) == 1) && (FLAG_1 == 1)) 
    { 
 
        colorWipe(color[random(1, 10)]); 
        audio_choose(1); 
        Serial.println("COMING IN"); 
        FLAG_1 = 0; 
        delay(1300);    //1300 
    } 
    // First passing D6, then passing D4 is leaving.
    if((digitalRead(body_pin) == 0) && (digitalRead(body_pin2) == 1)) 
    { 
        FLAG_2 = 1; 
        delay(200);    //2000 
    } 
    if((digitalRead(body_pin) == 1) && (digitalRead(body_pin2) == 1) && (FLAG_2 == 1)) 
    { 
        colorWipe(color[random(1, 10)]); 
        audio_choose(2); 
        Serial.println("GOING OUT"); 
        FLAG_2 = 0; 
        delay(1300);   //2000 
    } 
}
FAQ

  • Q: Which interface of the Microduino-Amplifier module dose the horn will be inserted into?
    • A: The horn does not have to distinguish between the left and right interfaces, any interfaces will be OK.
  • Q: Why do we think the reaction of the Microduino-PIR is slow?
    • A: Because the Microduino-PIR sensor has 2.3 seconds' delay, the sensor doesn't work during the 2.3 seconds after detecting the people.
  • Q: Why does it say welcome and good-bye in the other way around?