Difference between revisions of "Sensor-Tem&Hum-S2"
From Microduino Wiki
(Created page with "{{Language|Microduino-Temp&Hum}} {| style="width: 800px;" |- | 400px|thumb|right| Microduino-Temp&Hum Microduino-Temp&Hum is temperature and...") |
|||
| (5 intermediate revisions by 2 users not shown) | |||
| Line 3: | Line 3: | ||
|- | |- | ||
| | | | ||
| − | [[File: Microduino-Temp&Hum.jpg|400px|thumb|right| | + | [[File: Microduino-Temp&Hum.jpg|400px|thumb|right| Sensor-Temp&Hum]] |
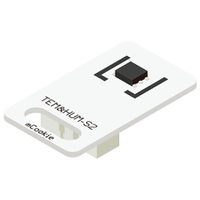
| − | + | The product number of Sensor-Temp&HumS2 is: MSDT31. Sensor-Temp&Hum is a temperature and humidity detection sensor module. | |
| − | + | SHT20 sensor contains a capacitive humidity component and a high precision integrated temperature measuring component, and it is connected with a high performance microprocessor. | |
==Instruction of Sensor Pin== | ==Instruction of Sensor Pin== | ||
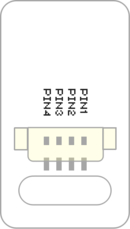
| − | {{ | + | {{ST_Pinout |
| − | | | + | |st_name=Temperature & Humidity S2 Sensor |
| − | | | + | |pin3=IIC SDA |
| − | | | + | |pin4=IIC SCL |
}} | }} | ||
| + | |||
==Features== | ==Features== | ||
| − | *Adopts | + | *Adopts SHT20 temperature and humidity sensor |
*With high accuracy and sensitivity | *With high accuracy and sensitivity | ||
*With low power consumption, long service life and good stability | *With low power consumption, long service life and good stability | ||
| Line 25: | Line 26: | ||
==Specification== | ==Specification== | ||
*Electric specification | *Electric specification | ||
| − | **Working voltage: | + | **Working voltage: 3.3~5V |
| − | ** | + | *Size of the sensor |
| + | **Size of the board: 23.5mm*13mm | ||
| + | **1.27mm-spacing 4Pin interface connected to sensorhub | ||
| + | **The CAD drawing of the sensor: '''[[File:Sensor_CAD.zip]]''' | ||
*Technical parameters | *Technical parameters | ||
**Resolution: temperature 0.1°C, and relative humidity 0.1%RH | **Resolution: temperature 0.1°C, and relative humidity 0.1%RH | ||
| − | |||
| − | |||
| − | |||
| − | |||
*Connection | *Connection | ||
| − | ** | + | **This sensor can be connected to I2C pin of core |
| − | |||
| − | |||
| − | |||
==Document== | ==Document== | ||
| − | *Schematic diagram: '''[[File: | + | *Schematic diagram: '''[[File: Sensor-Temp&HumS2.Zip]]''' |
| + | *Main chip: '''[[File: ST20 datasheet.pdf]]''' | ||
==Development== | ==Development== | ||
| − | === | + | ===Program Download=== |
| − | * | + | *Download and unzip the program '''[[File:Sensor-Tem&Hum_S2_Test.zip]]''' |
| − | + | ||
| − | + | ===Programming=== | |
| − | + | {{Upload | |
| − | = | + | |nameA=[[Microduino-Core]], [[Microduino-USBTTL]] |
| − | + | |nameB=[[Microduino-USBTTL]] | |
| − | + | |boardName=Microduino/mCookie-Core(328p), Atmega328P@16M,5V | |
| − | + | |fileName=Sensor-Tem&Hum-S2 Test.ino | |
| − | + | }} | |
| − | |||
| − | |||
| − | |||
===Hardware Setup=== | ===Hardware Setup=== | ||
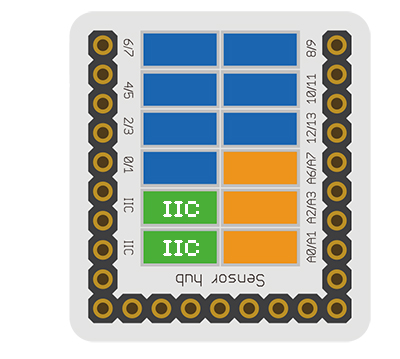
| − | * | + | *Referring to the following diagram, connect the Sensor--Tem&Hum-S2 to pin IIC of '''[[Microduino-Sensorhub]]'''. |
| − | [[Microduino-Sensorhub]] | + | <br> |
| − | + | [[file:Microduino-sensorhub_I2C.JPG|thumb|400px|left]] | |
| − | + | <br style="clear: left"/> | |
| − | [[file: | + | |
| − | + | ===Result=== | |
| − | + | *After download, open the serial monitor. | |
| − | + | *The current temperature and humidity value will be printed out in cycle in serial monitor. | |
| − | |||
| − | |||
| − | *After download, | ||
==Application== | ==Application== | ||
| Line 84: | Line 76: | ||
*Front | *Front | ||
| − | [[file: Microduino-Temp& | + | [[file: Microduino-Temp&HumS2-F.JPG|thumb|600px|center|Sensor-Temp&HumS2 Front]] |
*Back | *Back | ||
| − | [[file: Microduino-Temp& | + | [[file: Microduino-Temp&HumS2 -b.JPG|thumb|600px|center|Sensor-Temp&HumS2 Back]] |
|} | |} | ||
Latest revision as of 06:51, 4 August 2017
| Language: | English • 中文 |
|---|
|
The product number of Sensor-Temp&HumS2 is: MSDT31. Sensor-Temp&Hum is a temperature and humidity detection sensor module. SHT20 sensor contains a capacitive humidity component and a high precision integrated temperature measuring component, and it is connected with a high performance microprocessor.
ContentsInstruction of Sensor Pin
Features
Specification
Document
DevelopmentProgram Download
Programming
Hardware Setup
Result
ApplicationIt can be used to detect the temperature and humidity of the environment, and as temperature and humidity switch to control the air conditioner , fan and so on. Project
PurchaseHistoryGallery
File:Microduino-Temp&HumS2-F.JPG Sensor-Temp&HumS2 Front
File:Microduino-Temp&HumS2 -b.JPG Sensor-Temp&HumS2 Back |


